Brand Functionality in CQG Desktop
For Brand Administrators
- Brand Creation
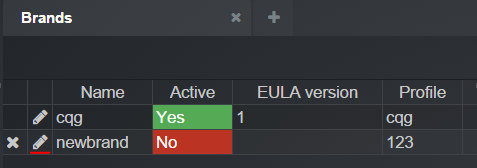
Brand Administrators are enabled to modify newly created brands but they cannot create new brands. Please contact CQG if you need a new brand created.
- Brand Customization
Configure brand properties using the Modify Brand dialog. This dialog is a step during new brand creation. You can open the dialog by clicking the editing icon to the left of the Name column in the Brands widget.
To make your branded CQG Desktop available to customers, the following configuration steps must be completed:- Steps for Brand Administrators
1. Fill out required fields. These fields are necessary for brand activation.
2. Set the activation flag to true (see Activation Tab for details).
3. Specify enablements (Widget, Pages, Lists tab), fields that are not required (Contact Info tab), and graphic resources (Graphics tab).
- Brand Activation
Brand activation is required to make the brand available to customers. Customers can log on only when the brand is activated. All required fields must be configured for the brand before it is ready for use. Brand deactivation makes a brand temporarily unavailable to customers. The login page of a deactivated brand may be opened, but an error message will display.
- Conditions Checklist
The following conditions must be met to allow customers to log on to your branded CQG Desktop:
1. Private label created on the CQG Gateway, initiated by CQG FCM Desk.
2. Configured and activated CQG Desktop brand, by CQG FCM Desk and partner business/marketing representative.
3. Trader authorized to the corresponding private label in CAST by FCM sales/support.
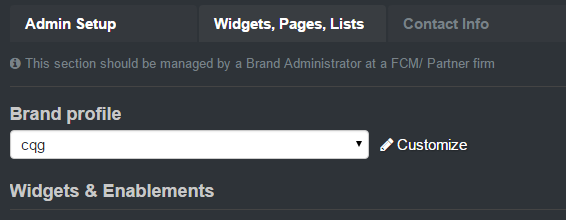
- Widgets, Pages, Lists Tab
Enablements, predefined pages, and lists can be shared between several CQG Desktop brands. They are configured inside a brand profile. The brand profile can then be linked to a brand.
There are two types profiles:
1. Public Profiles - Can be shared between brands. Profile changes will automatically affect all dependent brands.
2. Custom Profiles - Specific to a single brand only. They cannot be reused by another brand directly.
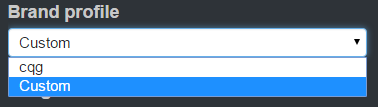
A combo box on the Widgets, Pages, Lists tab allows public profile selection. All public profiles are read-only in the Modify Brand dialog.
Click the Customize button to customize the currently selected public profile for a particular brand. In this case, a copy of a public profile is created. It will appear as "Custom" in the profile selection list.
2.4.1. Widgets & Enablements
Use this section to configure specific widget displays or enable/disable functionality. Note that disabled widgets will disappear from customer layouts after the application reloads.
The following options are available:
Quotes & Data Widgets
• 3D - enablement on Globe widget
• Quotes - enablement on Quotes widget
• World Clock Quotes - enablement on Map widget
• FXQB - enablement on FxQuotes widget
• News - enablement on News widget
• Time and Sales - enablement on Time and Sales widget
• Historical Settlements - enablement on Historical Settlements widget
• Commodity Volume - enablement on Commodity Volume widget
Trading Enablements
• Liquidate/Reverse Position - enable/disable ability to liquidate/reverse position in CQG Desktop
• Modify/Cancel Order - enable/disable ability to modify/cancel order in CQG Desktop
• Trading - enable/disable trading in Quotes widget and in Hybrid Order Ticket widget. If Trading is switched off, then the Trade widget will not be available to select in the widget menu.
Trading Widgets
• Trade - enablement on Trade widget
• Transactions - enablement on Transactions widget
• Orders - enablement on Orders widget
• Open Positions - enablement on Open Positions widget
• Purchase & Sales - enablement on Purchase & Sales widget
• Account Summary - enablement on Account Summary widget
• HOT - Hybrid Order Ticket- enablement on Hybrid Order Ticket widget
2.4.2. Partners Widgets
This section will not display if there are no partner widgets available. Partner Widget will show up as an additional item in the Add widget dialog. When clicked, a new web browser tab will open. The tab will contain the partner application with the same user logged on. Note that the user might not be able to log on to the partner application due to private label or application type restrictions. In this case, the user should notify the partner.
2.4.3. Pages
You can set up the layout that will appear to customers upon first logon. It is possible to create and customize a page and then make it predefined.
A full list of available predefined pages is displayed in the dropdown menu. Customers can select a page and it will be added to the layout.
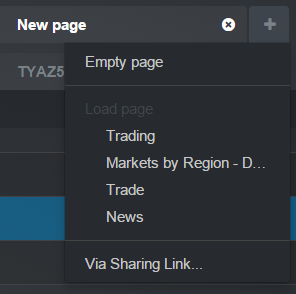
It is also possible to make a page predefined, but not shown to customers upon first logon. In this case, it will only be displayed in the pages list. It can be configured by setting Use as initial flag in the Modify Predefined Page dialog.
To add a new page to the predefined list, click the Add Page button in the Widgets, Pages, Lists tab of the Modify Brand dialog (a corresponding button exists in the public profile modification dialog). The Add Predefined Page dialog will display. It will contain a list of pages that exist in your layout.
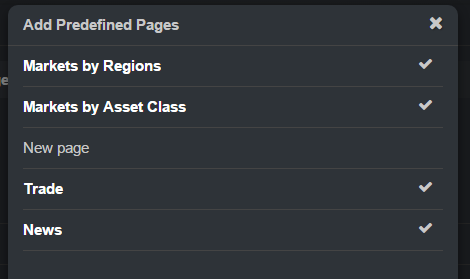
You can select several pages and make all of them predefined. If the selected pages contain saved non-predefined lists, the application will suggest to make these lists predefined also. Note that if a page with a saved list is re-added and the list made predefined, a duplicate of the previously created predefined list will be made.
Page content is saved the moment it is added and cannot be updated later. To update the page, it must be deleted and then added again.
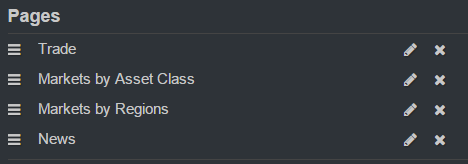
The page sequence can be changed via drag-and-drop.
2.4.4. Lists
You can configure symbol lists that will display in the Library tab of the Symbol List dialog. Customers can open this symbol list in the Quotes, FXQB, and Time and Sales widgets.
A predefined symbol list can be used inside a predefined page. In this case, a newly created predefined page should have this list inside a widget.
Note that predefined symbol list changes will be applied only after a page reload (customers are notified about the changes). On the customer side, it is impossible to modify symbol lists; only copies can be created.
The best way to add predefined symbol lists is to add them with the predefined pages. Nonetheless, you can make lists predefined using the following steps:
1. Create a new symbol list: Utilities > Symbols > New List.... Pro Tip: Copy and paste comma delimited symbols into the entry field. OK > Name list
2. Share the symbol list: Click on list you just created > Sharing… > Create link > Copy Link
3. Open the Brand/Profile Modification dialog: Utilities > Brands > Modify Brand > Features Tab > Lists Section
4. Click the Add List button. Add Predefined List dialog will open.
5. Paste the URL at the Sharing URL field and click the Add button.
2.4.5. Default Autosuggest List
It is possible to configure a default autosuggest list of symbols. It will be displayed in the Edit symbol dialog for customers who do not yet have a history of entered symbols. - Contact Info Tab
It is possible to configure several white-label-specific parts of the application. This tab contains text fields that can be changed. All items are grouped.
2.5.1. General
• Product Name (required) - Displayed in a browser window title and in the Go Live dialog.
2.5.2. Company
• Company Name (required) - Displayed in the About dialog and in the EULA window title.
• Company Website URL - Displayed in the About dialog. The URL address should be in the following format: http://example.com.
• Support Phone (required) - Displayed in the About dialog. Separate additional phone numbers with a semicolon.
• Sales Phone - Displayed in the About dialog. Separate additional phone numbers with a semicolon.
• Support/Feedback E-mail (required) - E-mail address is used for the Support/Feedback button in the About dialog.
• Contact Us URL - Displayed in the About dialog. The URL address should be in the following format: http://example.com.
2.5.3. Additional Contacts, Social Networks, etc.
All field of this group are displayed in the About dialog only as additional information.
The following items can be specified:
• Facebook URL
• Twitter URL
• What's new URL
• FCM list URL
• Forum URL
2.5.4. Legal Information
• Privacy Policy URL - Displayed on login screen. The URL address should be in the following format: http://example.com.
• EULA Version (required) - When the EULA version is updated, customers will be prompted upon next logon.
• End User License Agreement Text (Text or HTML) (required) - EULA is displayed upon customers’ first logon and on every EULA version update.
- Graphics Tab
It is possible to customize application icons, logos, and the login background image in the Graphics tab of the Modify Brand dialog. You can select the image on the File Choose dialog and it will be uploaded upon brand save. Note that every image should have a specific size to provide the best fit. The maximum size of the graphics resources is 1MB.
Here's a starter set of CQG Desktop brand assets you can download and customize.
After the brand creation, all graphics resources will be default. Note that these resources differ from the resources of the CQG brand. Every resource can be reset to its default value if the current image is displayed incorrectly.
2.6.1. App Logo
The app logo is displayed in the upper-left corner of the app. The file must be a single image consisting of two equal-sized, horizontal parts for a white and black theme.
Best fit size: 110x31x2px
Allowed image format: .png
2.6.2. Login Logo
The logo is displayed on the login screen.
Best fit size: 285x80px
Allowed image format: .png
2.6.3. Login Background
Image for the background of the login screen.
Best fit size: 1400x860px
Allowed image format: .jpg, .png, .svg
2.6.4. Login Main Color
Color of main elements on the login screen. You can use any CSS format: #FF00FF, rgb (255, 0, 255), etc.
2.6.5. Apple Touch Icon
This image will be an icon for Apple devices.
Best fit size: 152x152px
Allowed image format: .png
2.6.6. Favicon
This image will be an icon for browser tabs and bookmarks.
Best fit size: 16x16px
Allowed image format: .ico
- Activation Tab
It is possible to activate the brand using the corresponding check-box in the Activation tab of the Modify Brand dialog. It will be disabled if one of the required fields is not completed. The application will display a list of required fields that should be completed to make brand activation possible. Information and graphics can be edited after the brand is active.
The following fields are required:
• Product name [Contact Info]
• Company name [Contact Info]
• Support phone [Contact Info]
• Support/Feedback E-mail [Contact Info]
• Private label (should be filled out by master administrator/FCM Desk) [Admin Setup]
• EULA version [Contact Info]
• EULA [Contact Info]
See the Brand activation section for more information.
- Steps for Brand Administrators
- Adding RSS Feeds
Currently, the only way to distribute and add RSS feeds to a white label build is through saving a page and embedding it into the white label. There is no way to add RSS feeds via the admin interface.
- Add the news widget to a page you will want to save with your build
- Add the RSS Feed to the widget (remove those you don’t want) (https://mhelp.cqg.com/cqg-desktop/other-widgets#news)
Then embed the page into the build:
- Add/Go to the Public profiles widget
- Edit Profile
- Scroll to the pages section
- Add page
- Select the page you want to add
- Checking “Initial” will add the page to the left bar by default, and will be available in the “Add page” menu
- Unchecking ‘initial’ will put that page in the “Add page” menu
-
Hit the Add button.
How to Create a Custom Demo Form
To integrate a demo form for CQG Desktop in to your website, send a request to the FCM Desk.
We'll need the following information:
- Brokerage name
- Domain name where the form will be hosted
- Email address(es) that you'll want to cc/bcc
- Email template with graphics
- CQG will need to host graphics on cqg.com and change reference paths in the email
- Here's a sample you can start from: Your CQG Desktop Demo Login Request.eml
CQG will provide you with code snippets to use to build the form on your site. You can gather other customer information, but our HTML code will only require First name, Last name, Email, Phone. Our HTML will also require Google captcha validation for submitting a demo request.
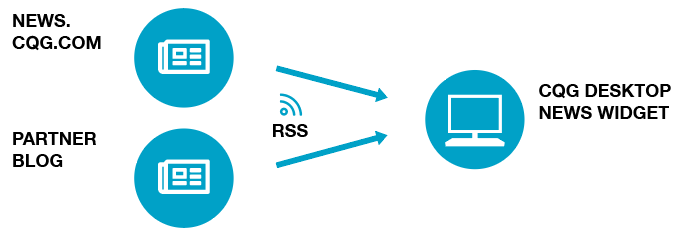
Distribute Custom Content to Your Customers through RSS
You can easily distribute your firm’s commentary and video content through your CQG Desktop private label. Currently the best way to do this is through adding your RSS feed to your white label for your customers.
Add default RSS feeds via Brand profile in white label admin:
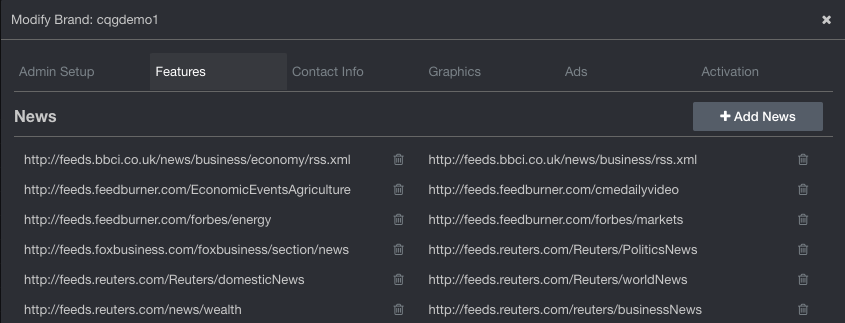
- Click the +Add News button.
- Paste in url for the RSS feed you want to add.
- Add/remove other RSS feeds from this list.
- Save the profile.
Add the News widget to one of your default pages for the private label:
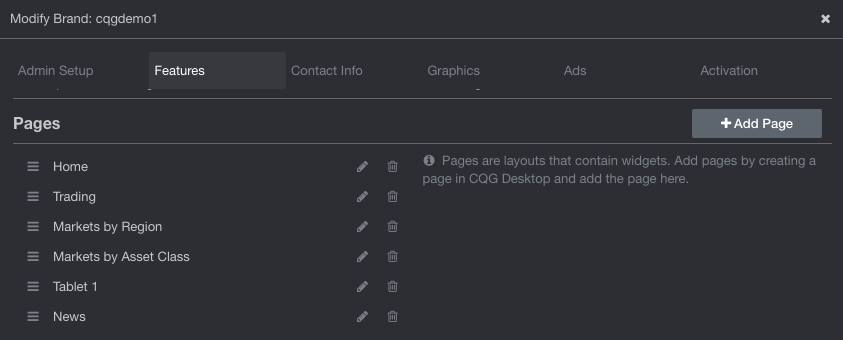
- Click on the +Add Page button
- Select the page you created/added with the News widget (click the Use as initial checkbox)
- Save the profile.
The page should now be available in the Add Page menu in the left bar, it should contain the News widget and the RSS feed you added.