CAST 2 Help
This collection of posts detail using CAST 2
CAST 2 is a work in progress. We are adding new screens regularly as we replicate the full functionality of CAST in this new product. All risk and account settings are now managed in CAST2.
Introduction
CAST 2 allows FCM partners to:
- Sign up new customers
- Create new, or modify existing trading accounts, data and permissions
Compatibility
CAST 2 is built to run in modern browsers
CAST Setup
In CAST User Info, enable the CAST trader for CAST2.

In CAST User Permissions, give the CAST user permission to create, modify, and delete an account
Access to the permissions are controlled by the firm's master CAST user

CAST2 Layout
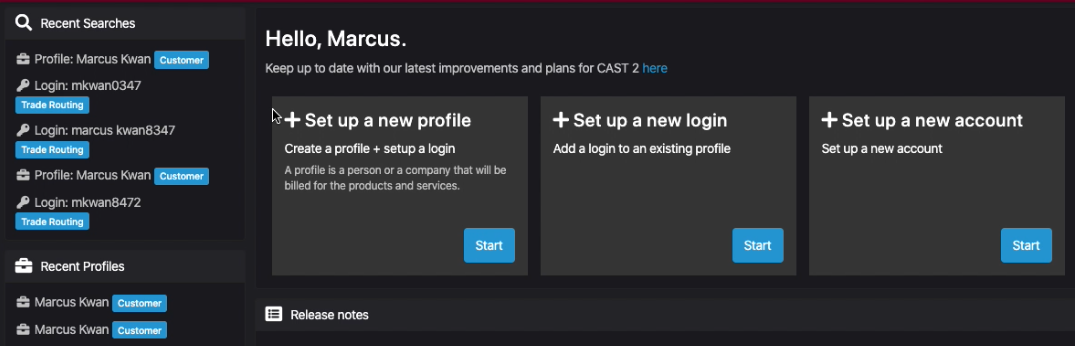
Home Screen
The home screen of CAST 2 is designed to easily facilitate typical workflows. In addition, from the Home Screen top navigation bar, use the Search box located in the top right-hand corner to find a profile, a login, an account, an order, and more. With the first letter entered a window opens using autofill to immediately aid your search.
Task cards
Task cards for common workflows are in the main part of the Home screen. In addition, from the Home Page, use the Search box located in the top right-hand corner to find a profile, a login, an account, an order, and more.
With the first letter entered a window opens using autofill to immediately aid your search.
Top Navigation Bar
The top navigation bar gives quick access to the main pages of CAST2: Logins, Profile, Accounts, and Orders.
Left Navigation Bar
The left hand side details recent searches including recently accessed profiles, recently accessed logins, recently accessed accounts, and recent orders.

Pro tip: You can use CTRL+Click or use the open in new tab icon to open the records in separate browser tabs so you don't have to wait for pages to load when navigating back to the original record.
Search
Over to the right of the Home page you can do a general search for anything from logins to user names, and more.
Search Change Activity History
Along the bottom you can search by "Change Activity History." Click in "Data from" and access the calendar.
Layout of Profiles, Logins, Orders
Search
Search for record and search results appear in this area.

Pro tip: You can use CTRL+Click or use the open in new tab icon to open the records in separate browser tabs so you don't have to wait for pages to load when navigating back to the original record. Only one browser instance was allowed with previous versions of CAST.
Left Navigation
Clicking on the navigation links in the left bar will scroll to the corresponding content card on the right.
Content Cards
Edit customer records and permissions in this content card area.
Related records
Easily access linked records in this section.
Change history
See recent changes of the current record here.
To search for any entries previously removed - click the "Trash can", then the Search button.

Profiles
Profiles represent the business entities in the system, that includes customers, administrators, customers and sales series/organizations.
You can set up a new profile, search for a profile, or do a bulk address update.
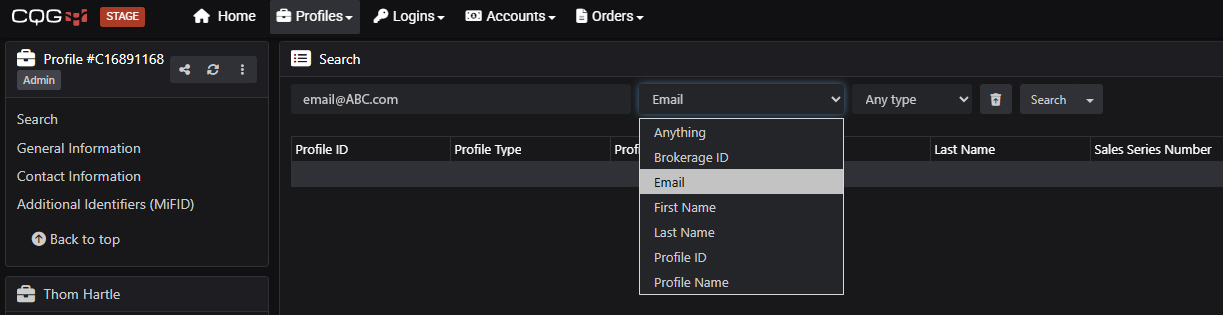
You have a choice of Searches of Profiles:
- Anything
- Brokerage (such as an Introducing Broker)
- First Name
- Last Name
- Profile ID
- Profile Name
Brokerage Risk Parameters
Brokerage is a type of profile, and Brokerage risk parameters is functionality that we recently added into CAST2, which is why it's called out here.
Select a Brokerage from the Profile Search and you can set:
(in parenthesis is the CAST corresponding settings)
-
General Information
- (CAST: FCM Info)
-
Risk Parameters Restrictions
- (CAST: Min FCM Risk Parameters)
-
New Account Risk Parameters
- (CAST: Default Account Risk Parameters)
-
Market Limits Restriction
- (CAST: Min FCM Market Limits)
-
Market Limits
- (CAST: Dynamic Default Market Limits)
Roll your mouse over the "i" icon for a tooltip.

This video, FCM Risk Parameters, details this component of the January 2025 CAST2 Gateway Release. Watch this to help you transition from CAST to CAST2.
For best viewing, click "Watch on YouTube."
Sales Series Risk Parameters
This video, Sales Series Risk Parameters, details this component of the January 2025 CAST2 Gateway Release.
For best viewing, click "Watch on YouTube."
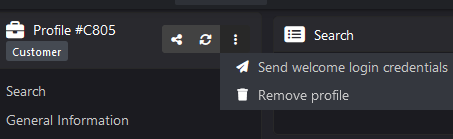
Profile page tasks
Once the Profile is saved the Ellipse menu button offer two choices:
- Send Welcome login credentials via email
- Remove profile
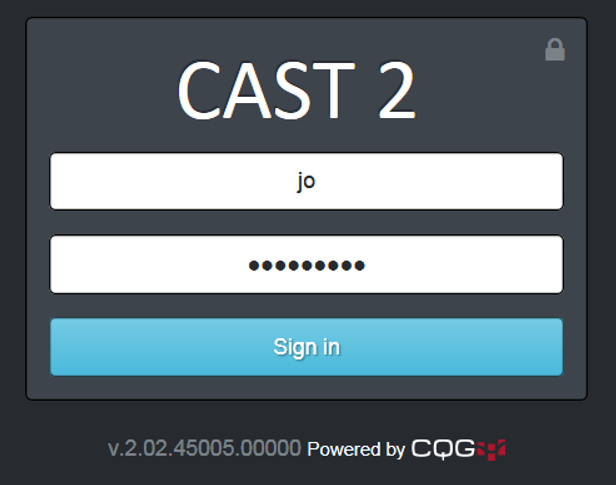
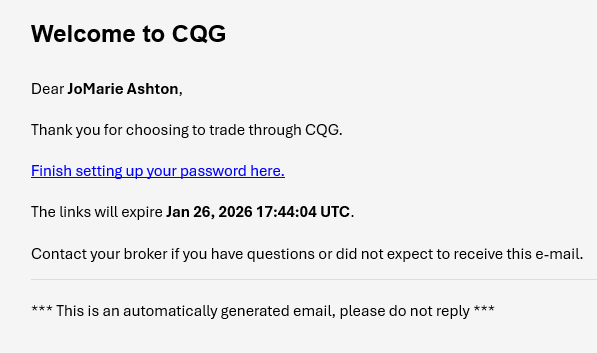
Sending login credentials to customers
Select: Send welcome login credentials
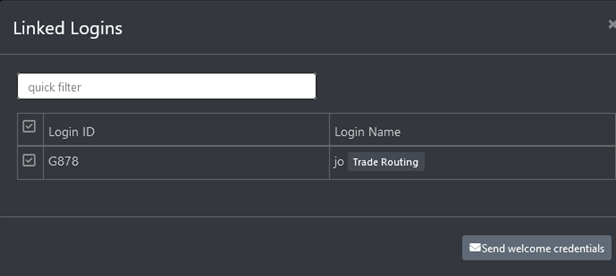
Two emails are sent to the email address entered in the Profile. One is your new User name:
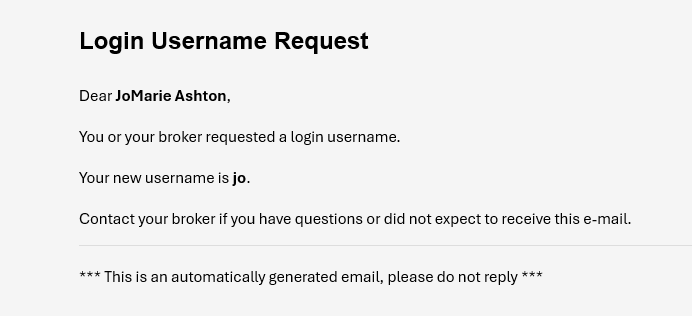
And, the second is to set up your password:
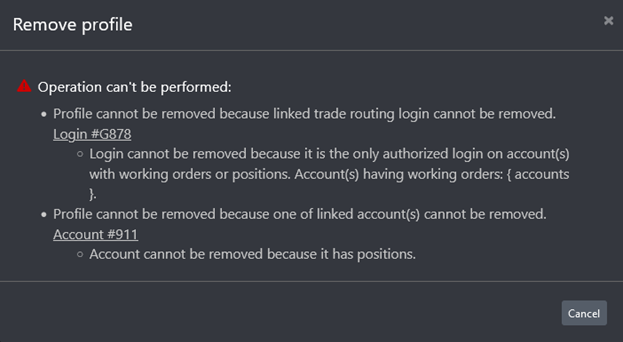
Remove a profile
Select Remove Profile
Message will display with any issues or display account and trader information that will be removed.
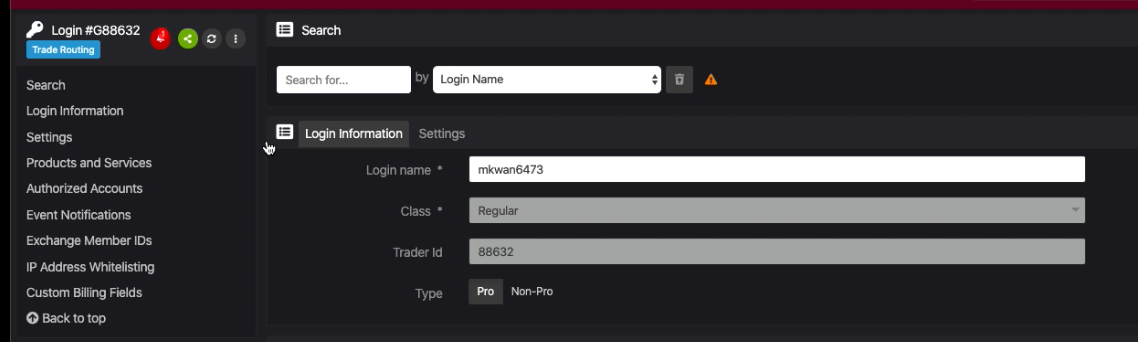
Login page
Select the Login tab to set up a new login, search for logins, or access recent logins.

Login task menu
User may send a welcome email the Trader email listed in the attached profile.
User may send a self-certification email to the Trader email listed in the Profile (this is only available for documents that have not been electronically signed previously).
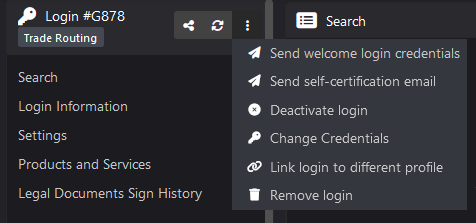
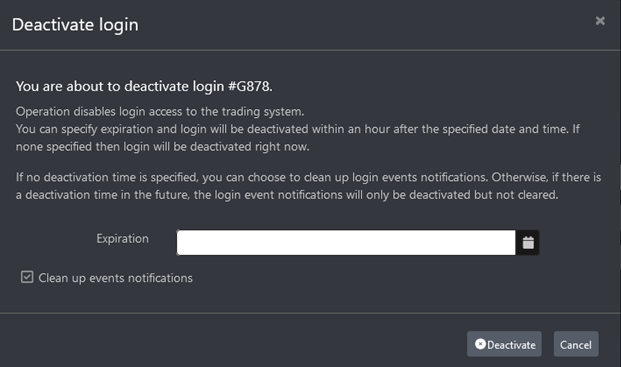
Deactivate Login allows the user to disable the login immediately or at a future time/date.
Change Credentials allows the user to erase current credentials and/or generate a change link that allows the Trader to reset the credentials (user would be responsible for creating the email to send to the Trader) or send an email to the Trader from CAST 2 which includes a link to reset the password.
Link Login to a different profile allows the CAST 2 user to link this Trader to a new or additional customer.
Accounts
You can set up a new account or search for accounts, and access recent accounts.
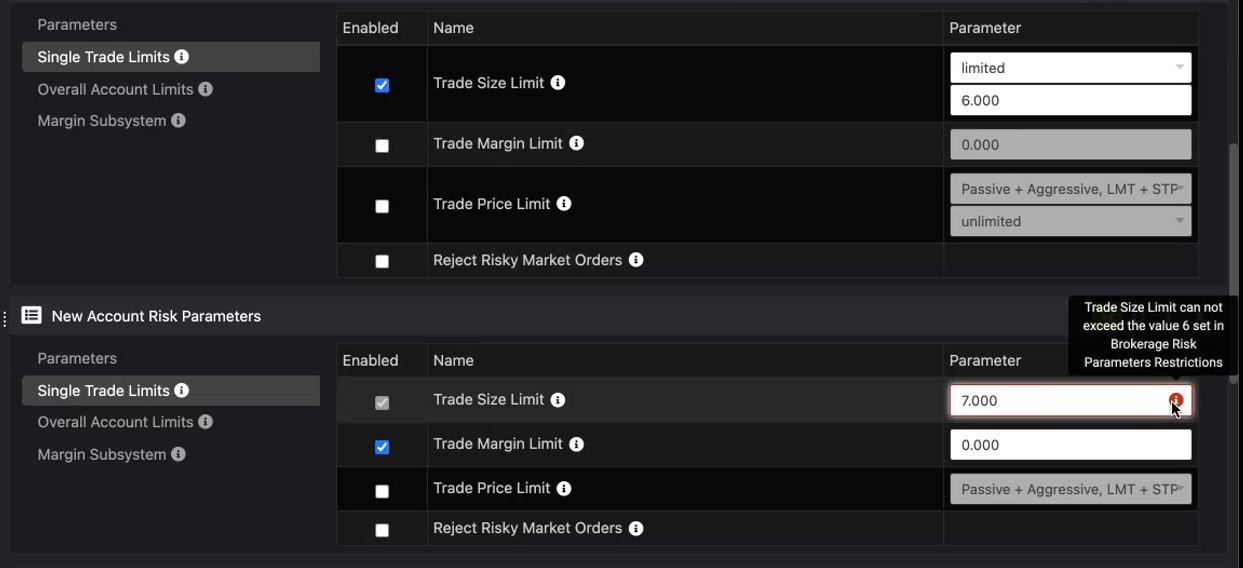
Account Risk Parameters
Account risk parameters is functionality that we recently added into CAST2, which is why it's called out here.
When setting Account Risk Parameters the Account Risk Parameters cannot exceed the Brokerage Risk Parameters.
This video, Account Risk Parameters, details this component of the January 2025 CAST2 Gateway Release.
For best viewing, click "Watch on YouTube."
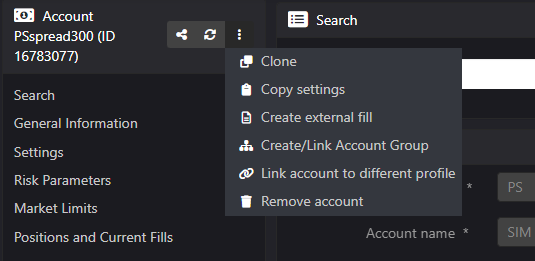
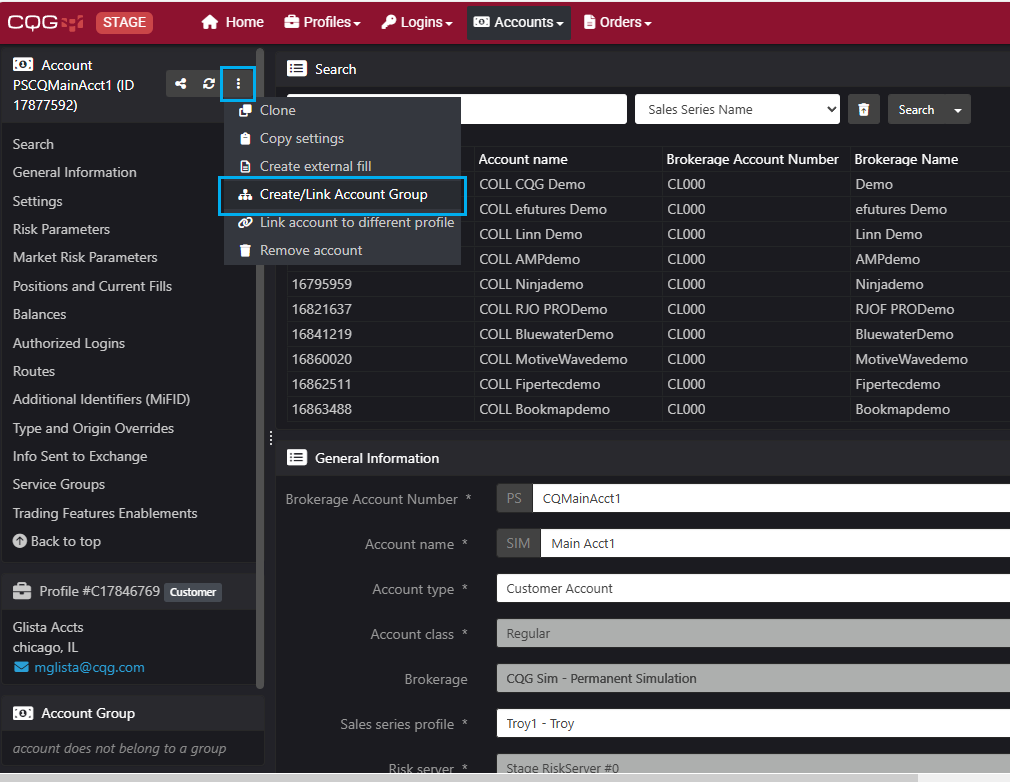
Accounts task menu
You can use Clone to easily create a duplicate account with a new name - settings for the account can be adjusted after the account has been created.
The user can copy settings - creating an exact replica with a different account name.
The user can Create an External Fill. Details include contract symbol, side (buy or sell), order type, open/close type, speculation type, quantity, price, and date time.
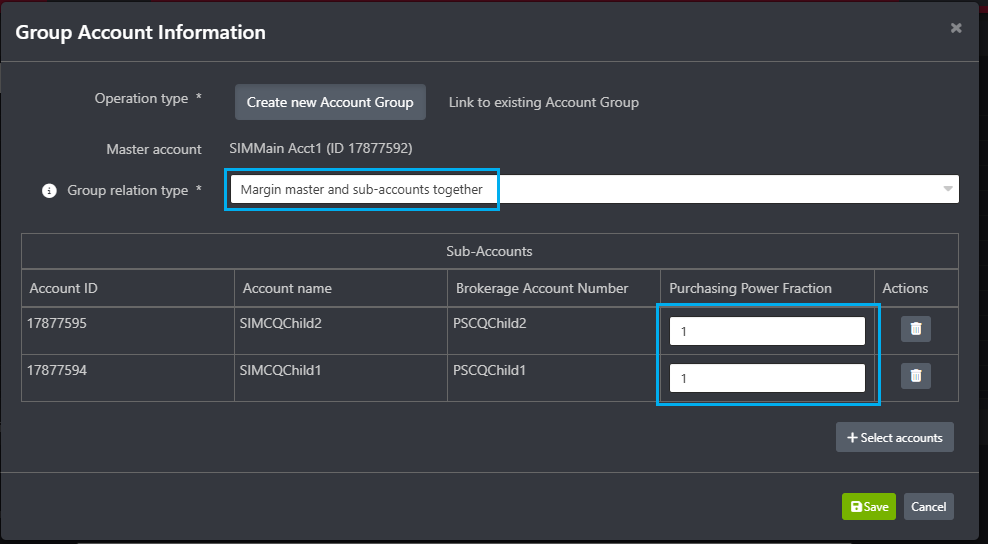
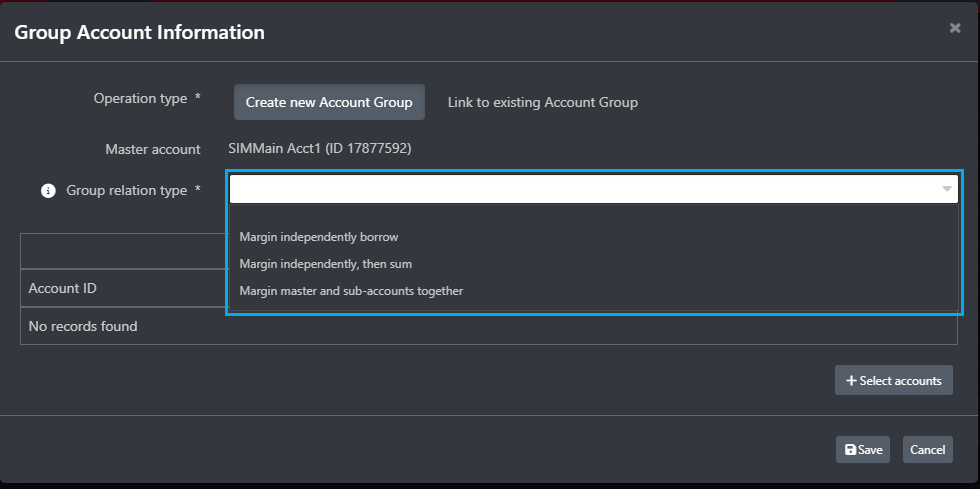
You can Create/Link Account Group. The user can create a new Account Group or link to an existing Account Group.
Link account to a different profile allows the user to link this account to a profile (customer).
Remove Account - removes the account from Profile - CAST 2 operands check to make sure all orders are settled and that there are no active positions.
Group account support
The Group Account feature allows a broker to distribute trading on the same funds between several traders or strategies. This is done by setting up a Main (aka Master) and Sub-Account(s) relationship between various accounts.
CQG supports multiple types of group relationships including "Co-Margin" type, when the main and sub-accounts are margined together (funds, orders and positions are combined for margin calculations).
Orders page
You can also search for orders, and access recent orders.
Orders page tasks
A working order can be cancelled.
The user can manually add an order placed outside of the environment to the Account.

Scenarios
Scenario: Set up a new Profile
On the Home page select start on the "Set up a new profile" card.
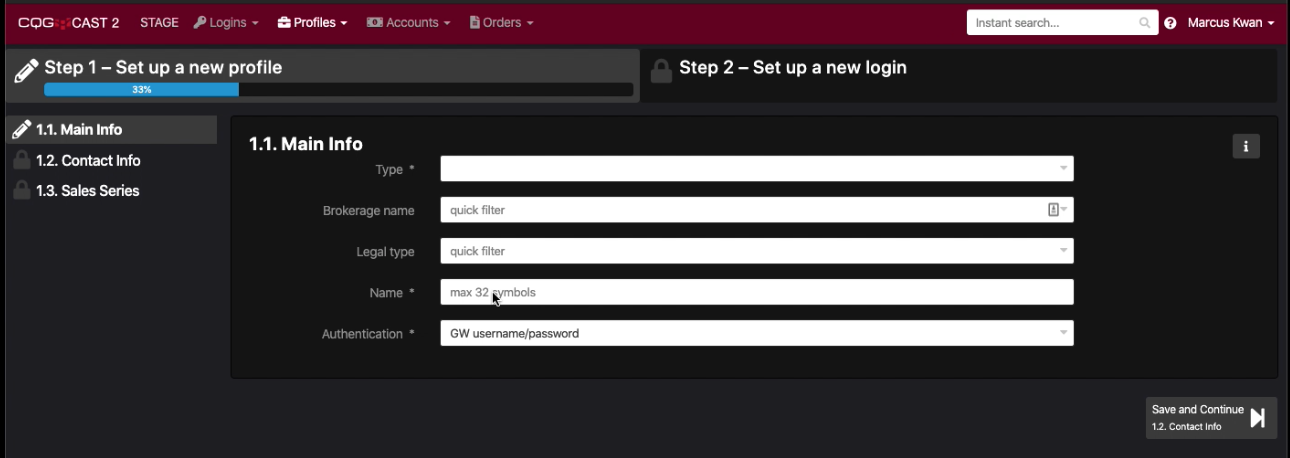
The Setup Profile Wizard
Main Info
This wizard below opens. For "Main Info" you select Type and the two choices are customer or administrator. The Brokerage name is usually automatically listed. The Legal Type is a drop down with these choices: Individual, Joint, Limited, Trust and Corporate.
Selecting Name adds a first and last name entry boxes.
Finally, Authentication uses a User Name and Password which are automatically generated from the CQG Gateway. Then, click on the Save and Continue to move to the Contact Info box.
Contact Info
The Contact Info slide has typical requirements: Email, Phone, Fax number (optional), Address 1, address 2 (optional), City, State, Zip/Postal code, Country. This information is used for billing.
Email address is required so you can send links when the customer needs to reset their password. In the future you'll be able to search by email address to find records.

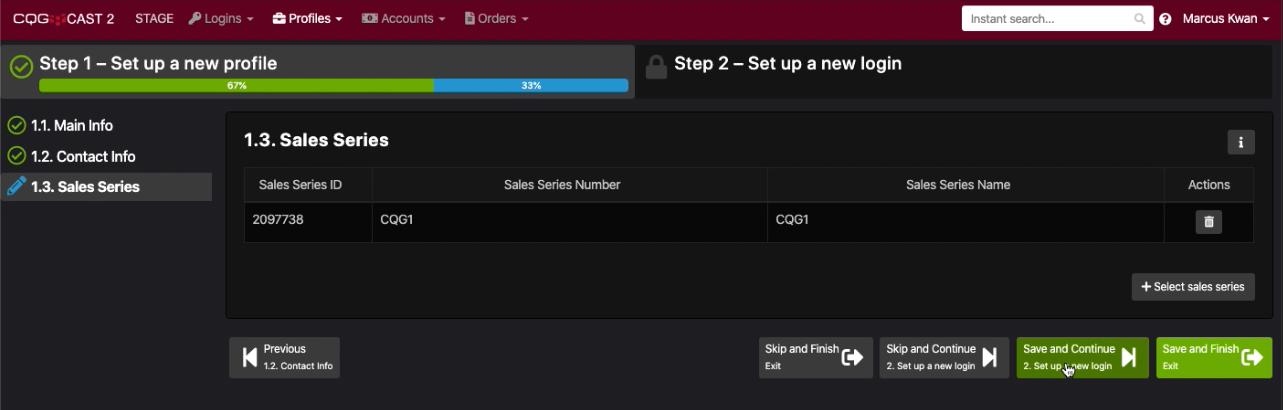
Sales Series
Sales Series is usually an assignment to a group, such as a sales representative. Click "Select sales series" to open the sales series list.
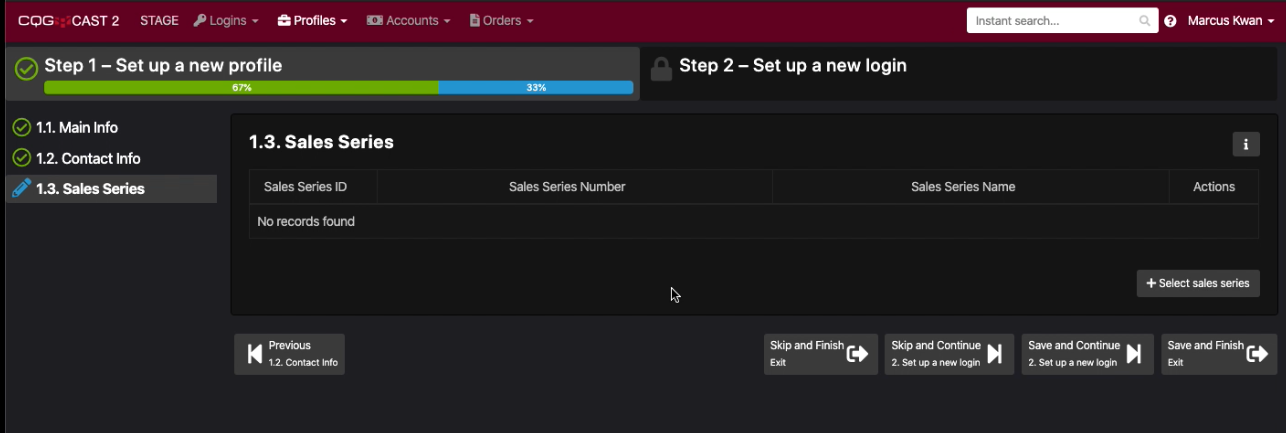
You can search for a Sales Series.

Once you have connected the Sales Series to the Profile you select "Save and Continue" to setup a new Login.
Products & Services
Current Active Products and Services are displayed.
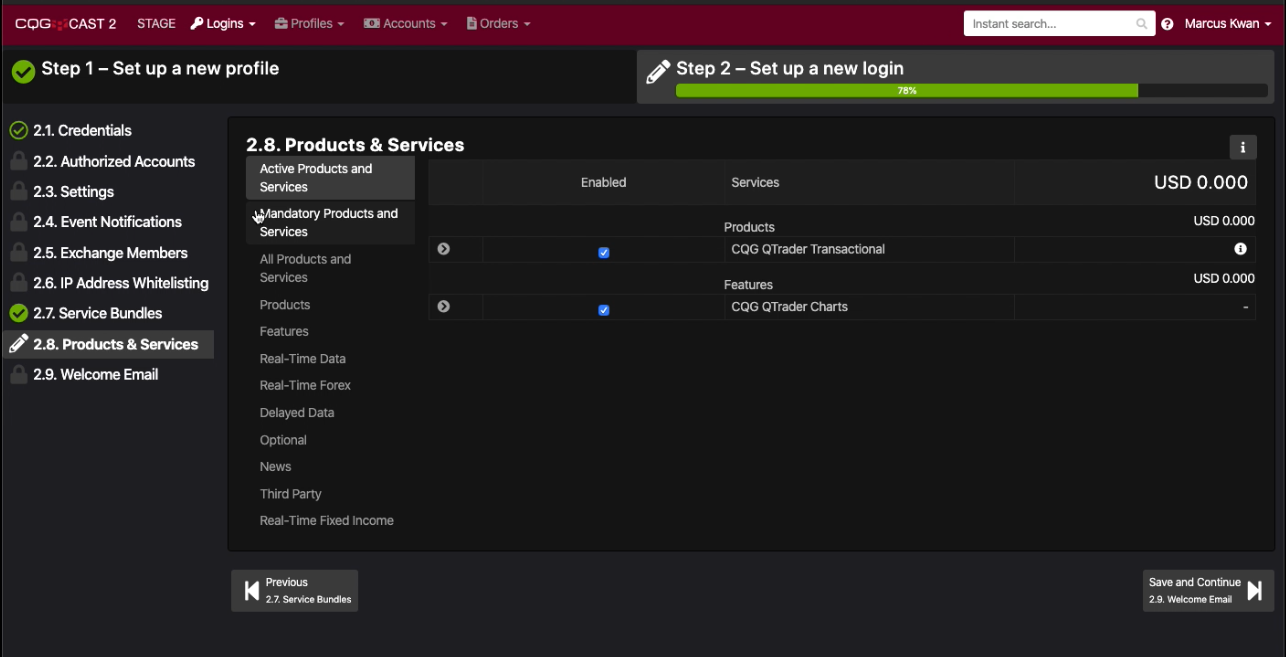
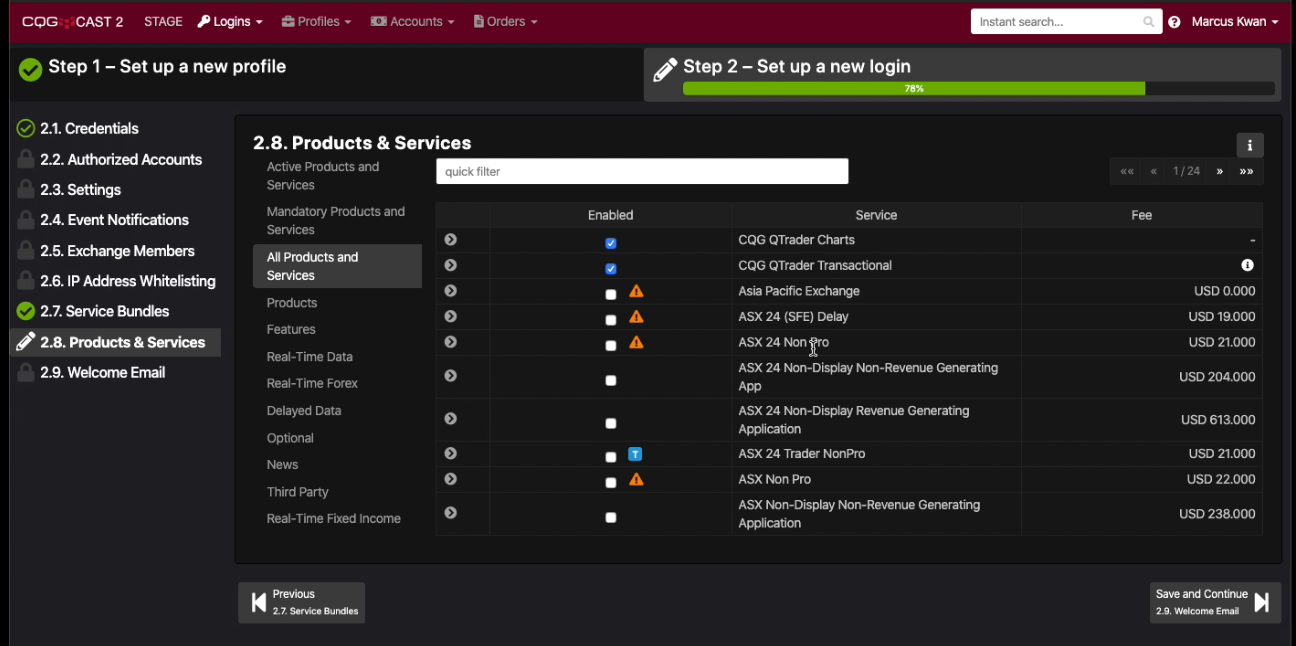
Click on "All Products and Services" to add exchanges, etc. As "Non-Pro" is the type so you have warning icons by some services.
Search for an exchange, such as CME to narrow your view.
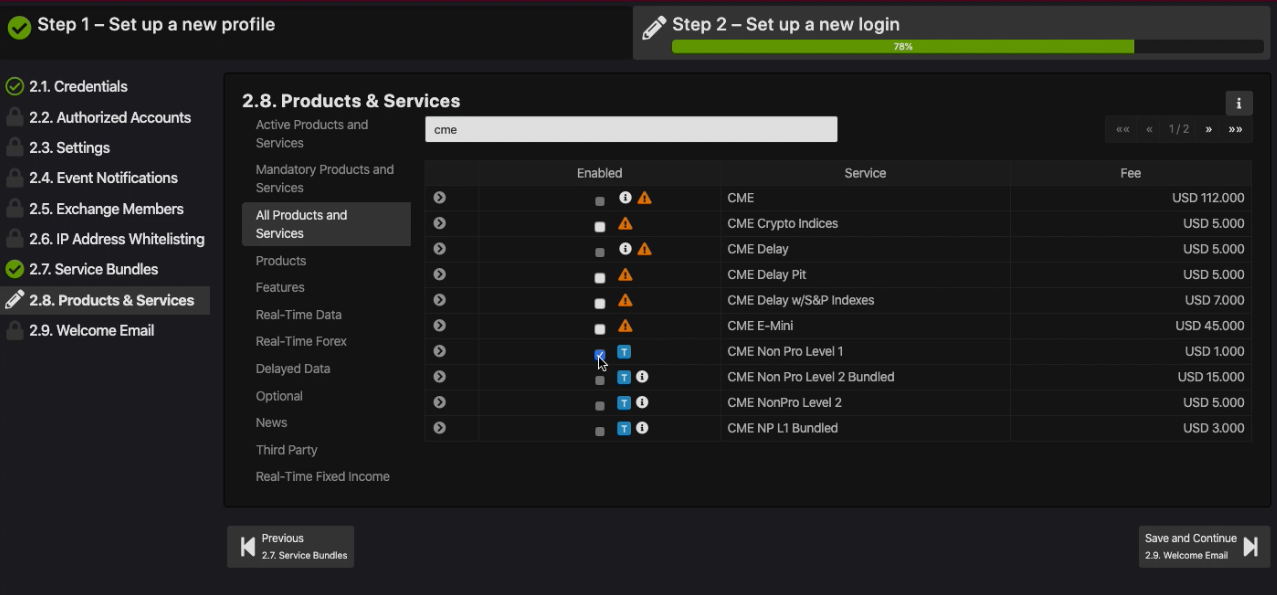
A reminder opens stating that a signed agreements is required. Select Yes.
(This is changing soon. FCMs will be required to send the agreement, and the agreement must be accepted by the customer before market data will be visible.)

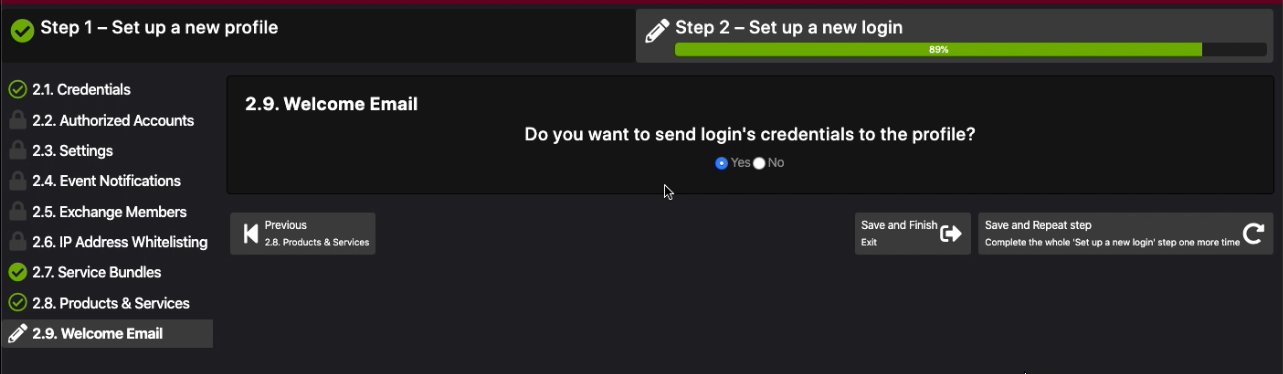
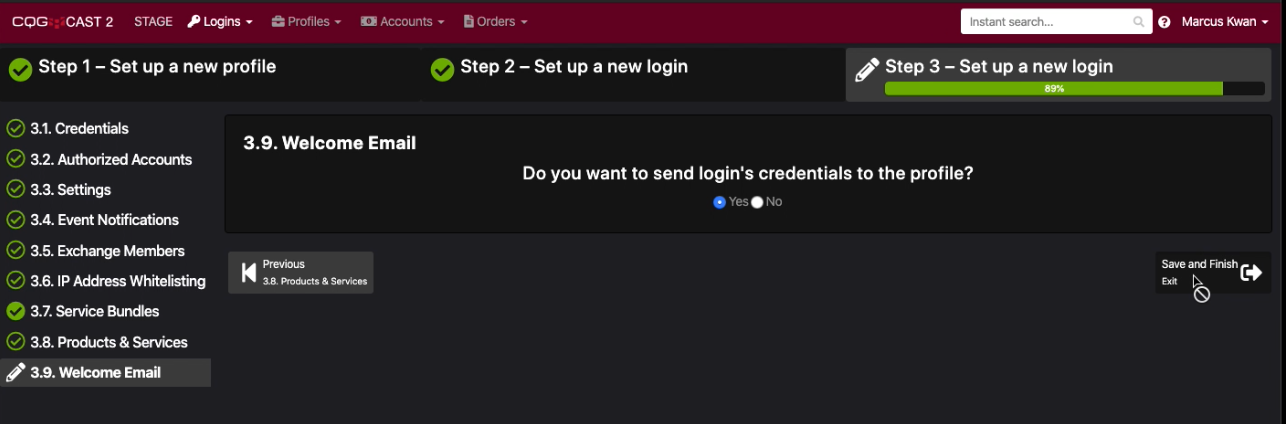
Send a Welcome email
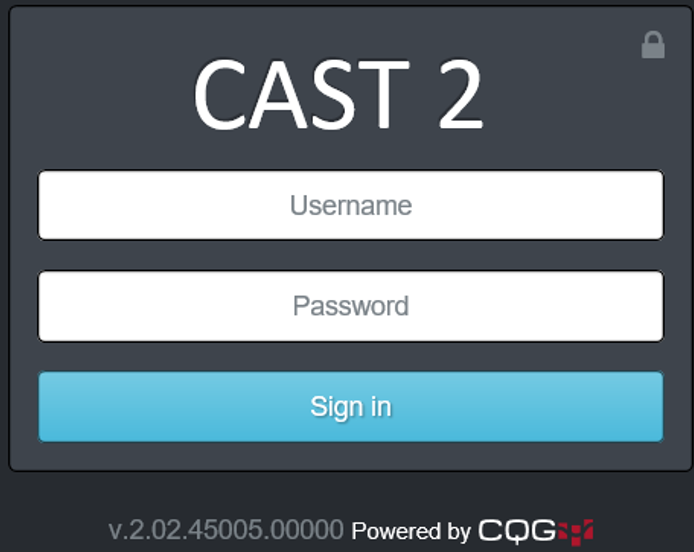
The last step is to send a Welcome Email so send the customer their credentials and link to download the software.
Setup a Trading Login
Credentials
Select "Save and Repeat step" to return to the set up a new Login for "Trade Routing".

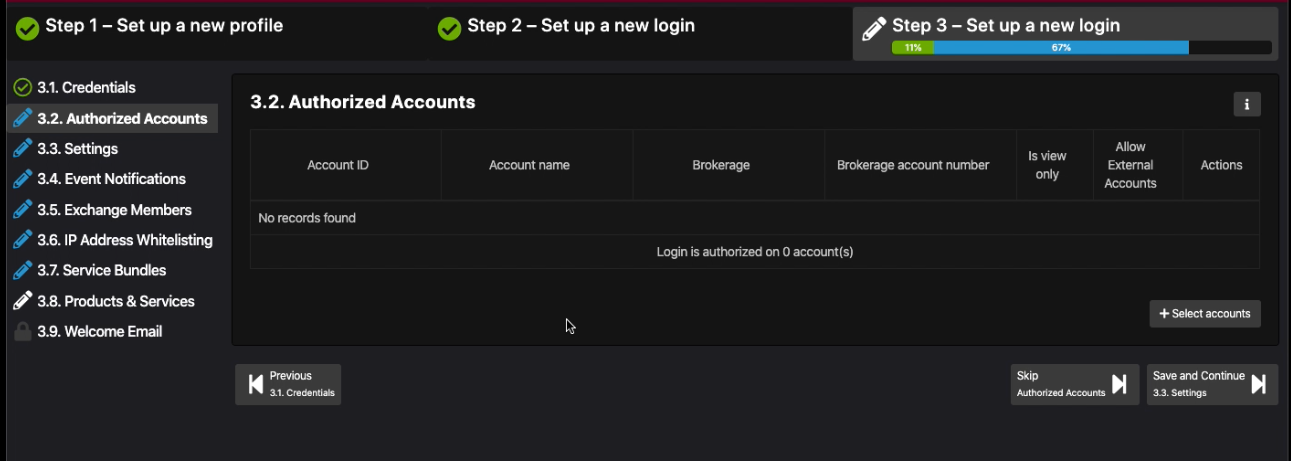
Authorized accounts
The next step is to bind the Trade Routing to an Account. Click on Select account down to the right to search for accounts.
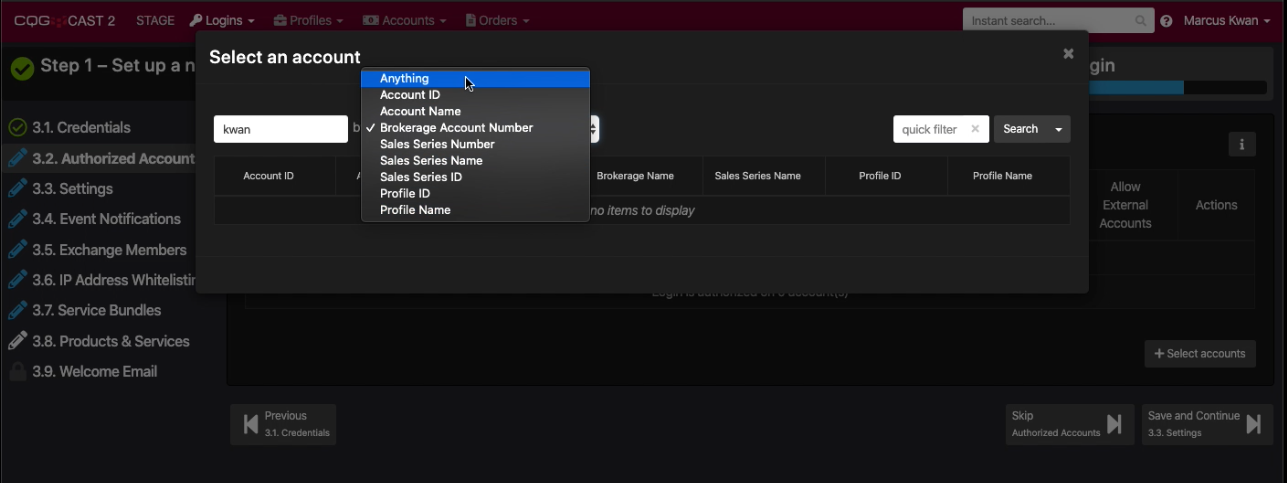
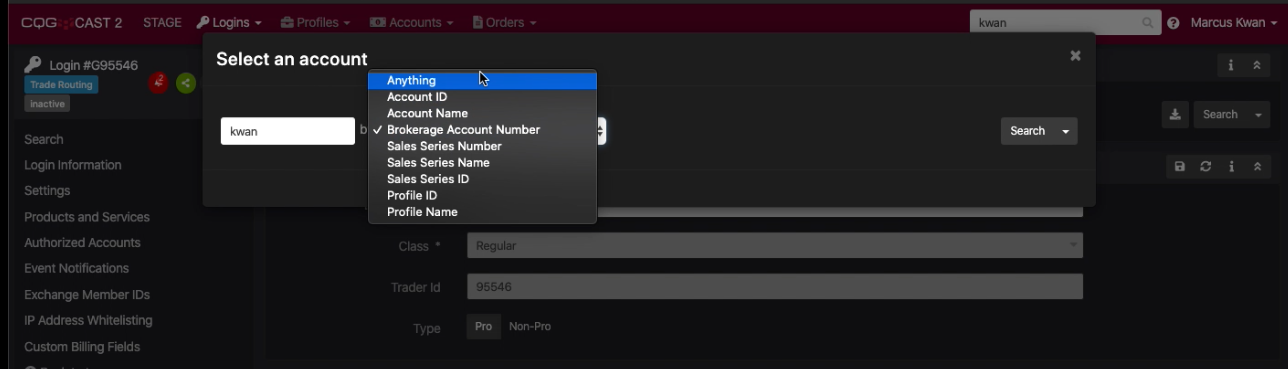
Choose "Anything."
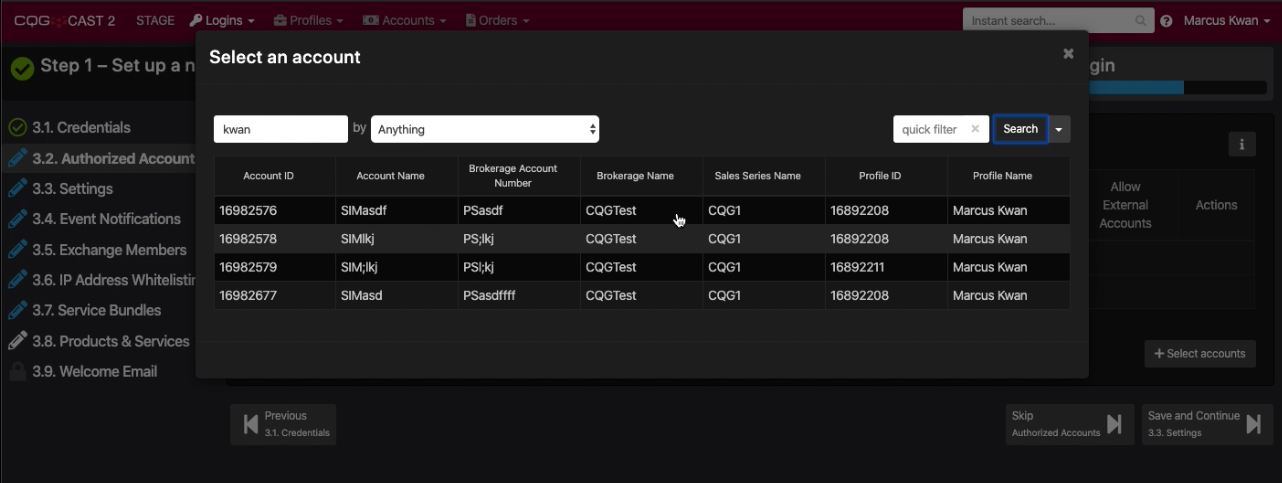
Select an Account to bind to.
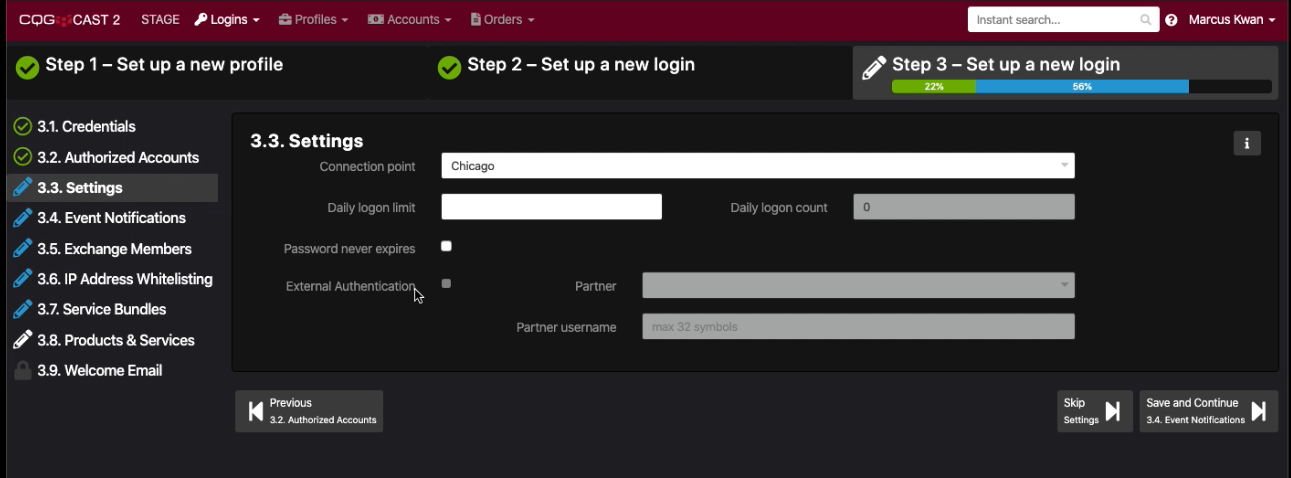
Connection Settings
Click Save and Continue for Settings. You can select the Connection point, Password never expires, etc. Click Save and Continue for Event Notifications.
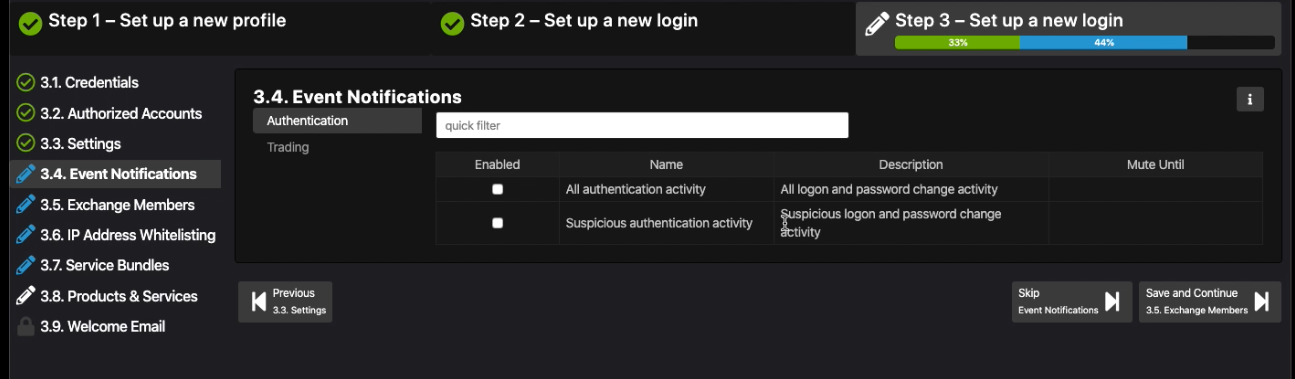
Login Notifications
Setup emails to come to the user based on the below criteria.
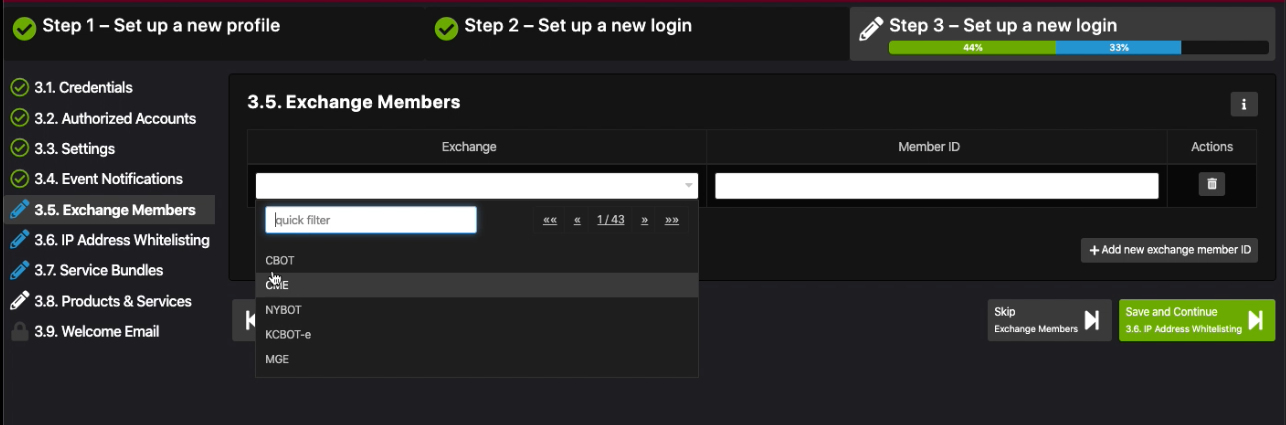
Exchange membership
If the customer is an Exchange member you select the Exchange and enter the customer's Member ID.
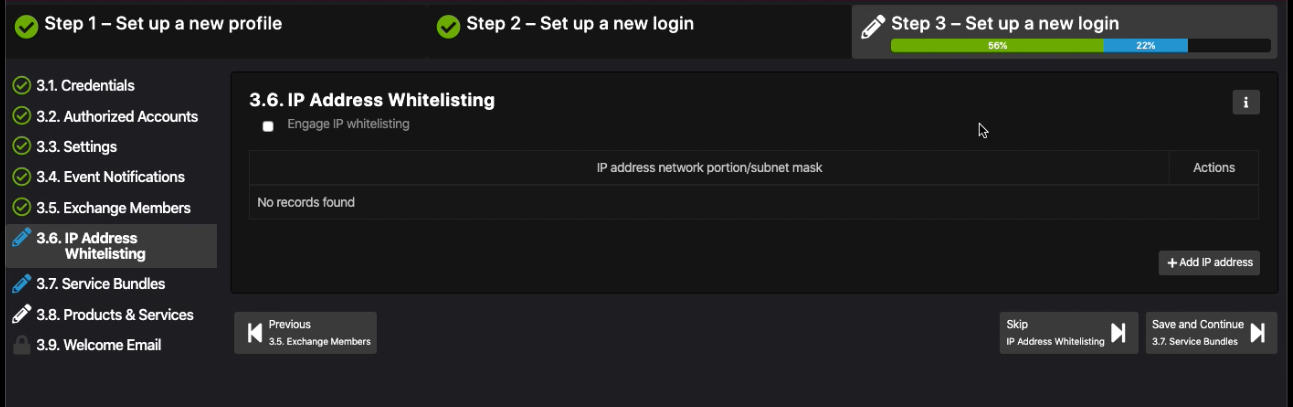
IP Whitelisting
IP white listing limits the locations a trader or CAST user can login from, such as the user can only login from inside the office.
Service Bundles are not available.
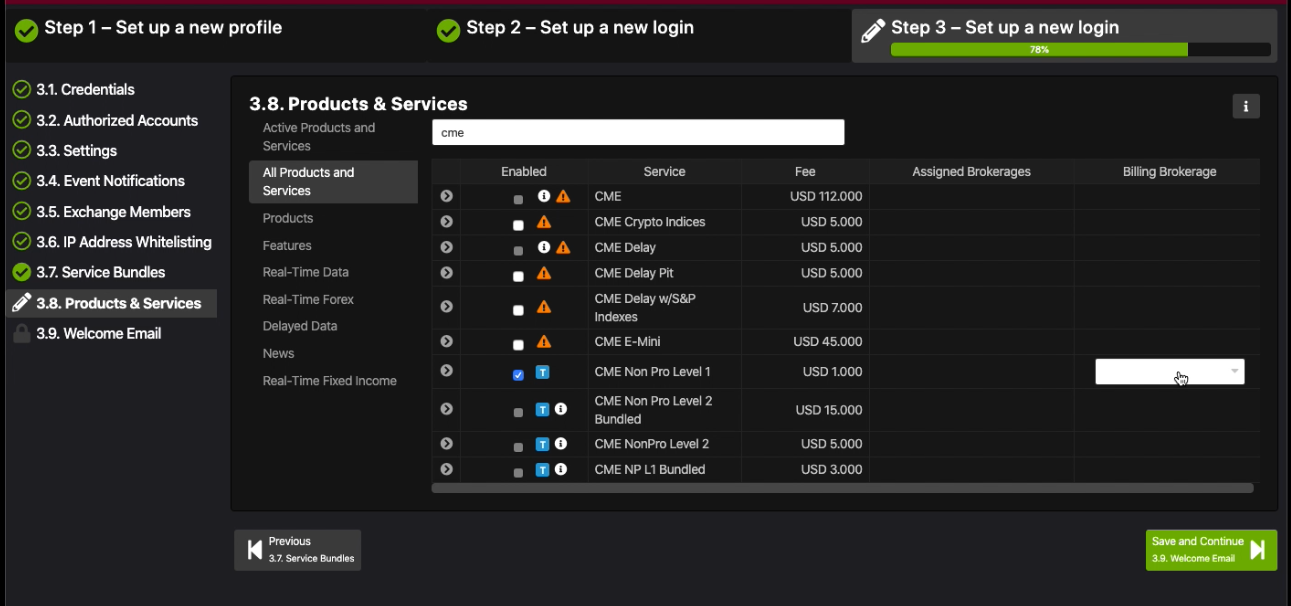
Products & Services
Add market data, such as from the CME exchange from the All Products & Services or from Real-Time data.
Welcome mail
Click Save and Continue to send out the Welcome email with credentials to the customer.
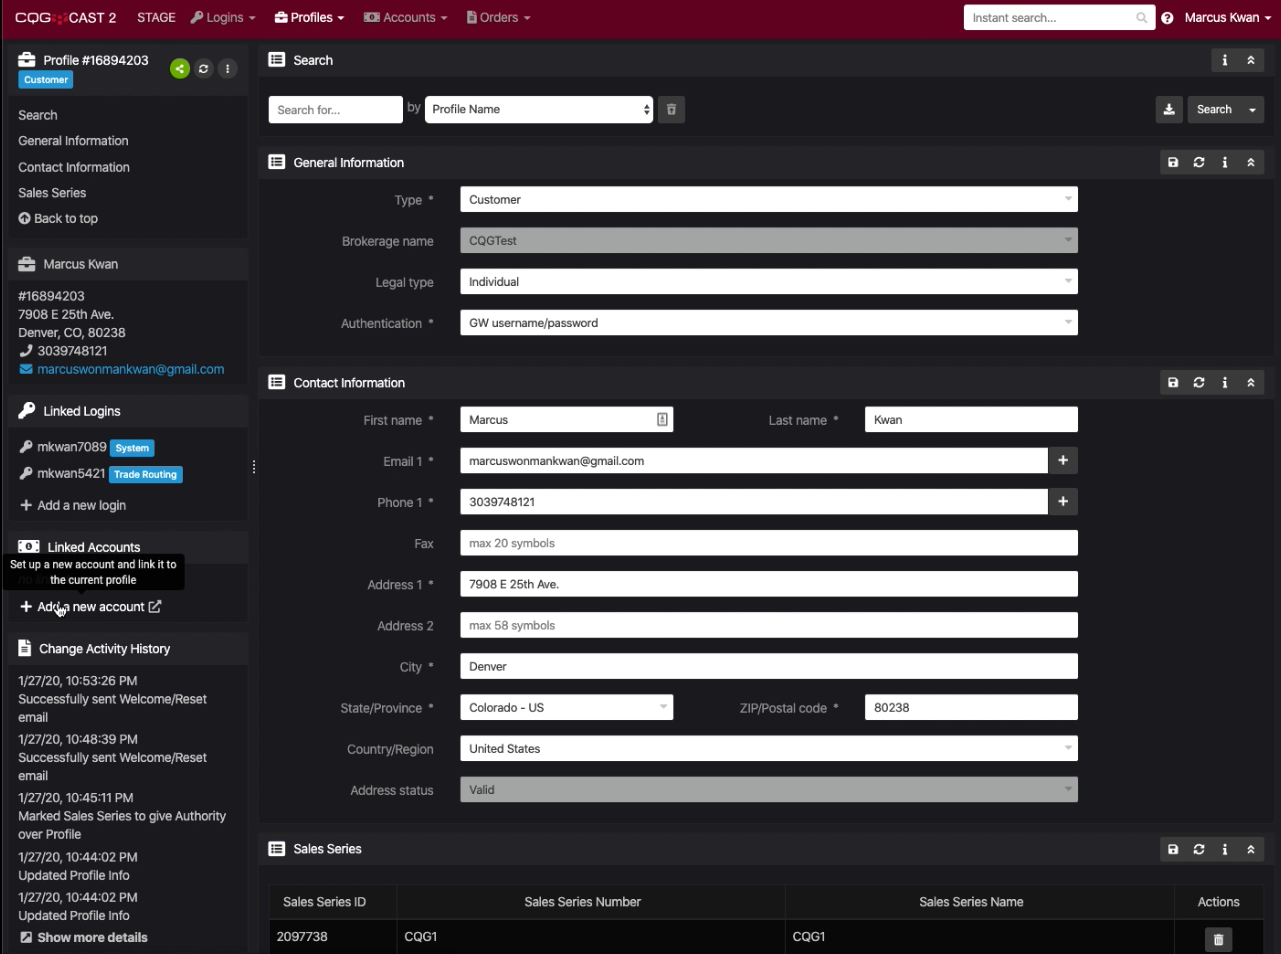
Profile Record
Once the new Profile and Login are completed you will see the new Profile Record. The left hand column gives details of the System Login, Customer Profile and Change Activity History.

Click on Profile in the left bar and you will see under Linked Logins both the System and Trade Routing logins.
Scenario: Setup a new Account or manage a current Account
Link a profile
To setup a new account, you must first have a profile setup to link it to.
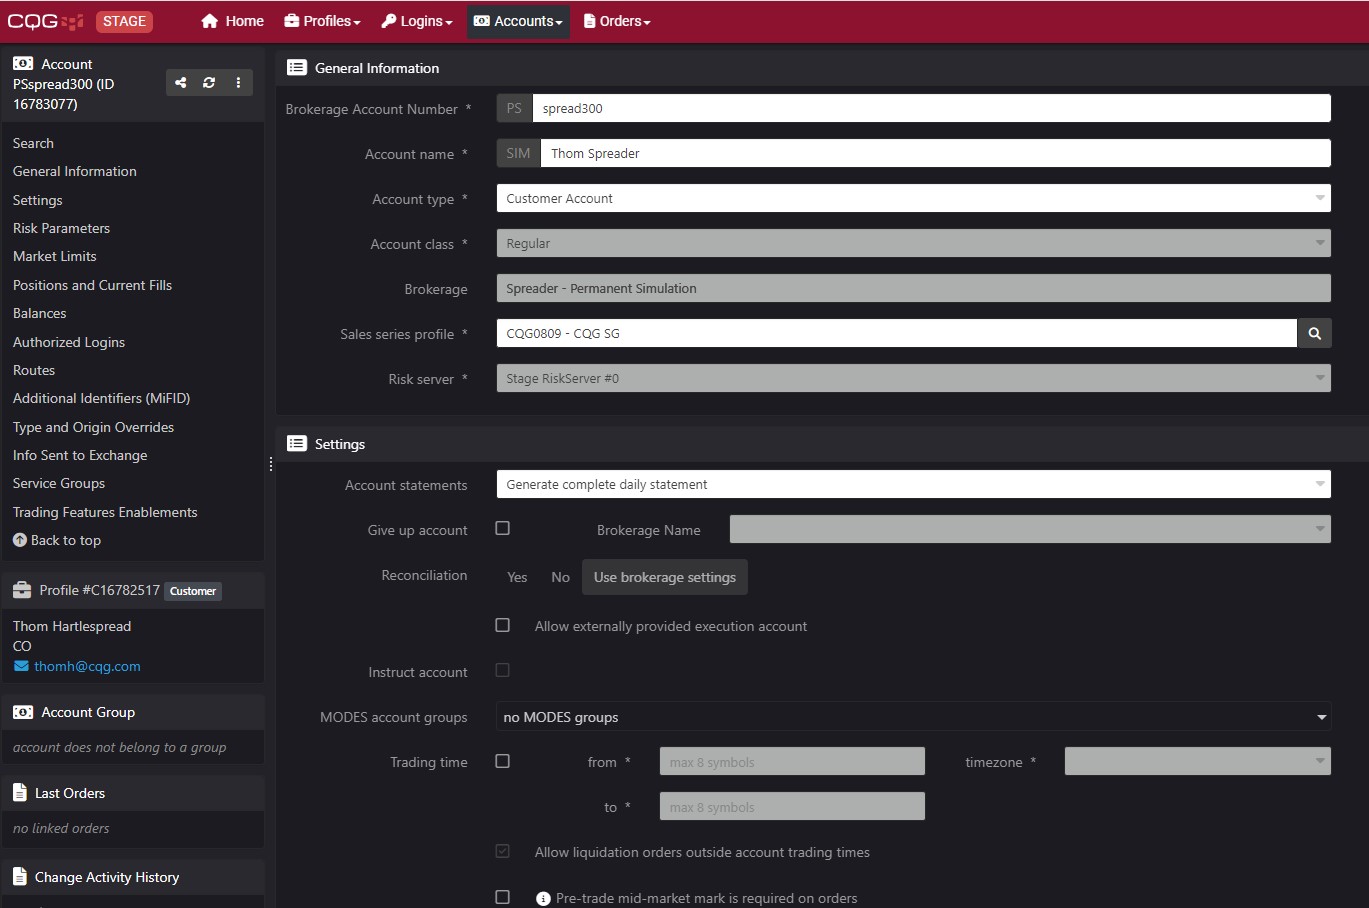
Once you have linked to the correct profile then the Account display lists the settings available on the left hand side: General Information, Settings, Risk Parameters, Market Limits, Balances, Authorized Logins, Type and Origin Overrides, Group Account Information.

General Information and Settings
Start with filling out General Information and Settings.
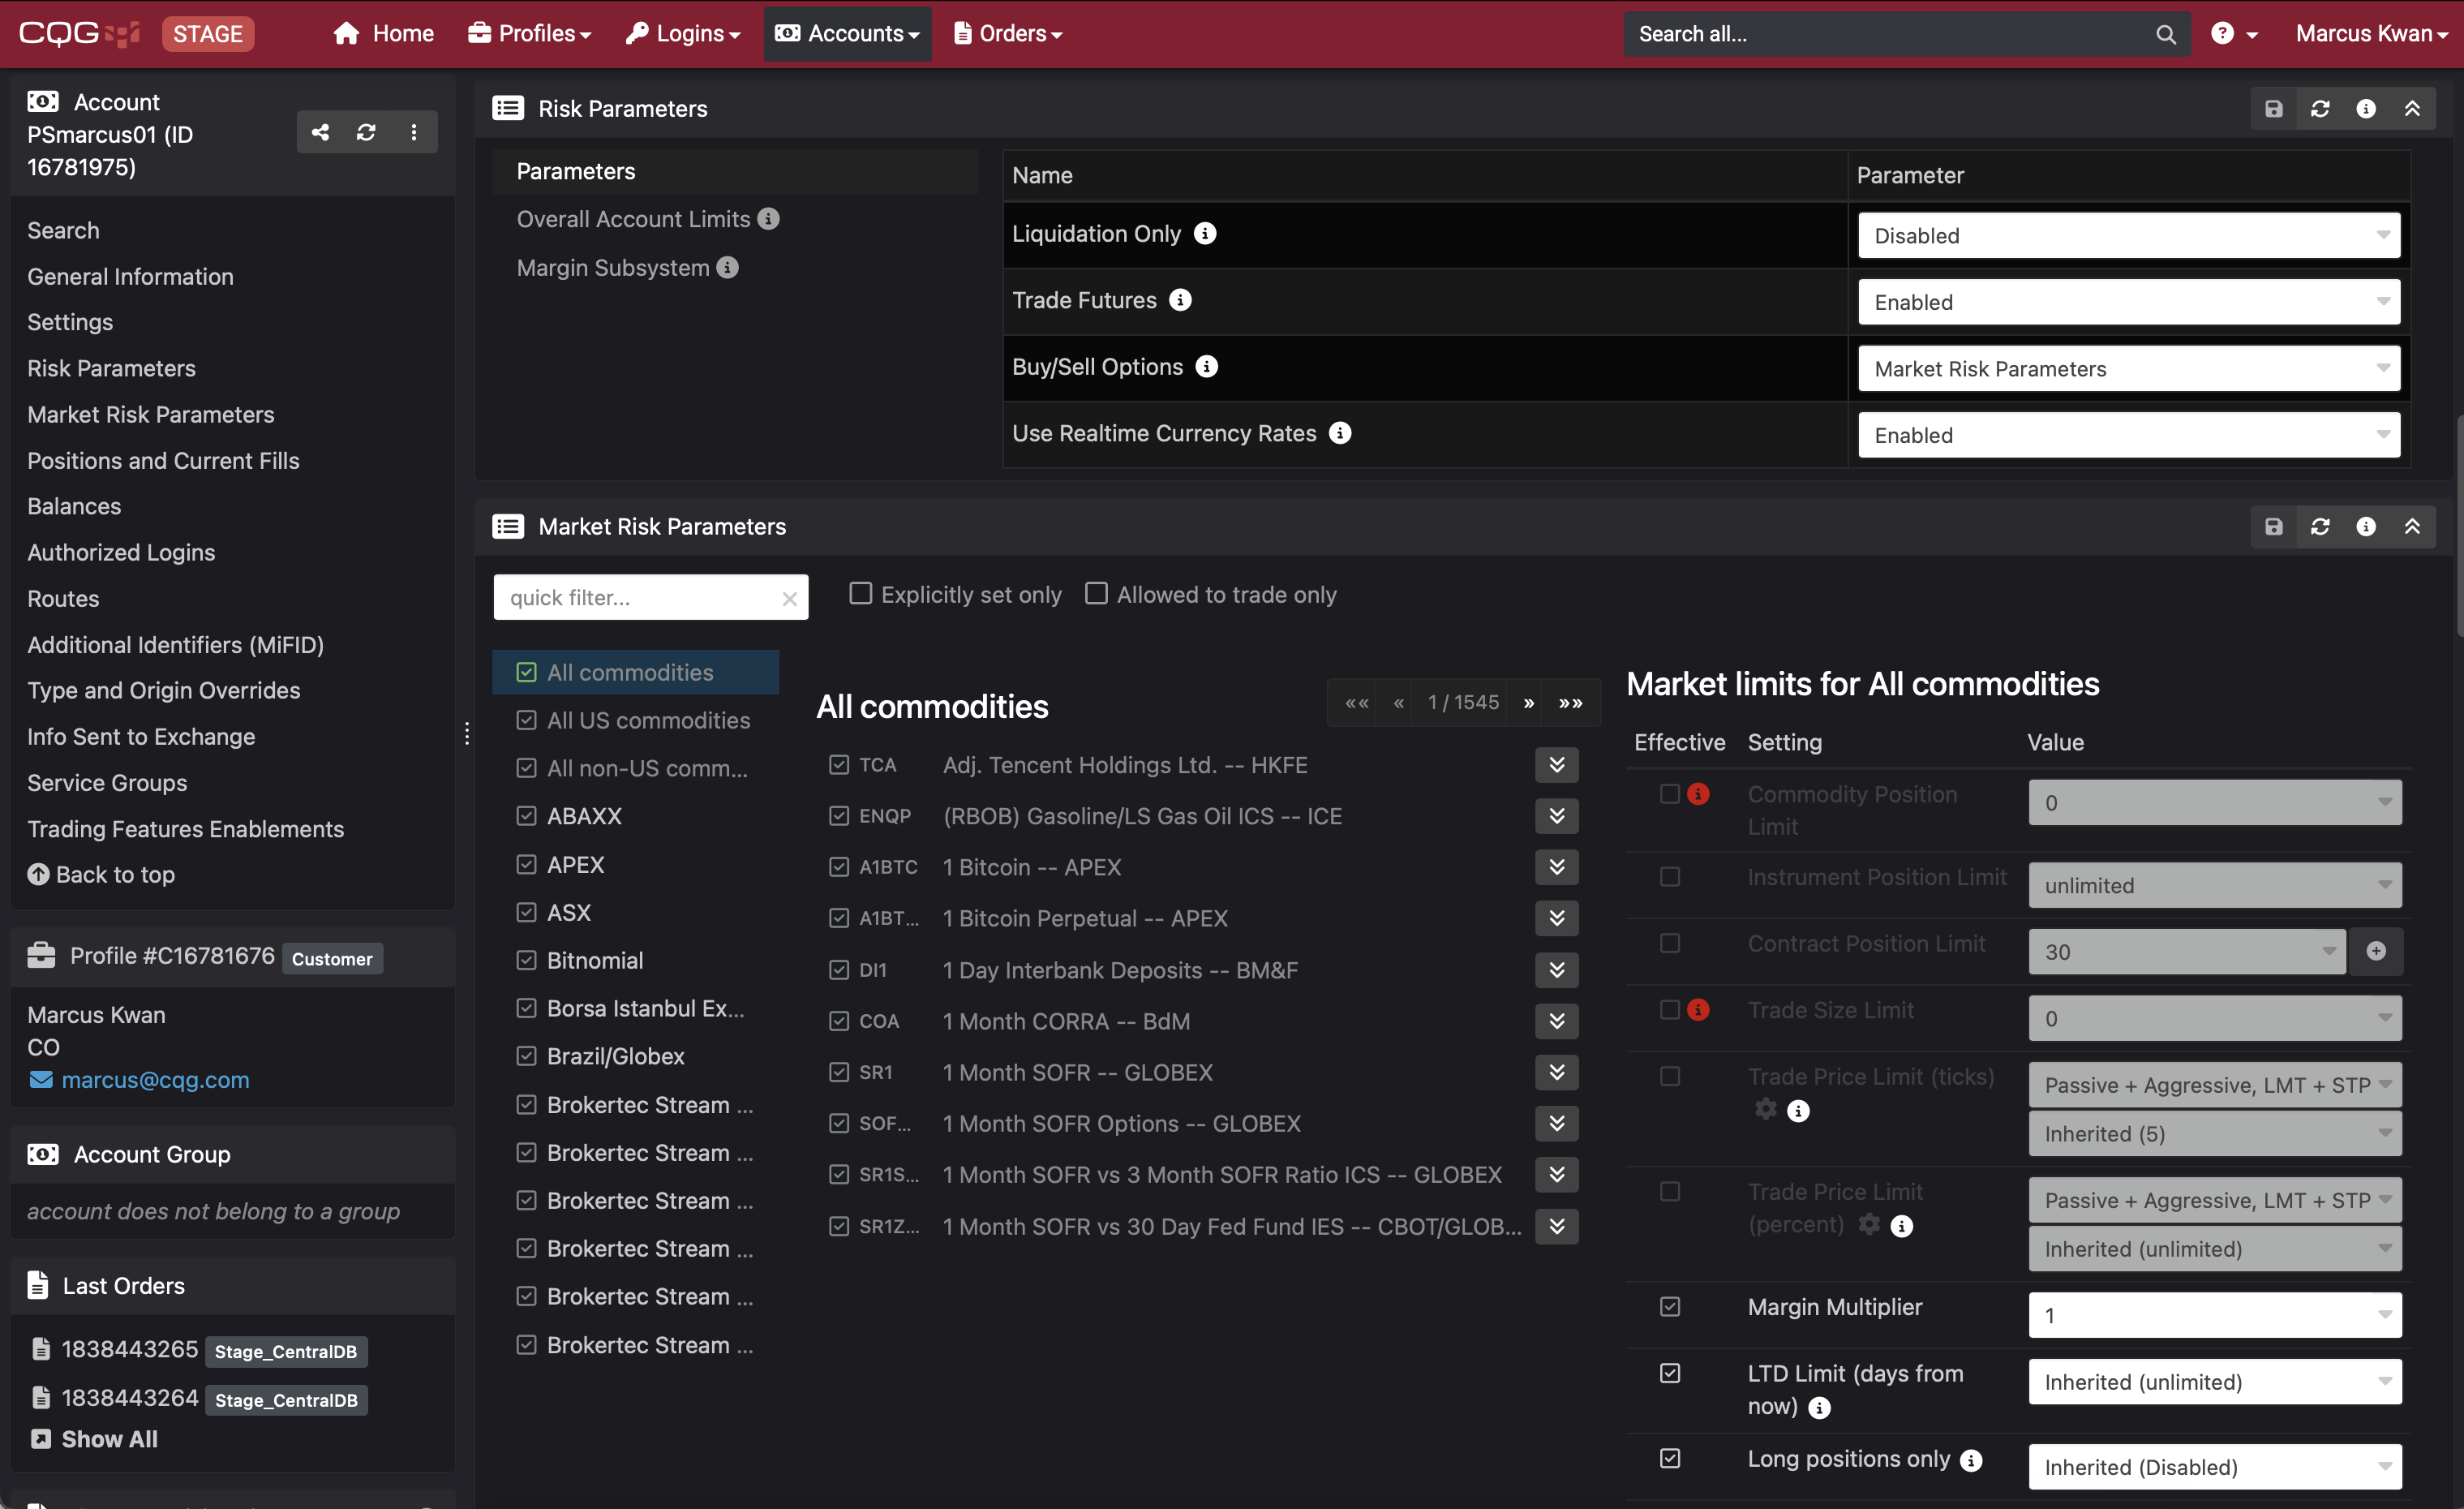
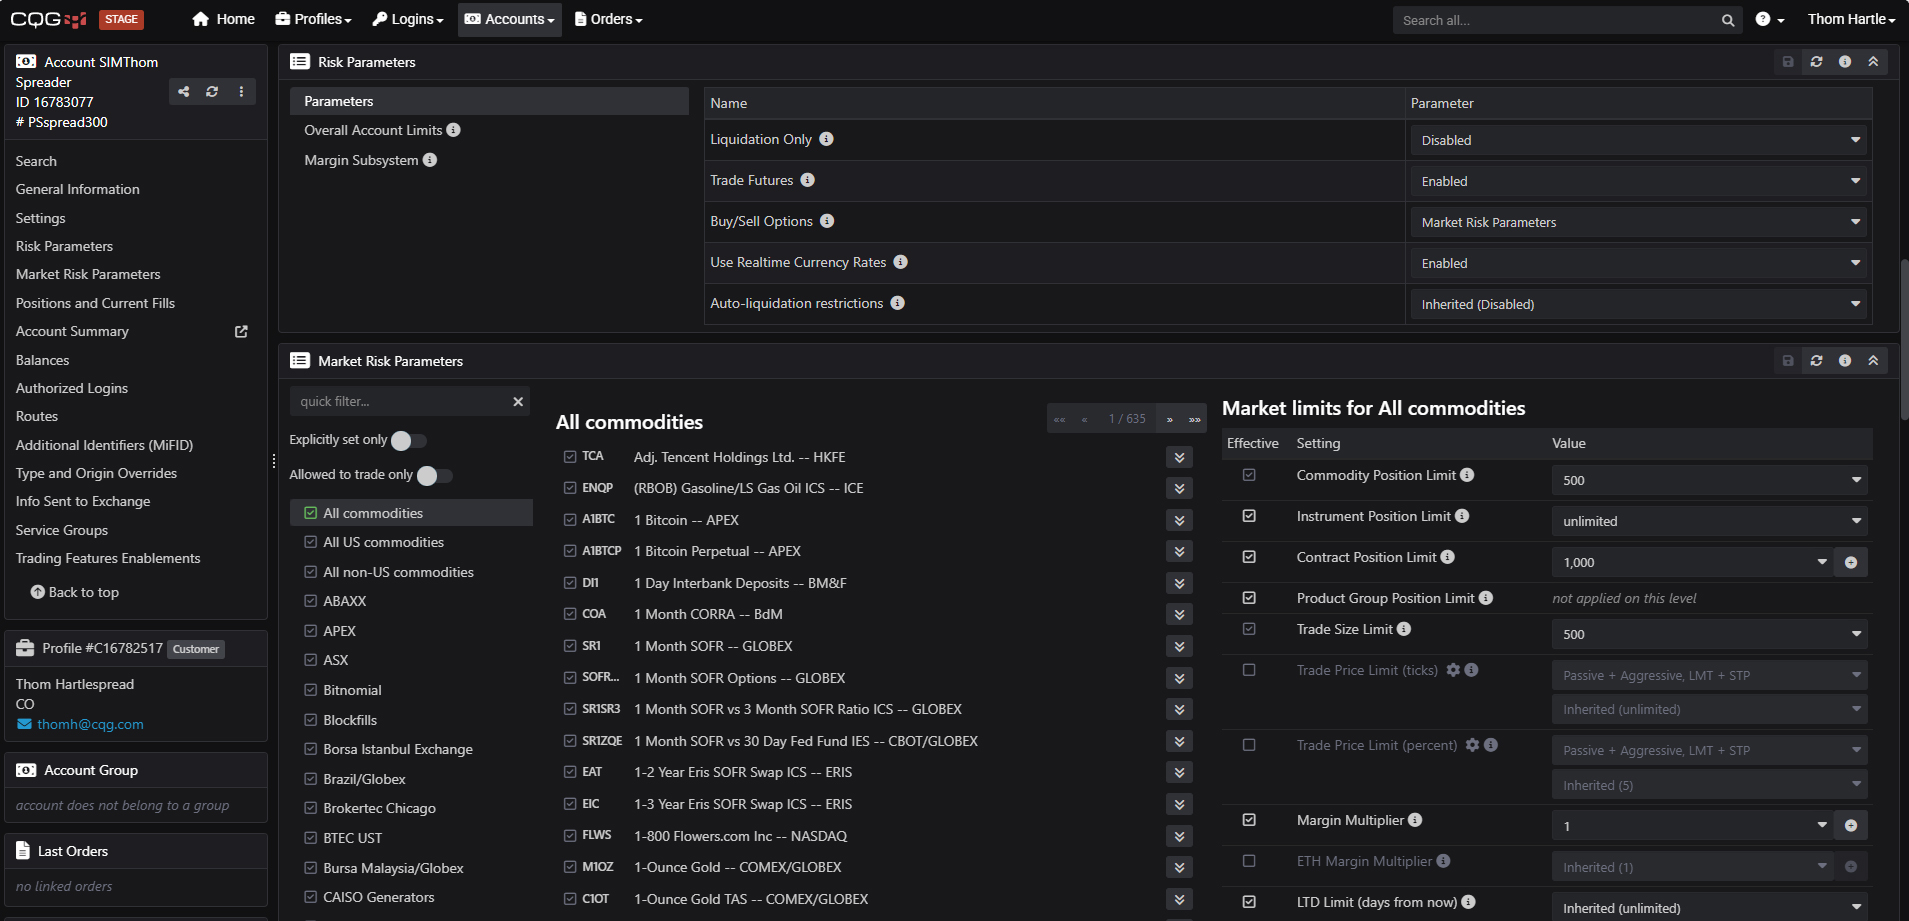
Risk Parameters and Market Risk Parameters
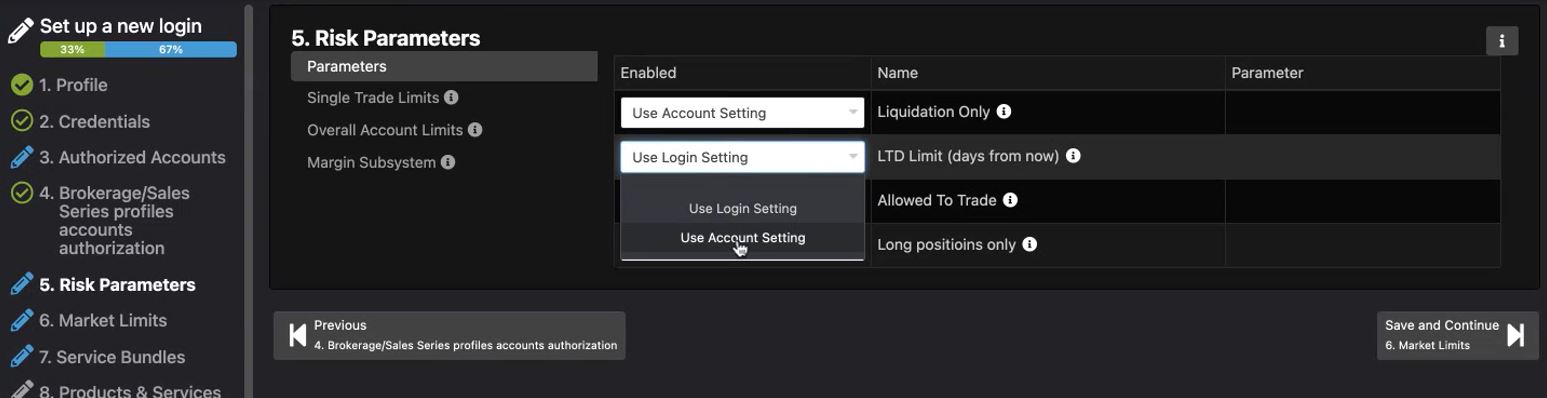
You can set Risk Parameters and Market Risk Parameters. There are three settings in the Risk Parameters window: Parameters, Overall Account Limits and Margin Subsystem.
The settings on the Risk Parameters page apply to risk at the account level and override the default settings for the FCM. If a maximum limit is set at the FCM level, then the account value must be less than the maximum FCM amount.
Set Parameters
The Parameters include:
- Liquidation Only
- Authorization to Trade Futures
- Dropdown menu for trading Options (No, Long Only, Market Risk Parameters and Inherited (Market Risk Parameters)
- Use Realtime Currency Rates
- Auto-liquidation restrictions
Set Overall Account Limits
The Overall Account Limits include:
- Setting Daily Loss Limit
- Delta Daily Loss Limit
- Reject Risky Market Orders
- Include UPL in DDL/DDLL
- Include OTE in DLL/DDLL

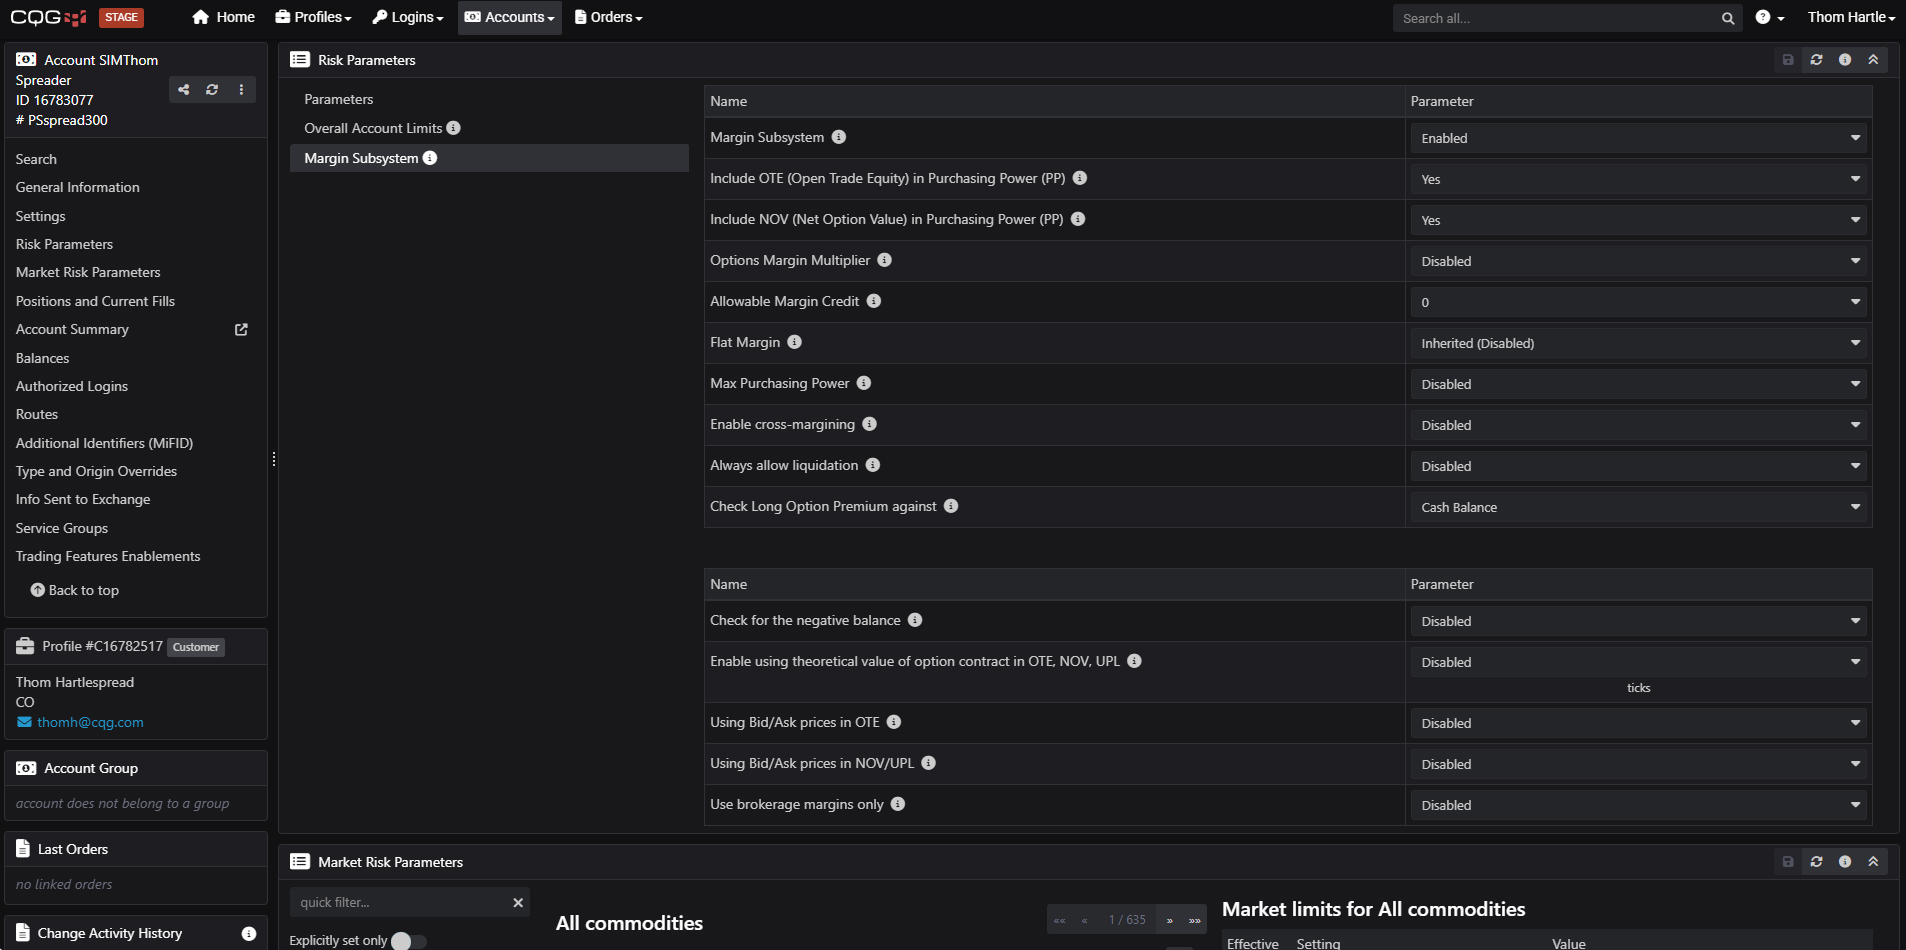
Set Margin Subsystem Parameters
The Margin Subsystem, when enforced, any trade that could cause margin requirements to exceed account's available funds is denied.
The parameters comprise:
- Include OTE (Open Trade Equity) in Purchasing Power (PP)
- Include NOV (Net Option Value) in Purchasing Power (PP)
- Options Margin Multiplier
- Allowable Margin Credit
- Flat Margin
- Max Purchasing Power
- Enable cross-margining
- Always allow liquidation
- Check Long Option Premium against
- Check for the negative balance
- Enable using theoretical value of option contract in OTE, NOV, UPL
- Using Bid/Ask prices in OTE
- Using Bid/Ask prices in NOV/UPL
- Use brokerage margins only
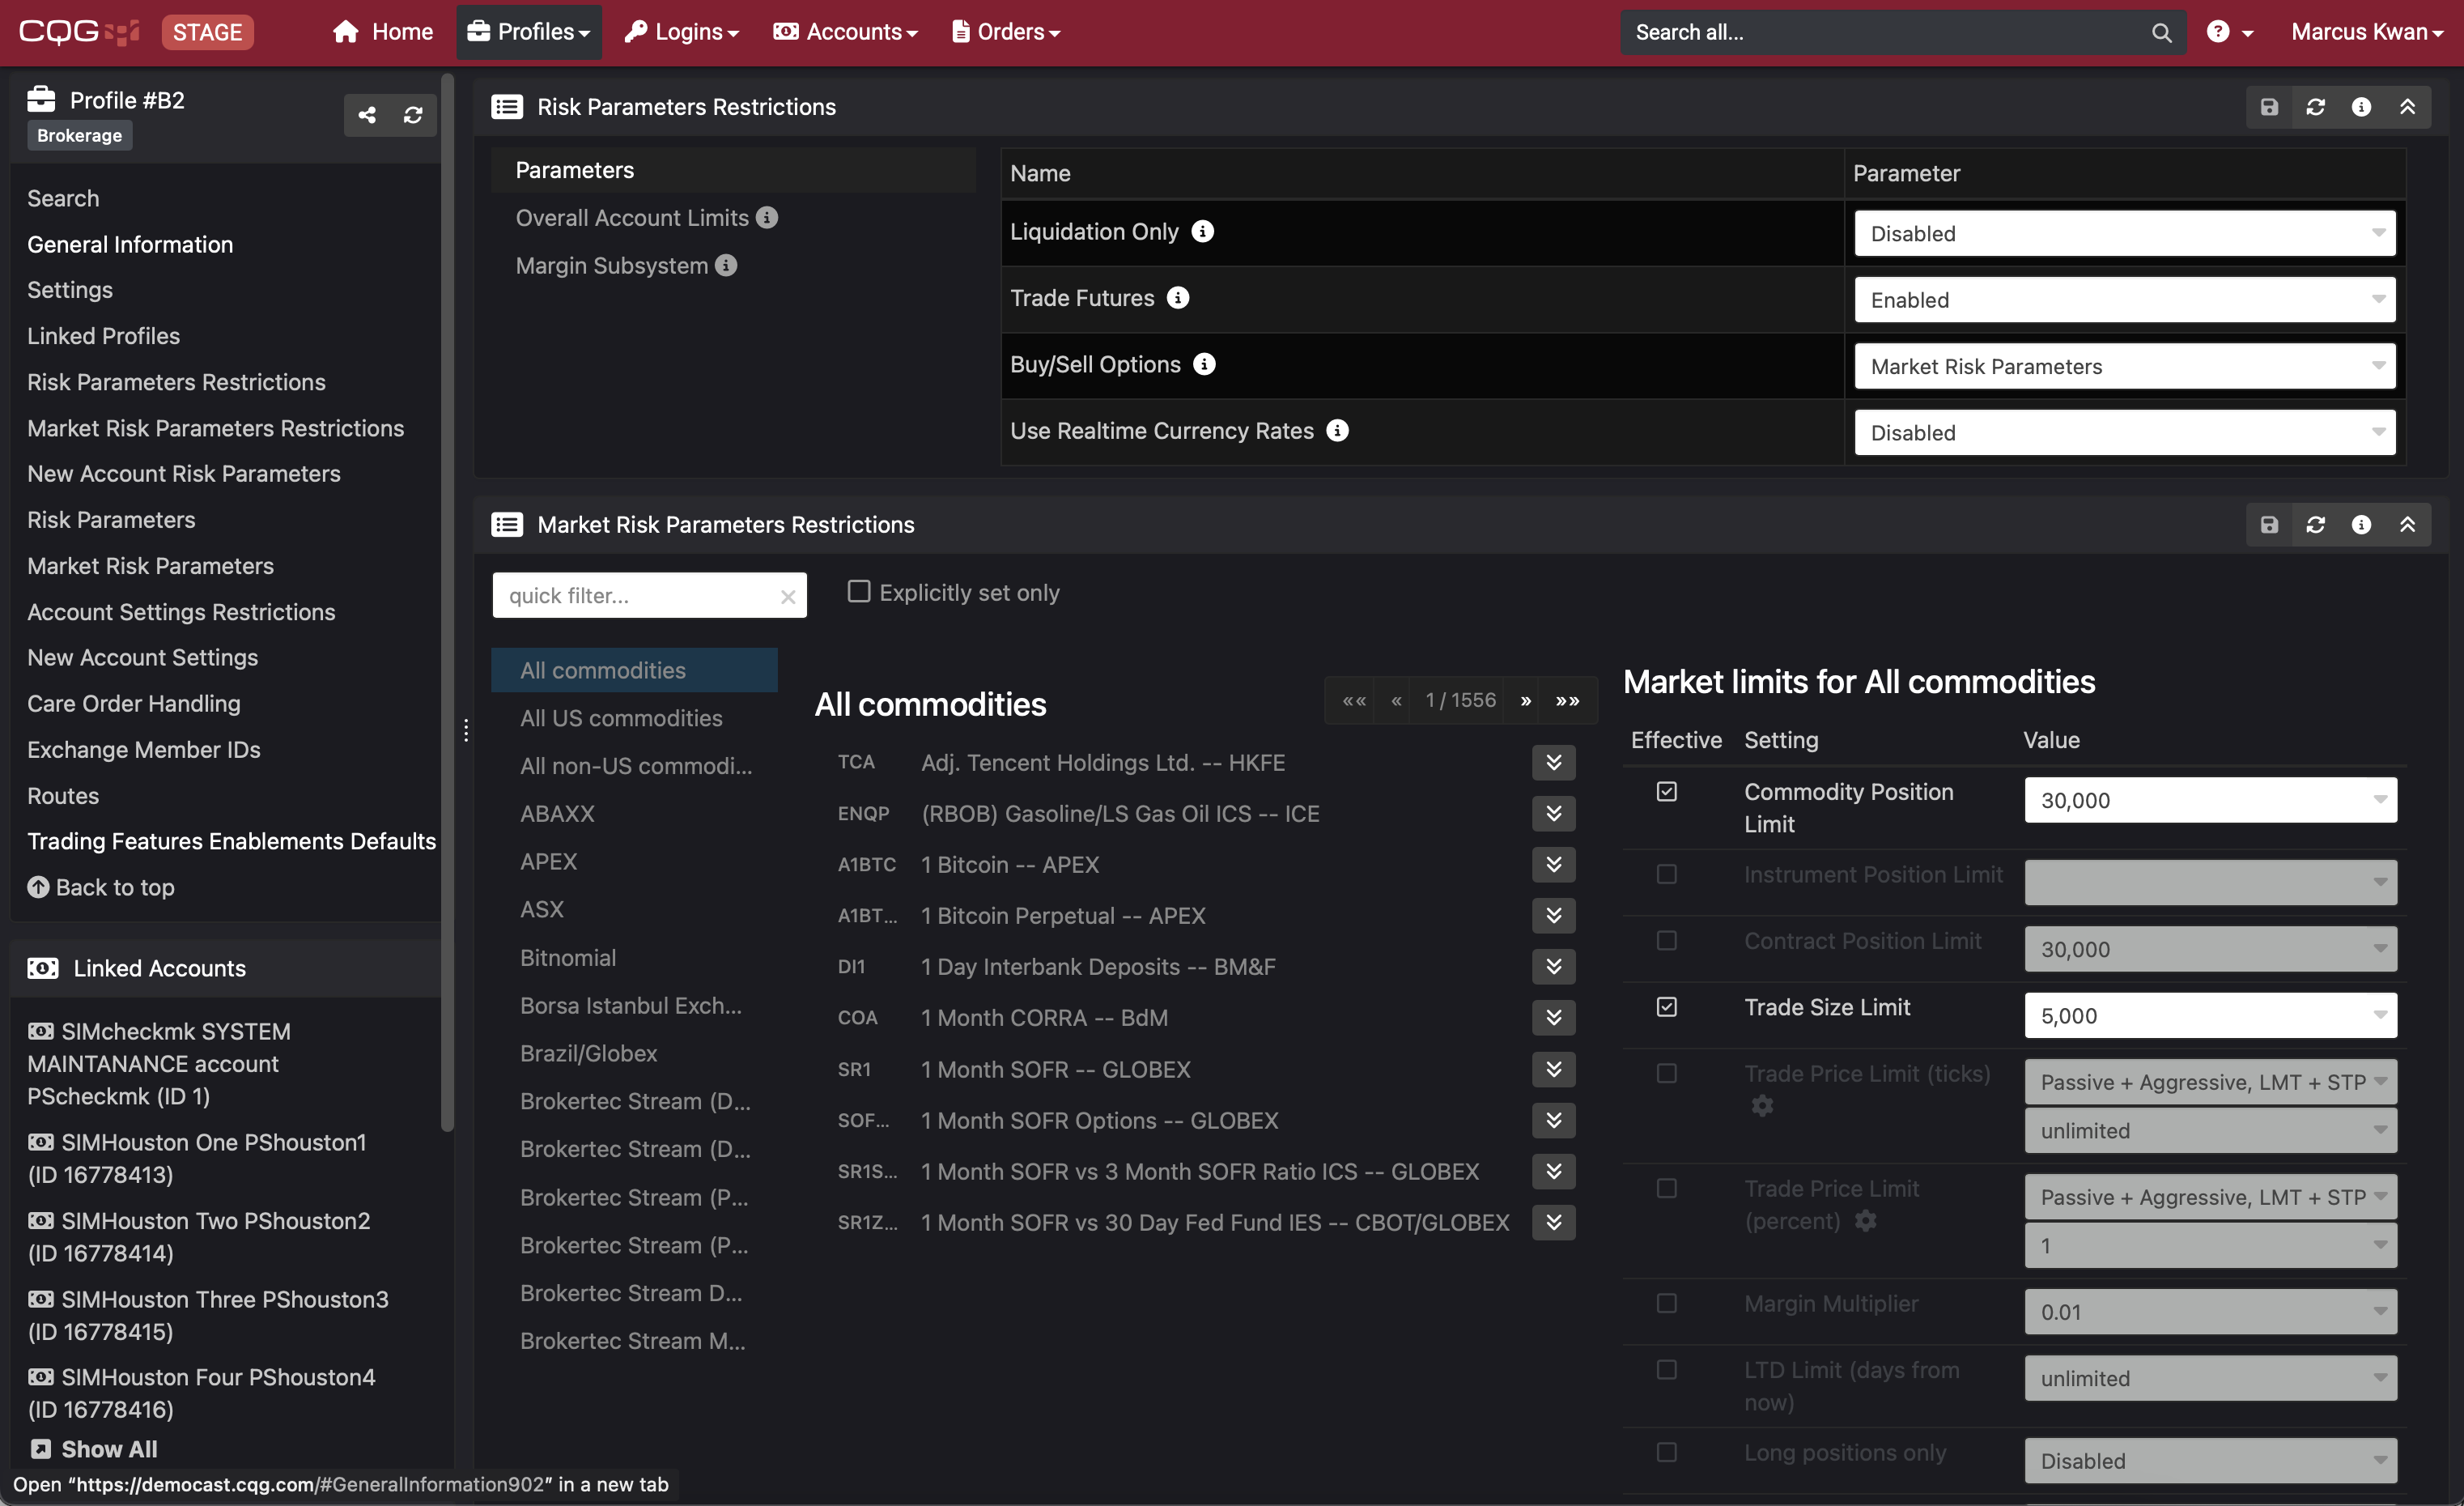
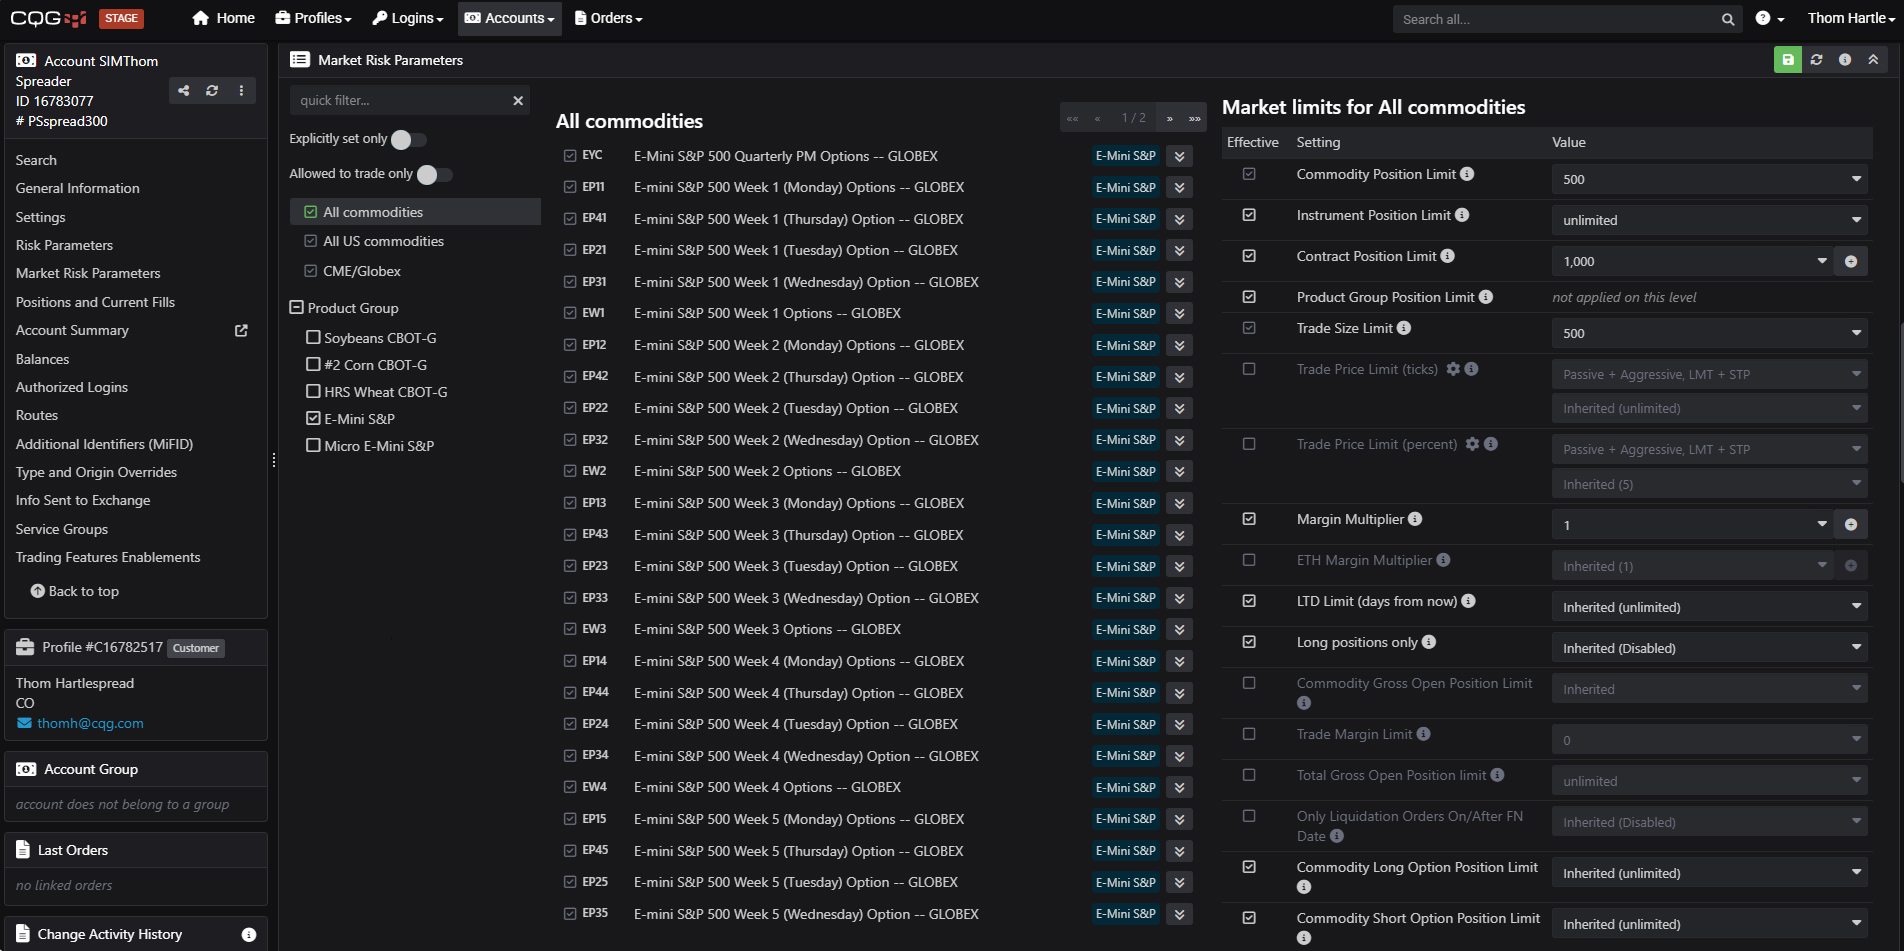
Set Market Risk Parameters
The Market Risk Parameters settings are using parameters from the Risk Parameters group. You can override them here by Commodity:
- Commodity Position Limit
- Instrument Position Limit
- Contract Position Limit
- Trade Size Limit
- Trade Price Limit
- Margin Multiplier
- LTD Limit (days from now)
- The setting LTD Limit (days from now) allows you to prohibit trading if the last trading day is more than N calendar days from today.
Select Product Group and Set Product Group Position Limit
The Product Group is a collection of contracts that use the same root symbol. When a group is selected you can set the Product Group Position Limit.
Set Quantity Based Margin Multipliers
Margin Multiplier in CAST 2 is a configurable parameter that scales the calculated margin requirements for trading accounts. It affects how margins are computed (e.g., multiplying exchange or FCM-set margins by a factor like 1.15 to impose stricter risk controls). This helps enforce trading limits by ensuring available funds cover the adjusted requirements. When the Margin Subsystem is enabled, trades exceeding these adjusted margins are denied.
The Margin Multiplier will have a default value (current value of margin multiplier) and multipliers specific to quantity ranges.
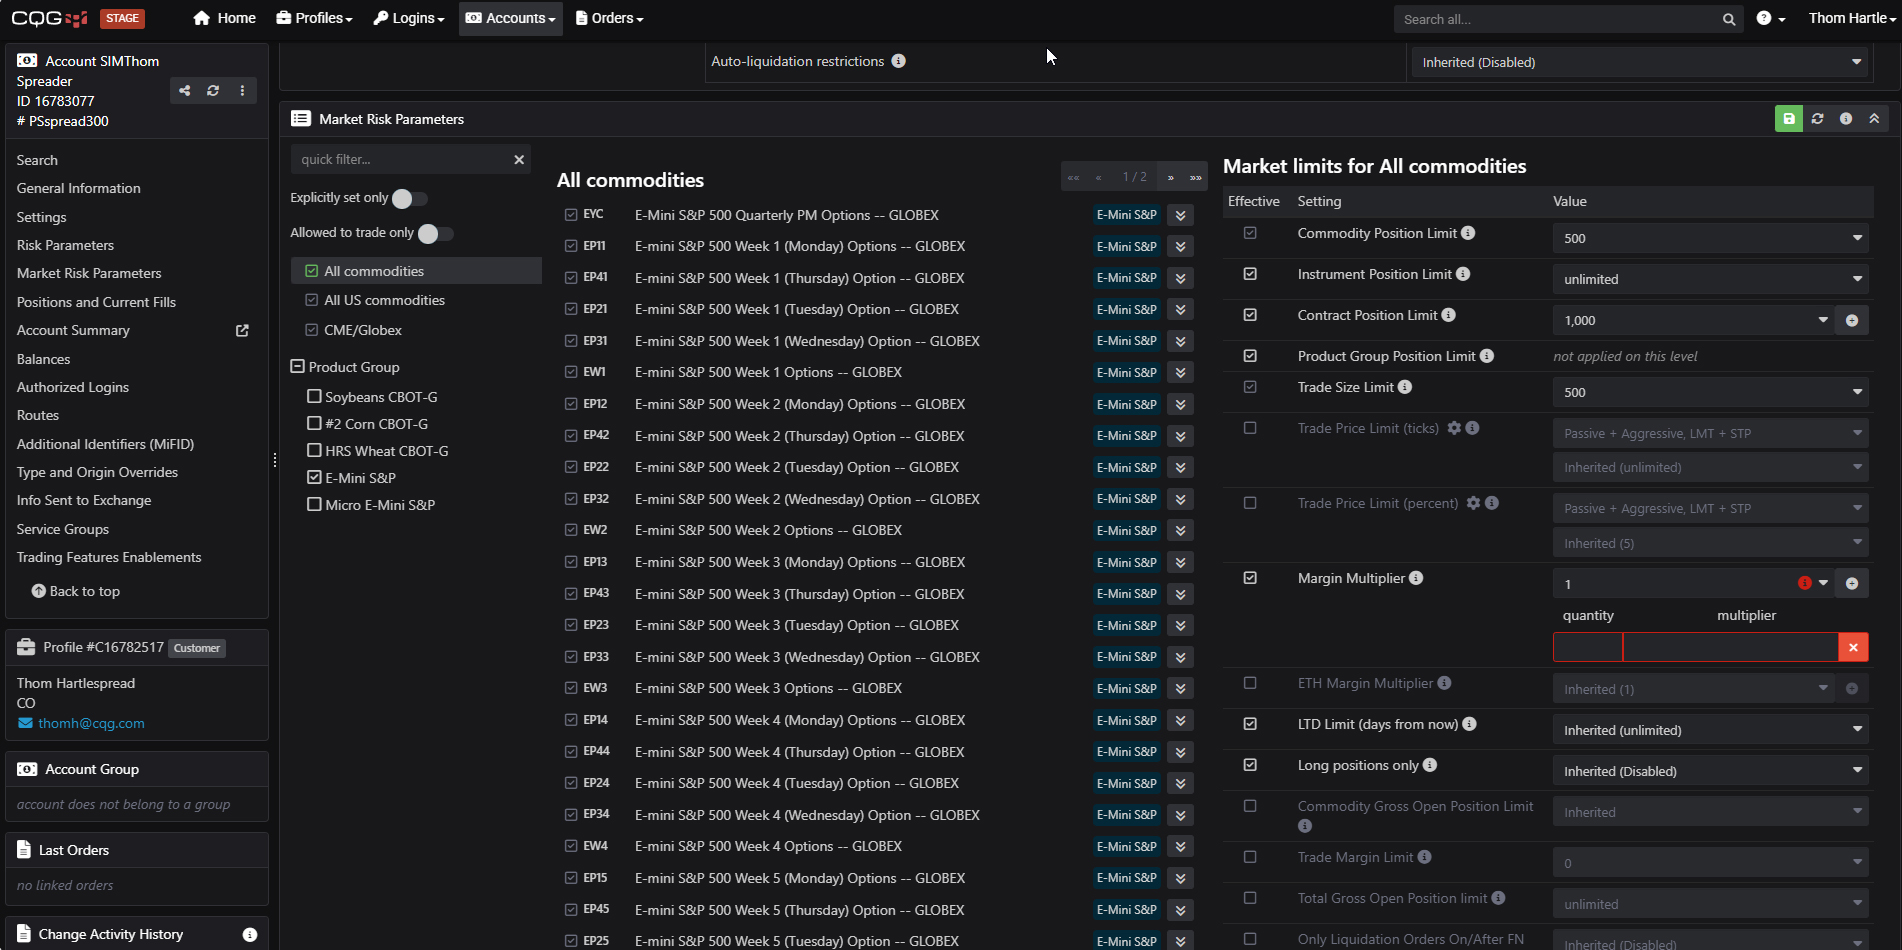
For example, positions with sizes up to fifteen could have a margin multiplier of 0.25. Positions with sizes greater than fifteen and less or equal to thirty will have a margin multiplier of 0.50. And positions larger than thirty will have a default margin multiplier of 1.0.
|
TierQtyMax |
Margin multiplier |
|---|---|
|
15 |
0.25 |
|
30 |
0.50 |
|
Default |
1.0 |
Press the "+" to add additional quantity ranges. Up to 5 quantity ranges with specific margin multipliers can be defined for each market level: All Commodities, US/Non US Commodities, Risk Exchange Group and Margin Group. Most specific level overrides general ones. Quantity range is defined by the upper bound of the range.
The multiplier is typically set to 1.00 by default but can be overridden at various levels (account, trader, or market-specific) for finer control.
Quantity Based Margin Multipliers are defined for regular trading hours (RTH) and extended trading hours (ETH).
If "Enable cross-margining" is On, then Quantity Based Margin Multipliers are not used.
Options Margin Multipliers have priority over Quantity Based Margin Multipliers. Quantity Based Margin Multipliers can be set for FCM, Sales Series and an Account. Order Handler Trader can override Quantity Based Margin Multipliers.
Video Introduction to December 2025 CAST 2 Gateway Release
This video was published in December 2025 CAST 2 Gateway Release
The video details new features for CAST 2 in Gateway Release 5.33
- Market Risk Parameters - added product group position limits
- Margin multiplier enhancements
- Added Commodity Long/Short Option Position Limit
- Positions & Fills: Added single currency view and Login column
- Account summary: Added Collateral information. Get access to the Post Trade Admin by contacting the FCM Desk
- Routes: Added cross trade control per account at a route level
For best viewing, click "Watch on YouTube" and set the Quality to 1080p HD.
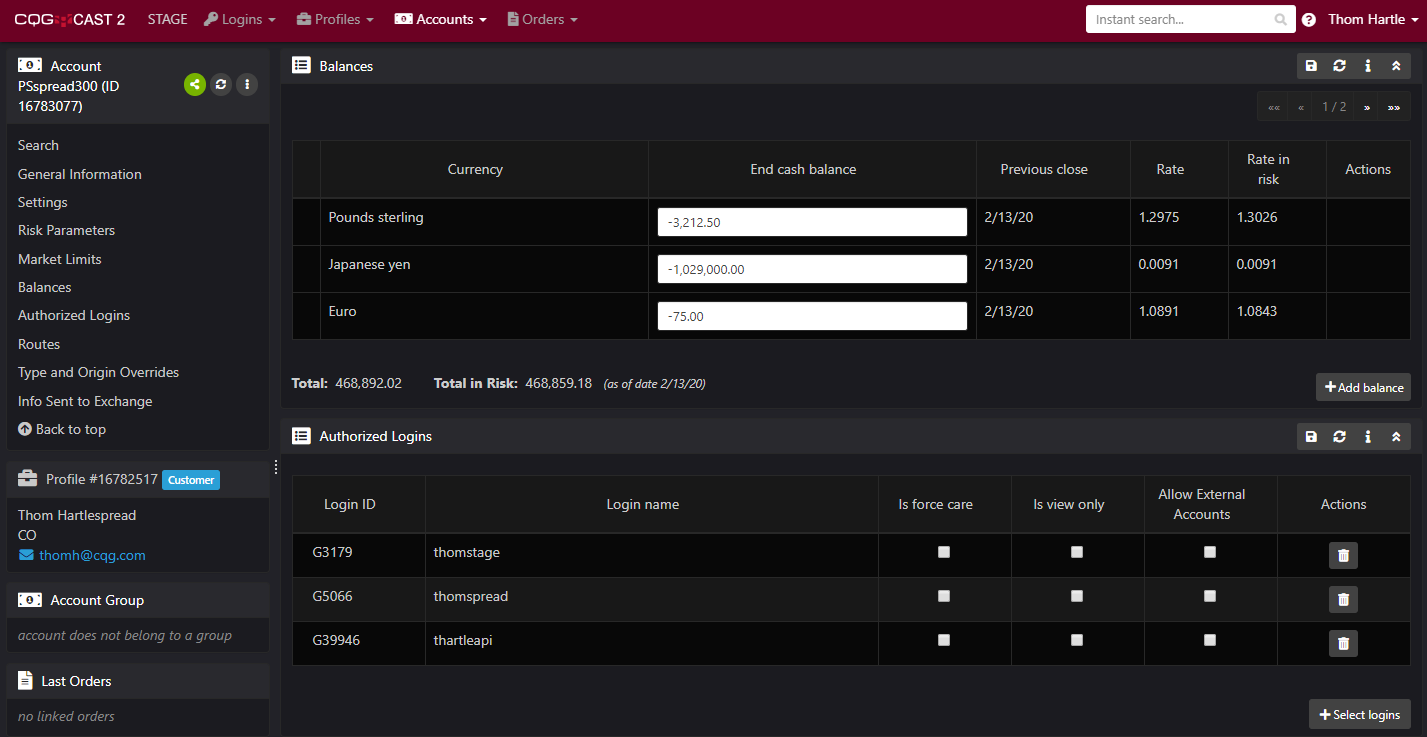
Setting Balances
Setting Balances: To add a new balance, select the +Add balance button.
The rate displayed for the currency is sent by the FCM with the rest of the nightly statement data. CQG will provide the rate if it is not provided with back office data. The rate is needed in order to accurately calculate the account value.
CQG uses CQG FX Indices values for current rate data. Your account is configured to use the current intraday currency rate by default. To change this setting, contact CQG. If the current intraday currency rate is not available, then yesterday's settlement rate is used. For accounts that choose not to use the intraday currency rate, the system calculates risk based on the rate used by the account's FCM on the most recent statement date. If that value is not available, then yesterday's settlement rate is used.
Link Authorized Logins
In the Authorized Logins section, to add a new Login select the +Select Logins.
Select or unselect the check boxes: View Only, Remove Authority, Force Care, and Allow External Accounts.
- View Only: Trader can view account information but cannot trade on the account.
- Remove Authority: Trader cannot view account information or trade on this account. (Account is removed when you save the page.)
- Force Care: Trader cannot place orders directly to the exchange; only care orders are allowed.
- Allow External Accounts: This enables the Broker External Orders feature. Brokers now have the ability to enter orders into any account, including accounts associated with the broker that are not set up on CQG.
Routes
Routes have two tabs: Active Routes and Available Routes, which is a list of available routes.
You can view the account type data that is sent to the exchange. Click the Account info sent to exchange tab.

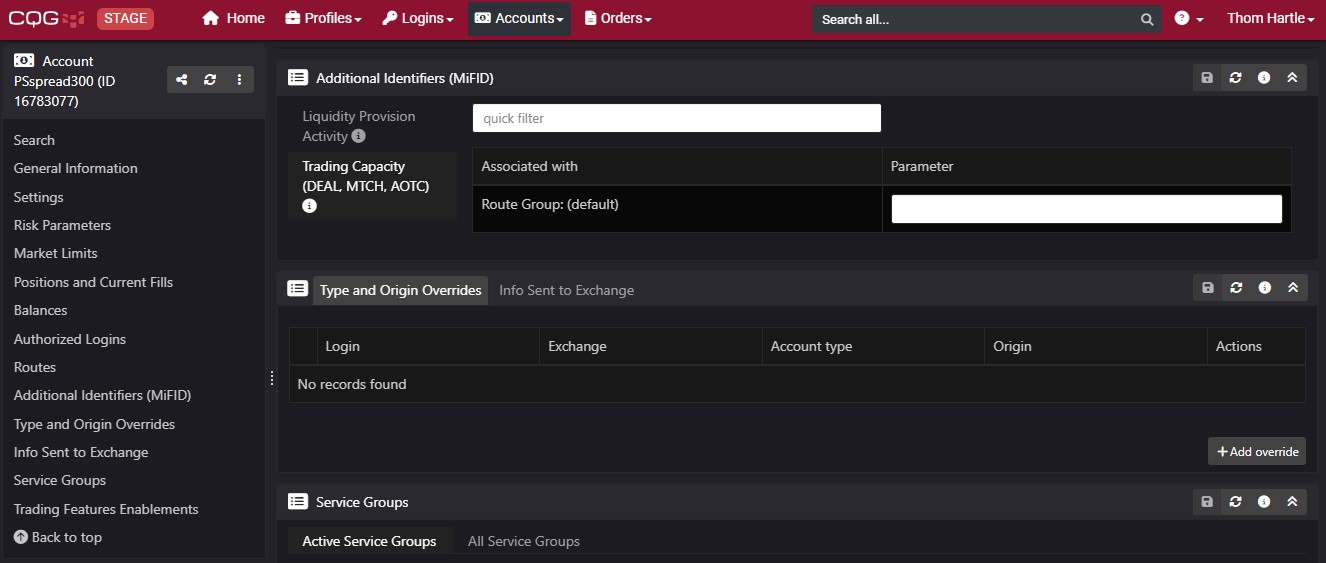
Additional Identifiers (MiFID)
Liquidity Provision Activity: Whether this Account's orders should be sent with the MiFID ll 'liquidity provision activity indicator (1 = true. 0 or not set = false).
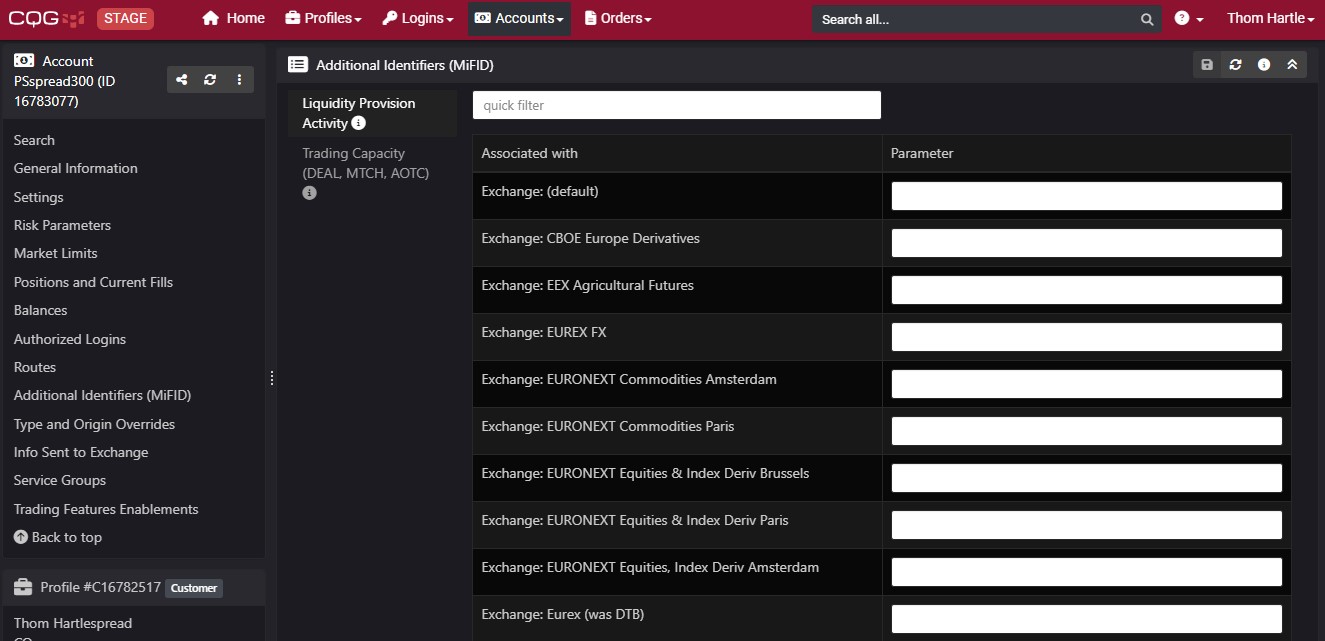
Trading Capacity (DEAL, MTCH, AOTC): Official MiFID code for trading capacity (DEAL = dealing own account, MITCH = matched principle, AOTC = any other capacity). If not configured then AOTC value is used.
Scenario: Customer needs to Reset their Password
Search for a customer
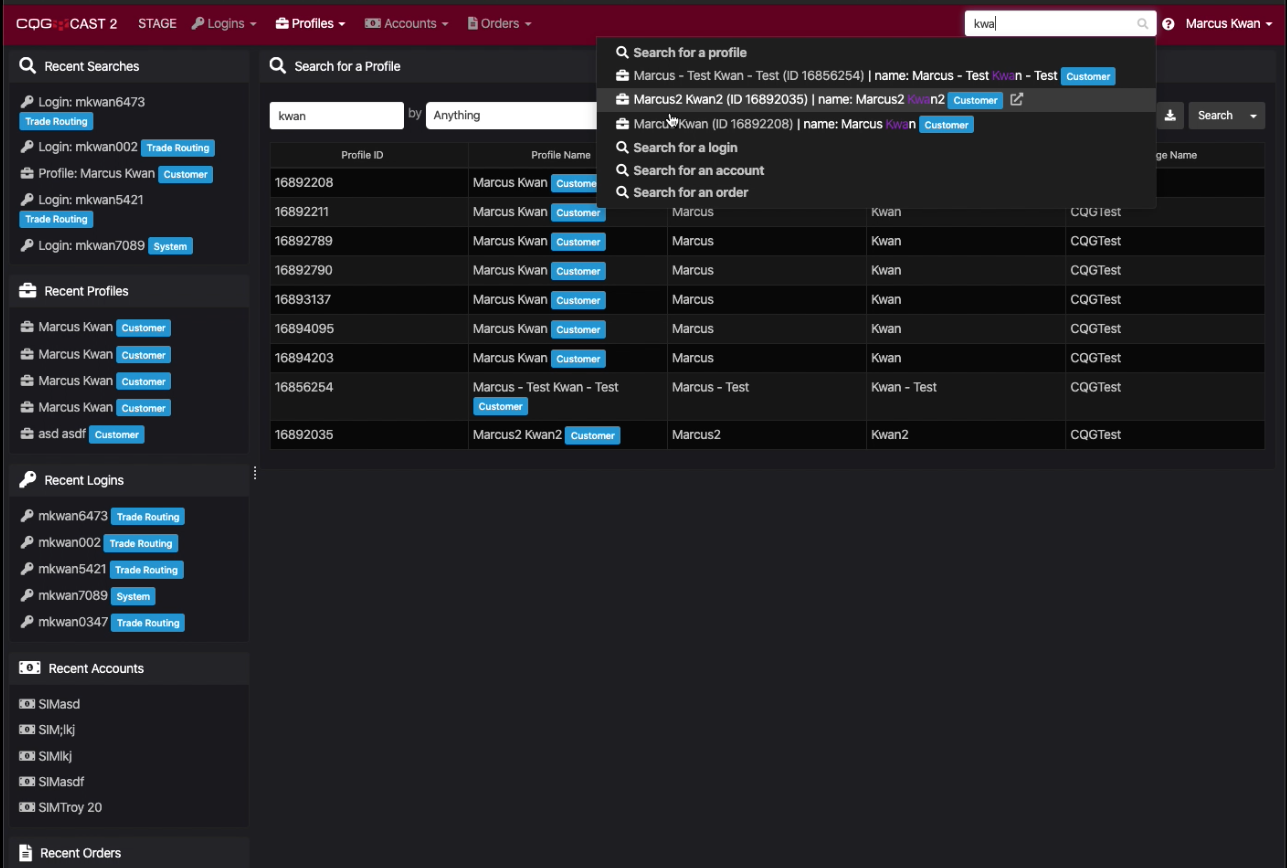
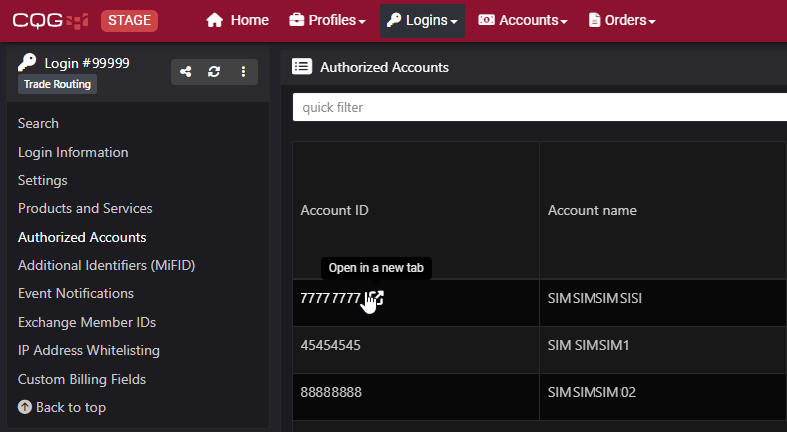
From the Home Page, simply use the Search box located in the top right-hand corner to find the customer. You can search by the customer name or other key information, such as login.
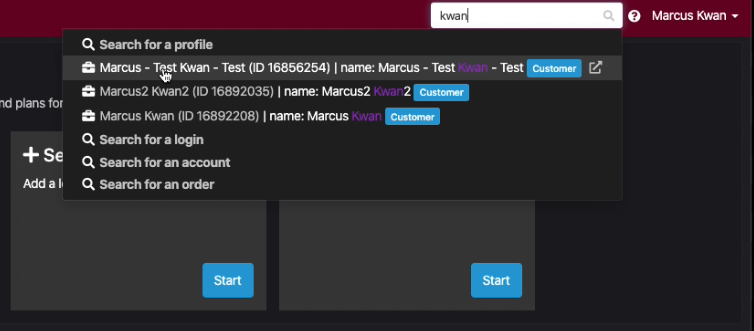
What is returned are results using "Search for a profile." If you click "Search for a login" then a new window opens displaying the results.
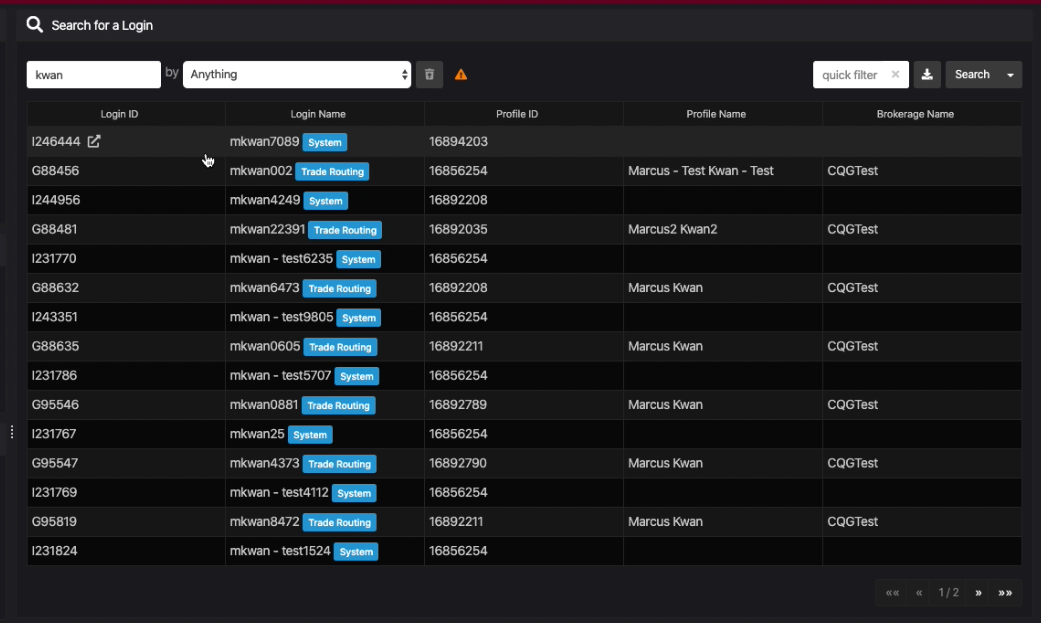
Hovering your mouse over a row will expose the "Open in a new tab" feature. Clicking this will open that feature in a new tab. Now, you can open up multiple records at the same time, select the tab of interest or drag the tabs to be side by side.
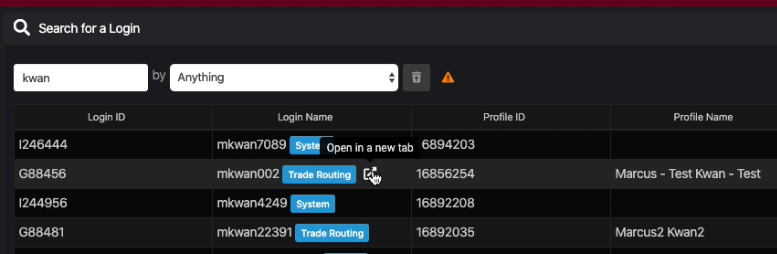
If you click on the row, that record will open.
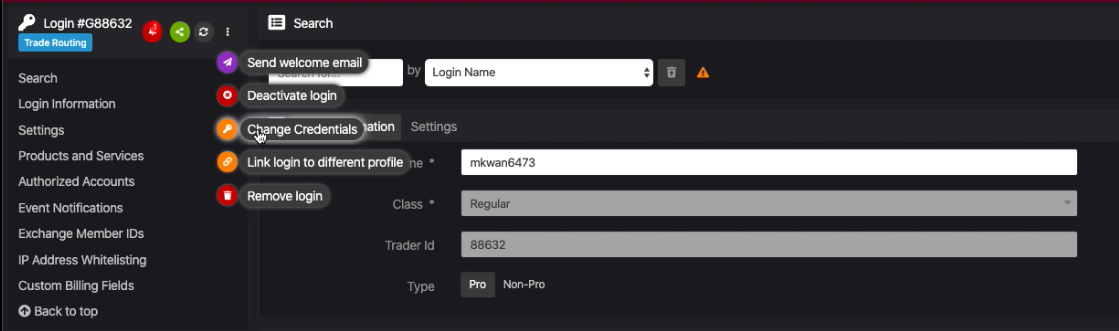
Task menu
Clicking the three dot menu will expand the drop down with a list of features. As the scenario is a customer wants to change their password, you select "Change Credentials."
The CAST user cannot change the credentials for the customer. Selecting "Change credentials" will open this window. You have different choices including "Send credential change email" to the customer. The email sent includes links to MyCQG.com to login and change the password. The CAST user can stay on the phone with the customer for any additional assistance.
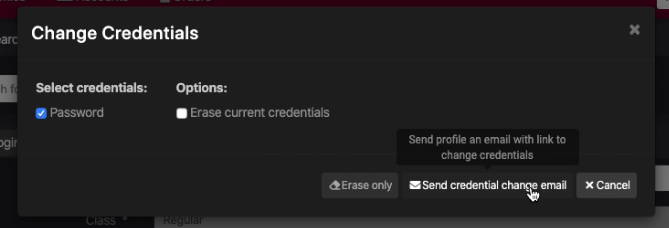
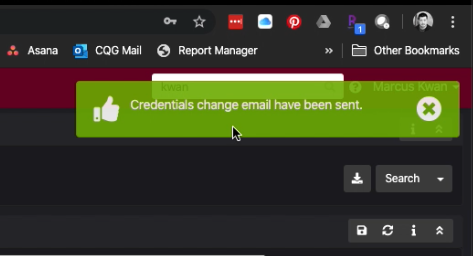
When the email is sent the confirmation window opens. The email is sent only to the email address listed for the Customer.
Scenario: Adding Market Data or other features
To add market data requested by a customer you first search for the profile of the customer using the upper right-hand search. Choose the correct profile.
Access linked logins in the left bar
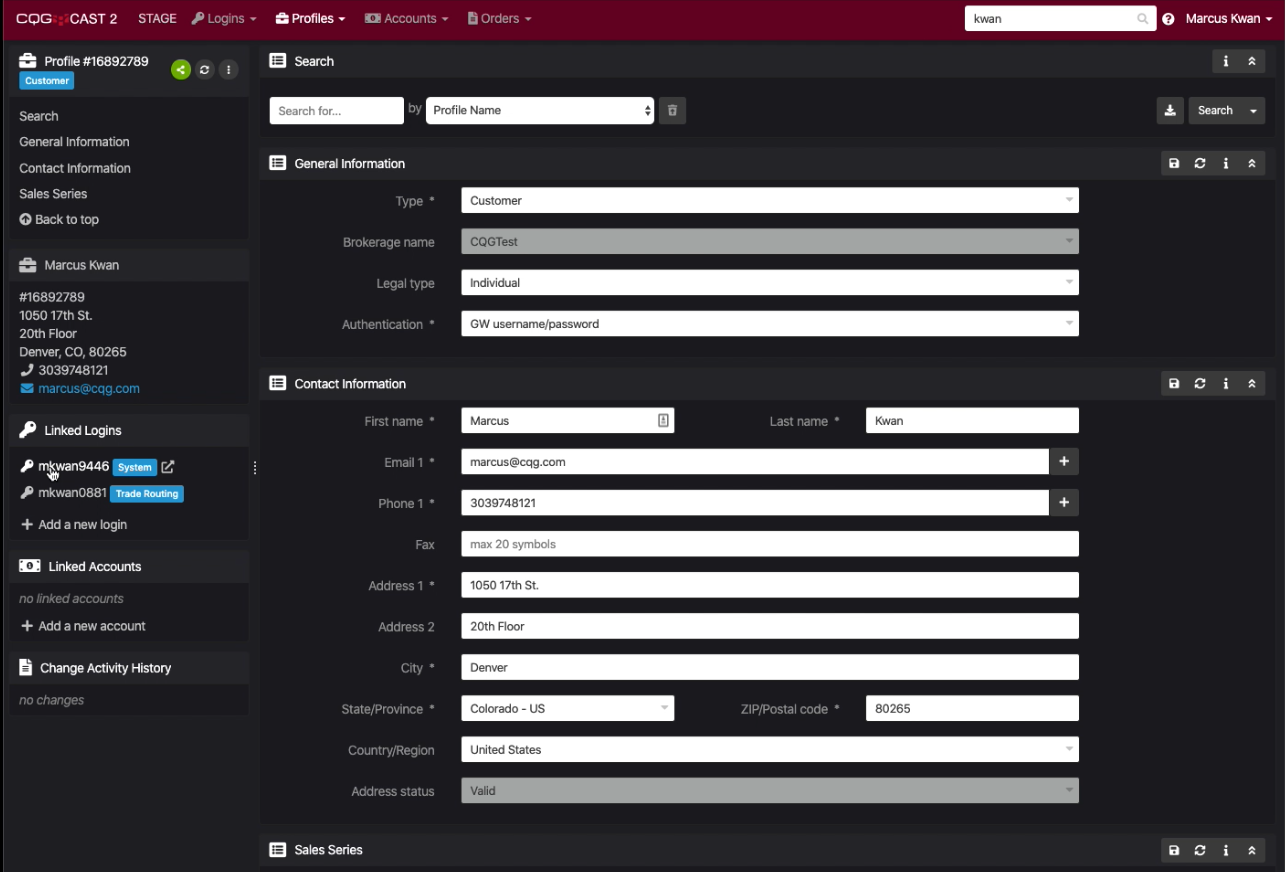
The profile displays the Linked Logins, both the System and the Trade Routing on the left hand side. If the customer wants to access new market data and be able to trade the market you first add the exchange using the System Login then second, add the exchange for the Trade Routing Login.
Pro tip: You can use CTRL+Click or use the open in new tab icon to open the records in separate browser tabs so you don't have to wait for pages to load when navigating back to the original record.
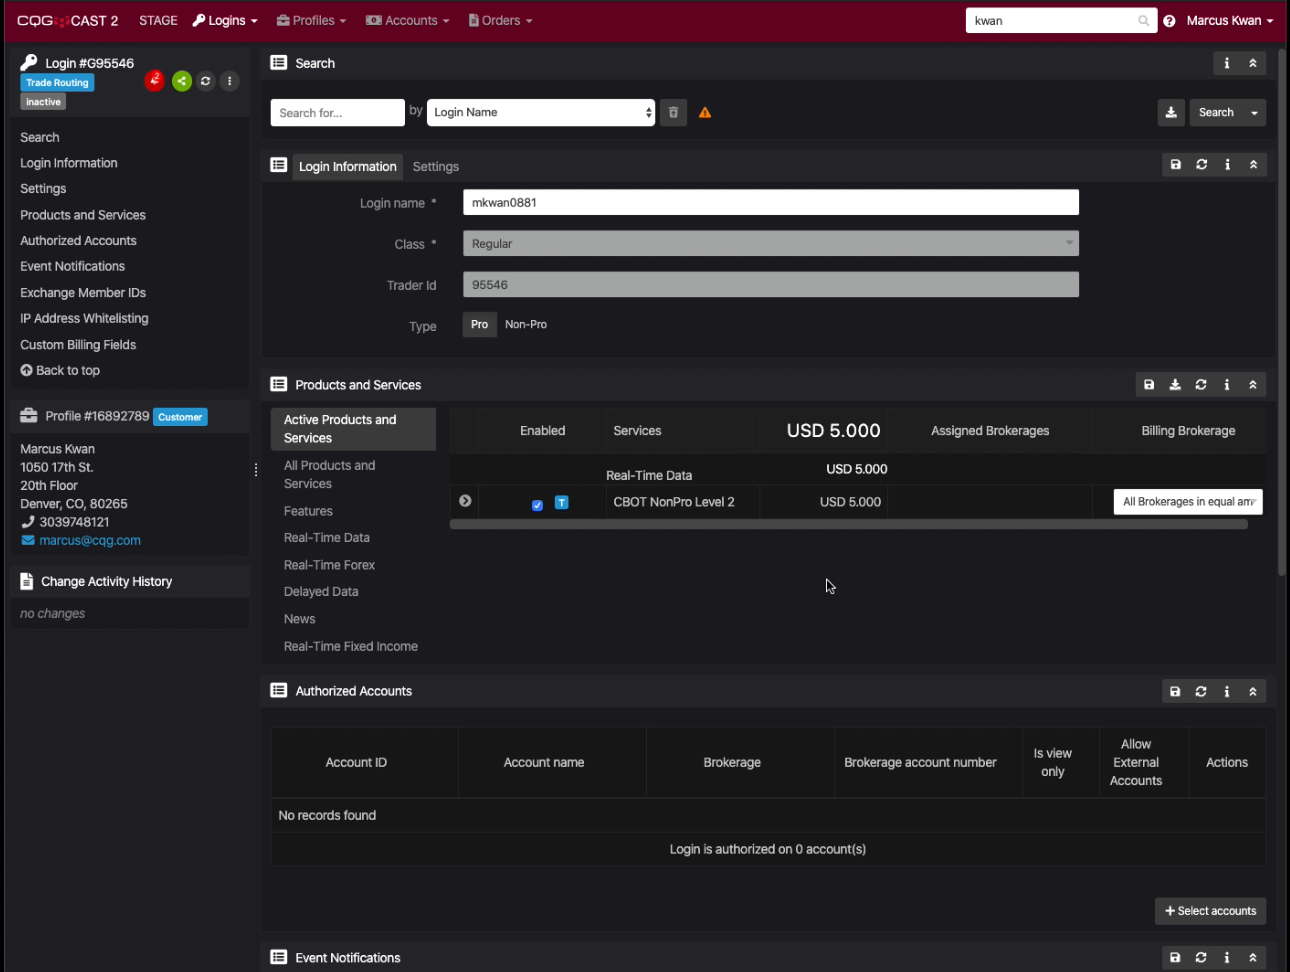
Update Trading Login Exchange access
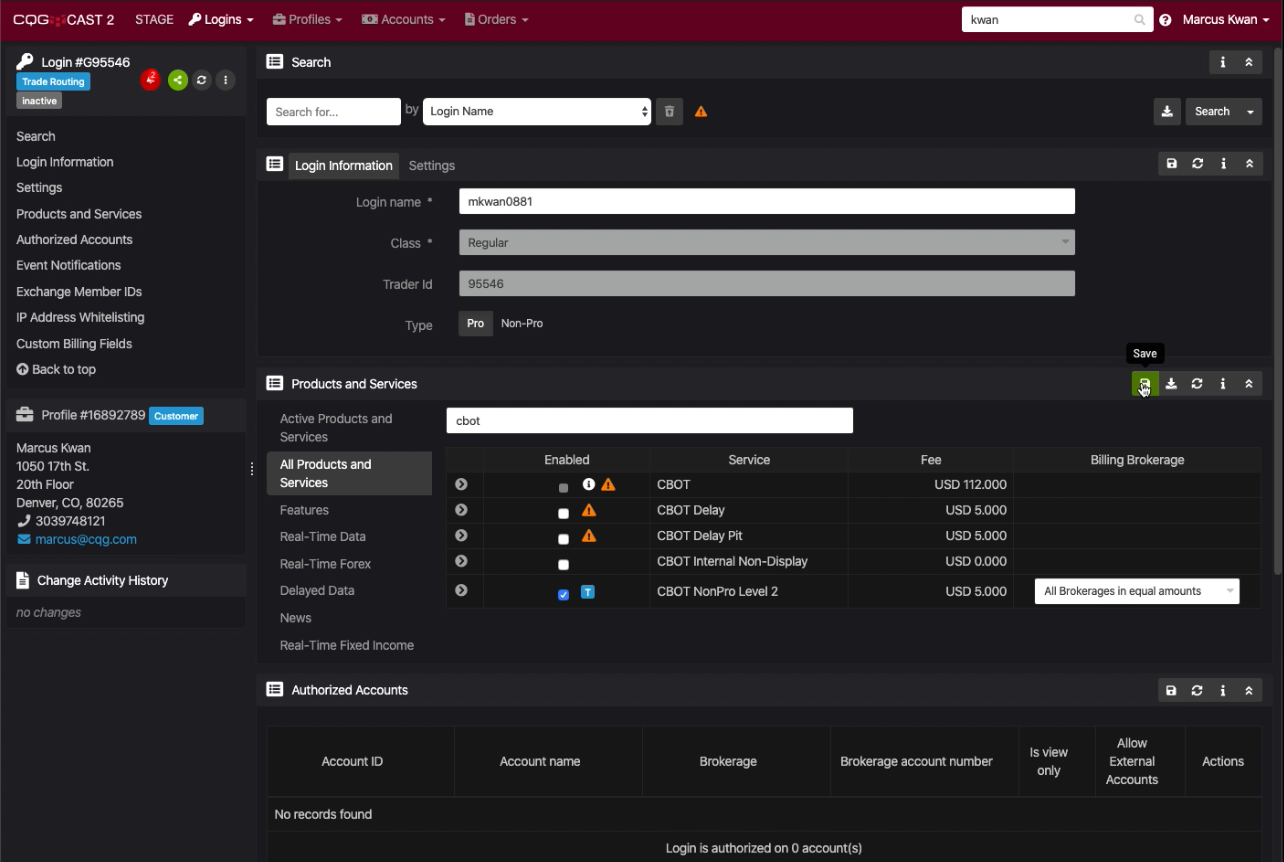
For adding the exchange to Trade Routing go back to the profile and click the Trade Routing Login under Linked Logins. You can add the exchange by selecting Real-Time Data or search All Products and Services for the exchange and then enable the exchange. For customers with multiple brokers you select under Billing brokerage "All Brokerages in Equal Amounts." Then click Save.
If there's not authorized account: add one
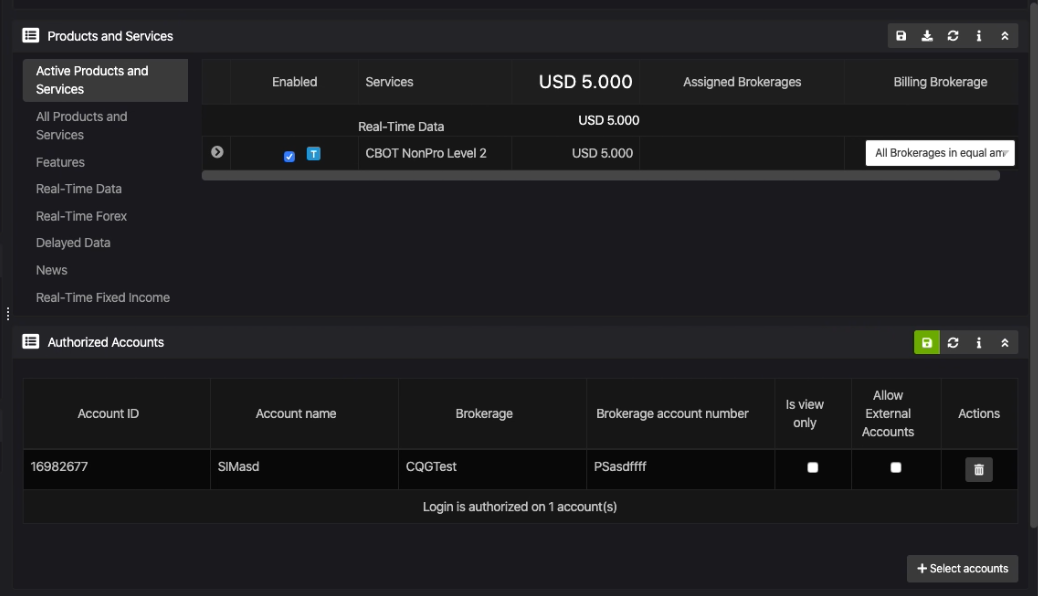
In the above example, there is not an authorized account. This would be rare, but to connect to an account after you have saved the changes click "+Select accounts" in the bottom right hand corner as seen in the image below.
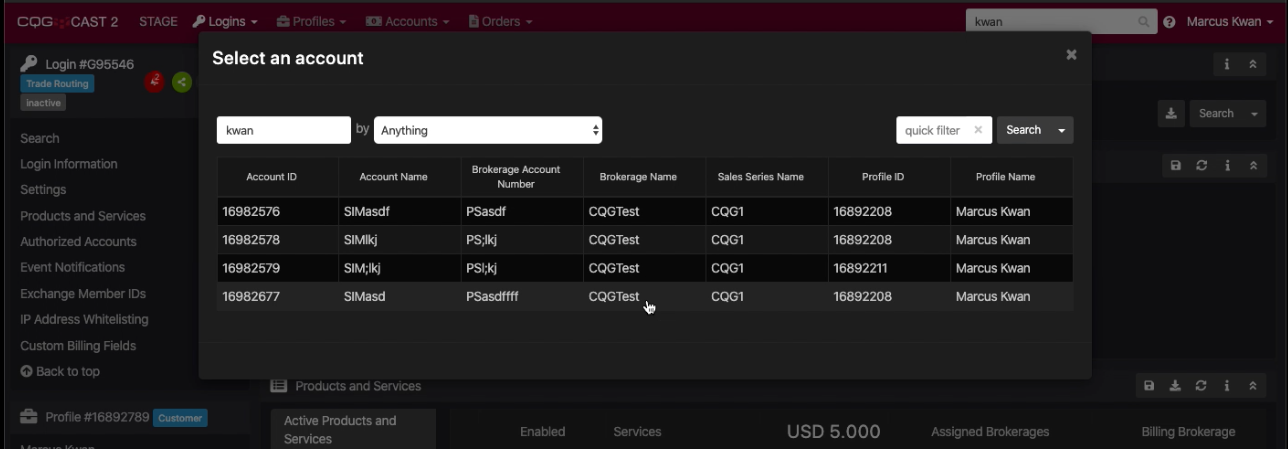
Then search for an Account using the dropdown list.
Select the Account.
The selected account is authorized.
Rolling the mouse over the Account ID and the Account ID can be opened in a new tab. Ten tabs may be open at a time. Opening a new tab will close the first tab opened.
Scenario: Troubleshoot an order
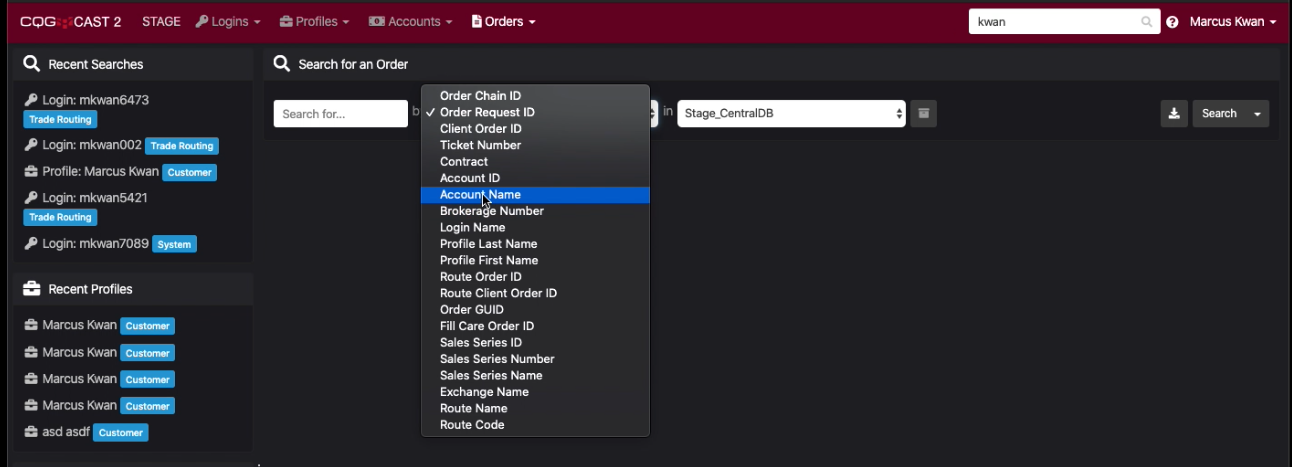
A customer contacts the FCM with questions regarding an order. Click on the Orders tab at the top and select "Search for an order."

Search
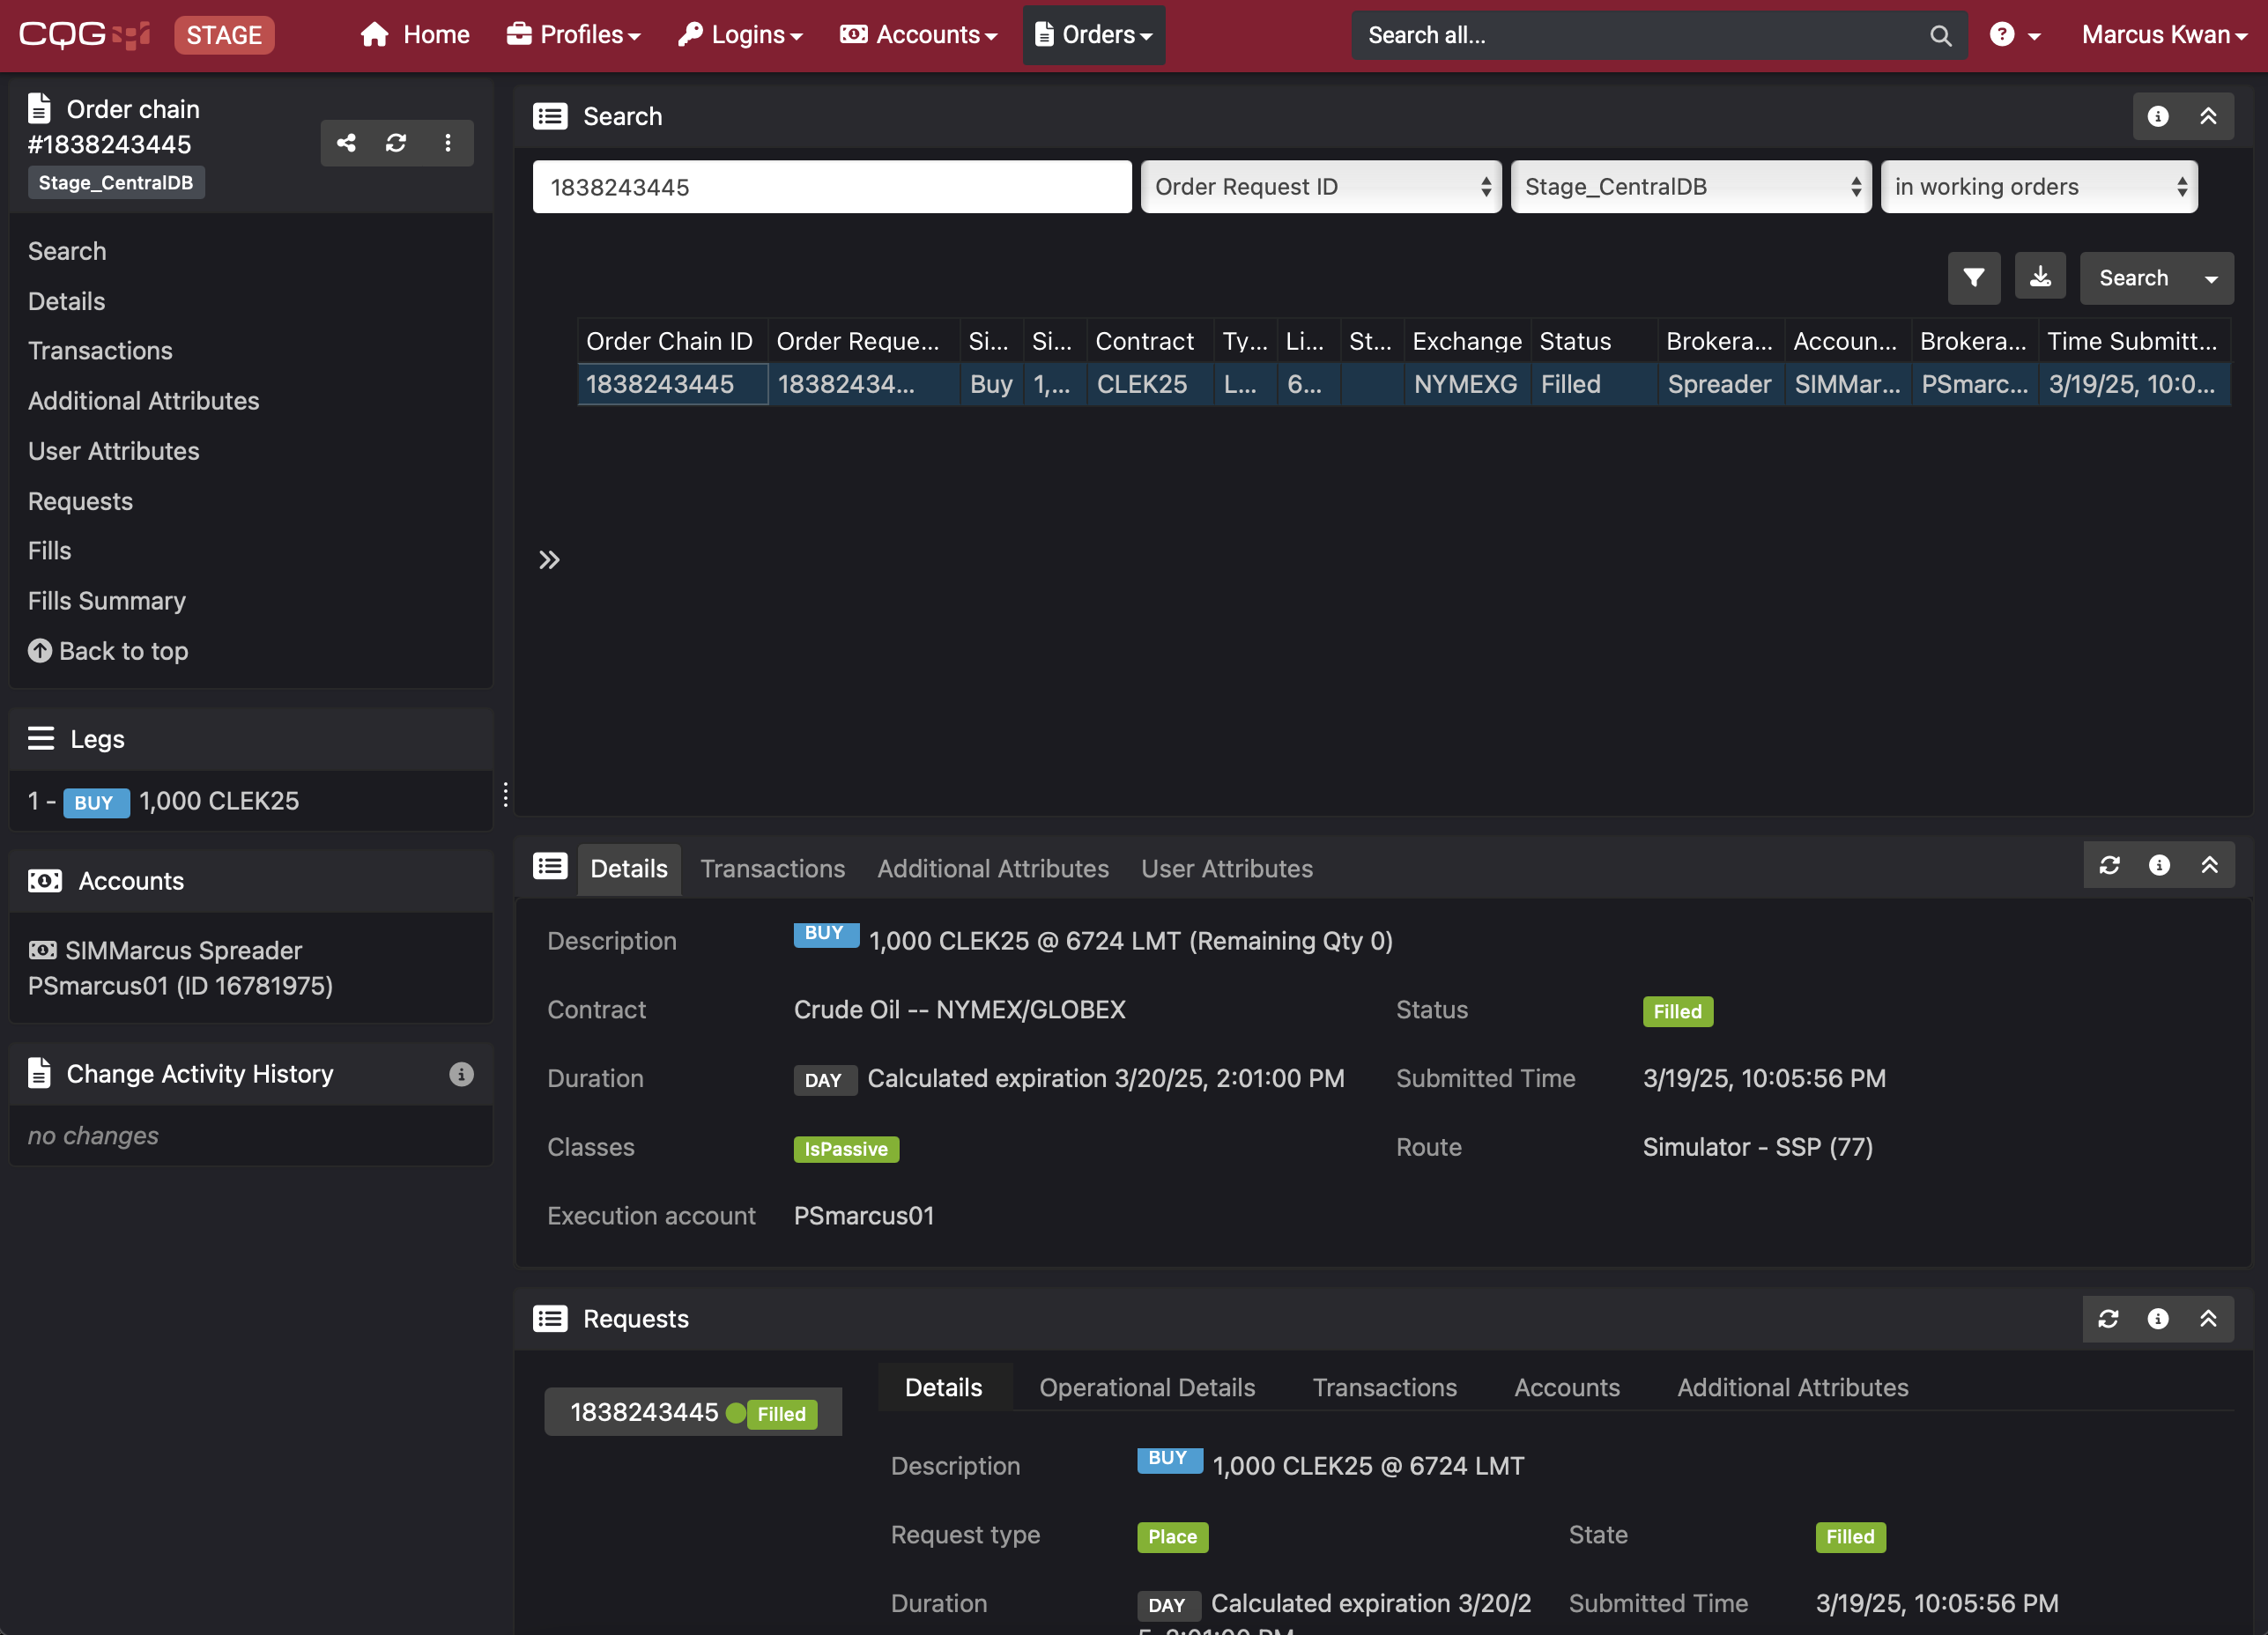
You can search for an order by using any of a long list of choices. Or, enter the Order ID in the right-hand top search window.
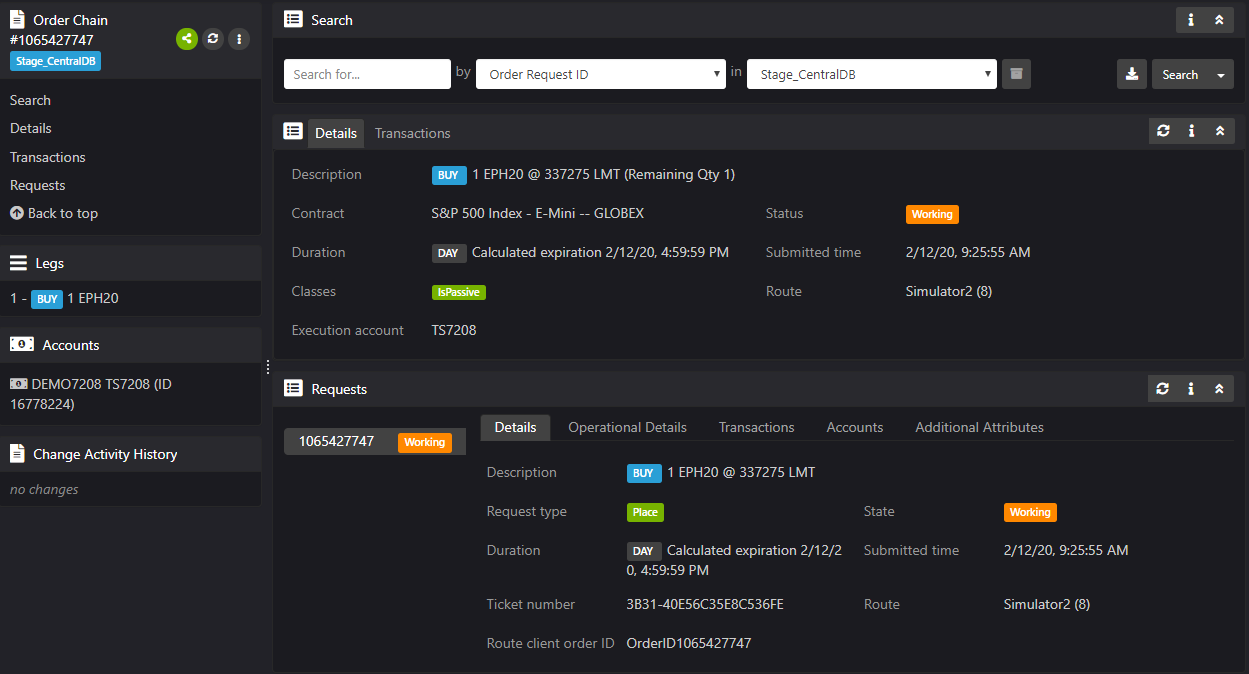
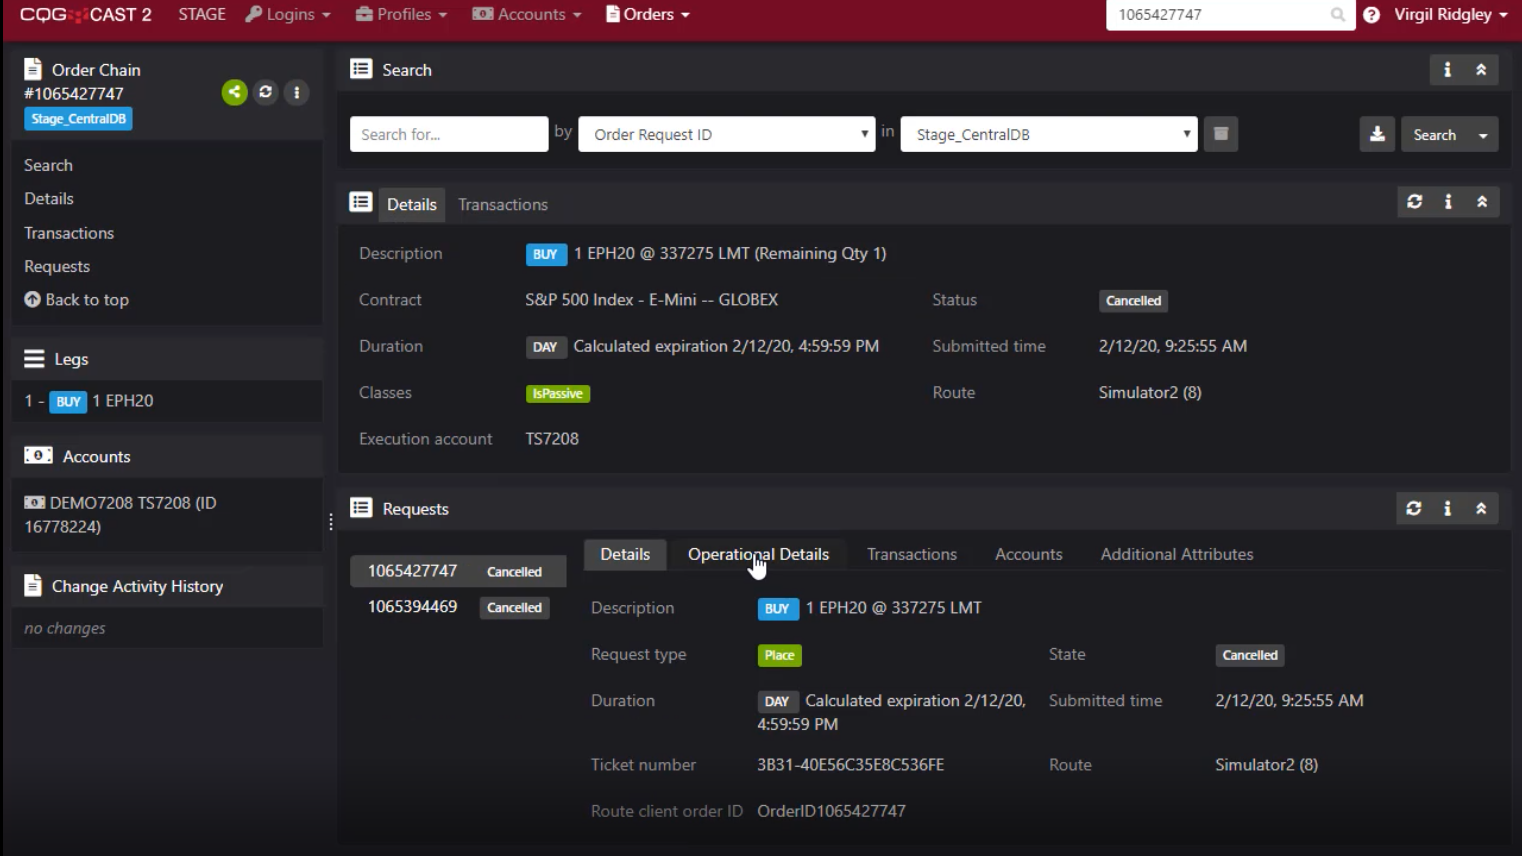
Here is an example of the order information returned following the search using an Order ID number.
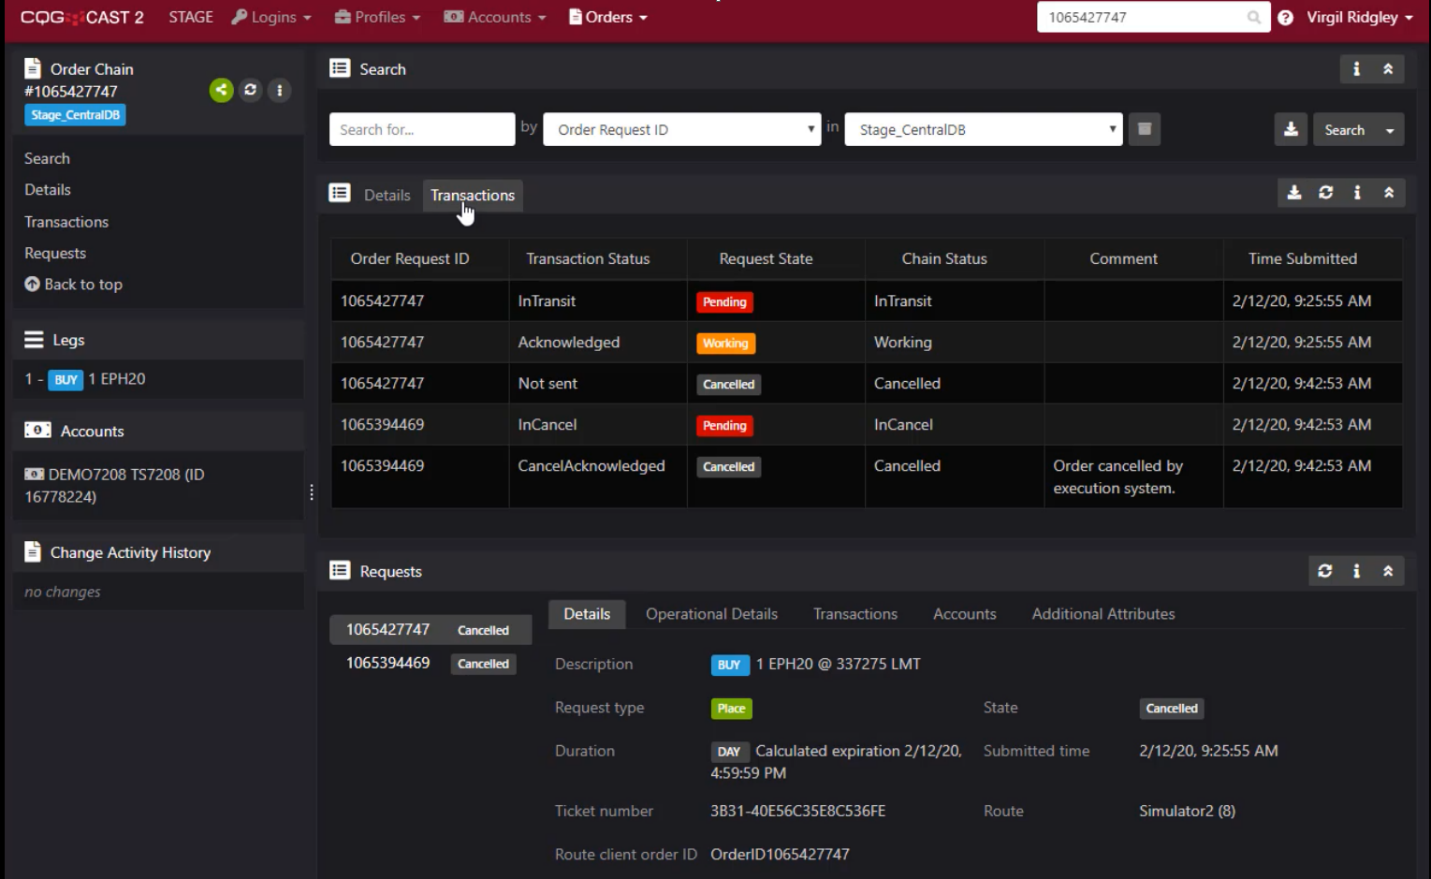
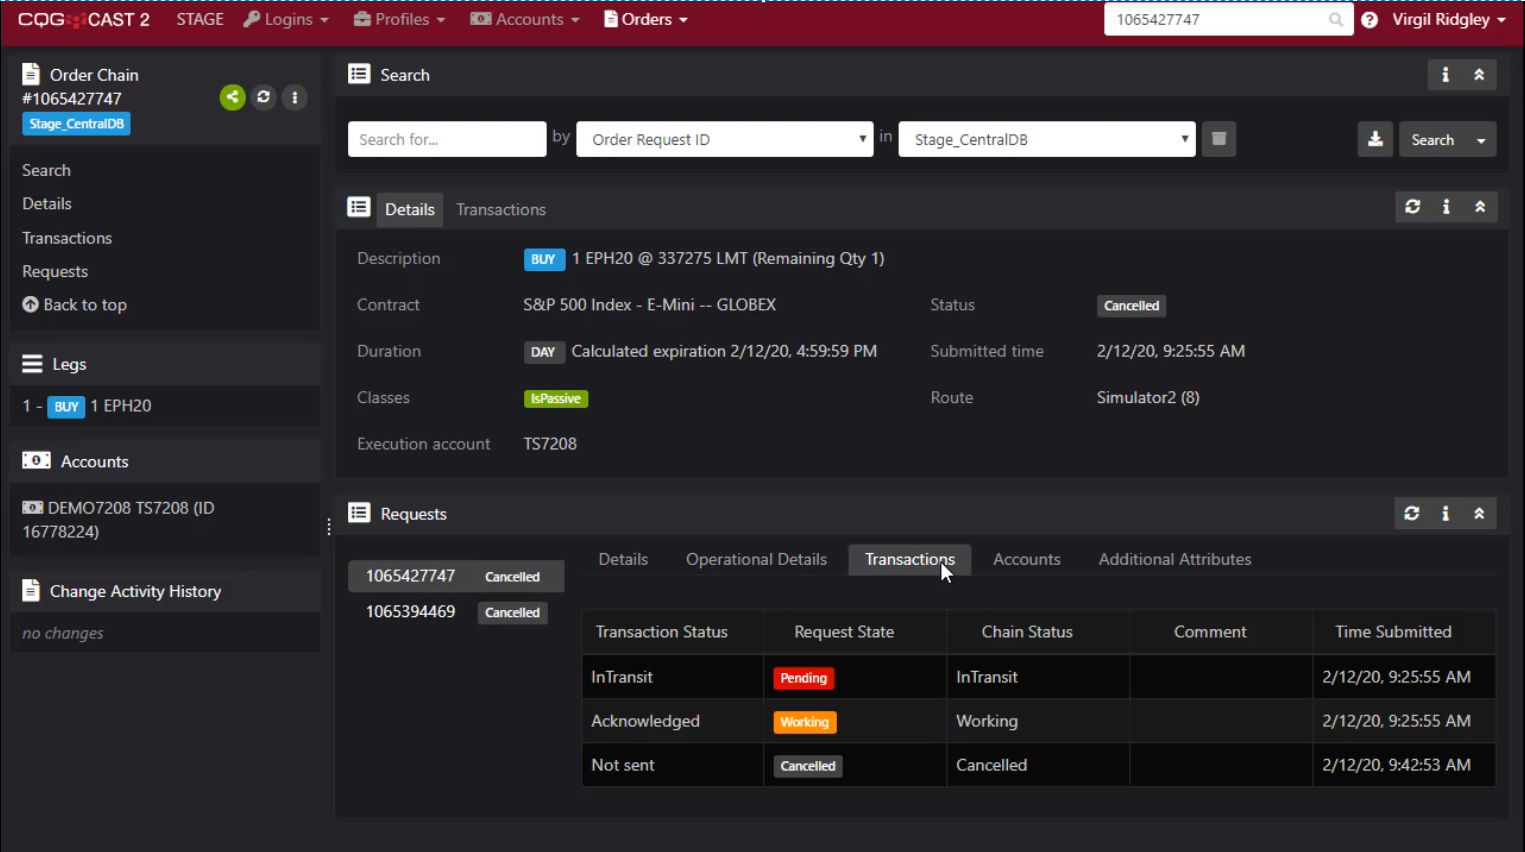
Transaction status
Here are the Transactions statuses, such as order state details by time.
Details
Switch back to the Details tab in the top pane and select Operational Details in the bottom pane.
Here are the Transactions tab details.
Account Details
Select the Accounts tab for account details.

Additional attributes
The final tab lists any Additional Attributes.

Scenario: Restrict Accounts to Long Positions only
New Account Risk Parameters (All Markets)
A new feature to restrict an account to placing long positions only. Set Risk Parameters for a new account. Save changes. This is set for all markets.

New Account Risk Parameter (One Market)
This risk parameter can also be applied to a single market.

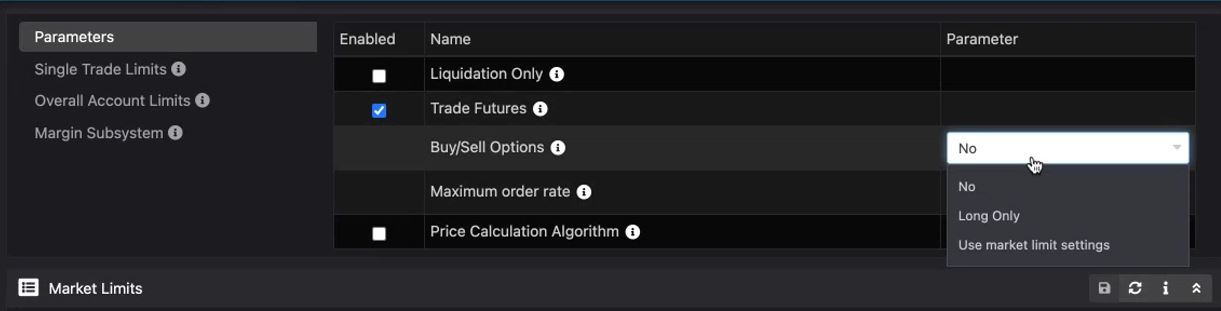
Options Account Risk Parameters
You can restrict options trading to "No", "Long Only" and "Use market limit settings."
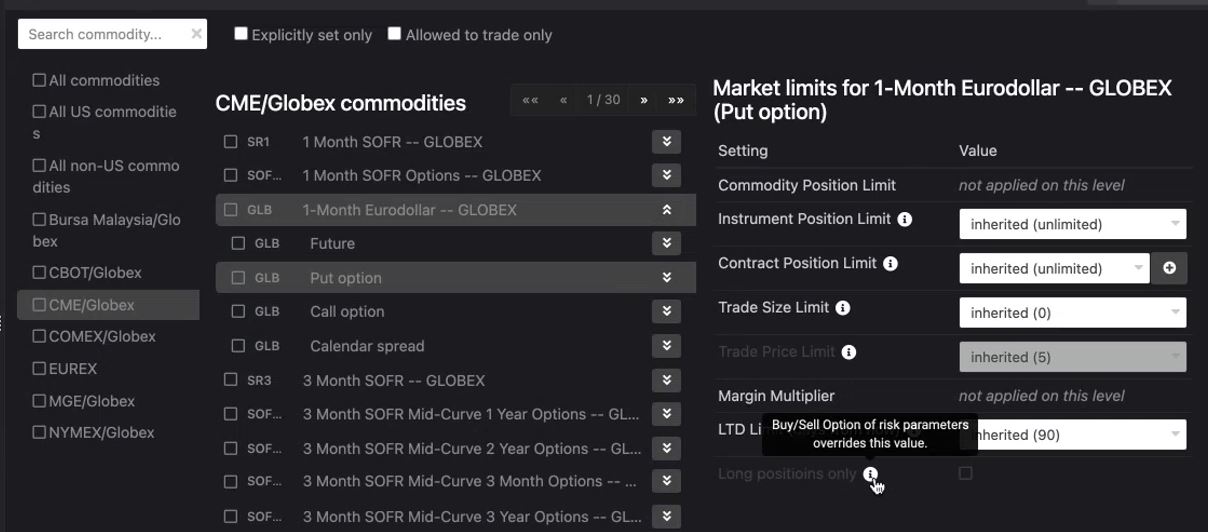
Account Risk Parameter
The Market Limits Risk Parameter cannot override the Account Risk parameter (it is greyed out). If you choose "Use market limit settings" then you can set the rule from the Market Limits Parameters.
Scenario: Create an Order Handler
First, add a new login.

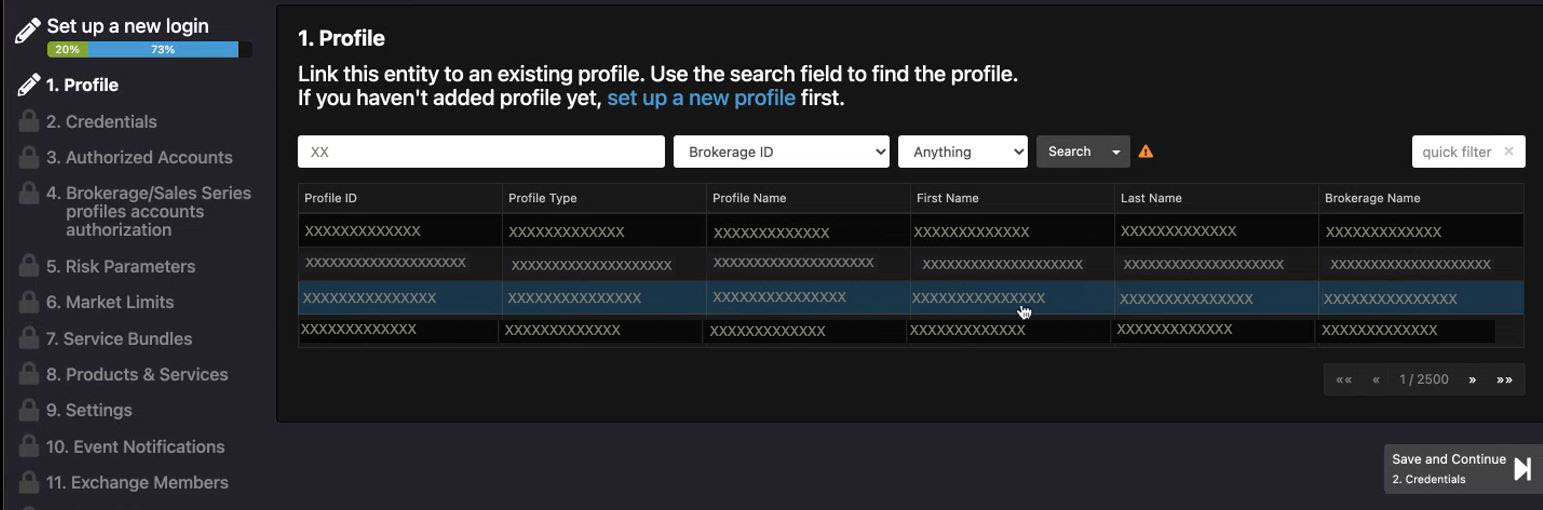
Link this profile to an existing profile.
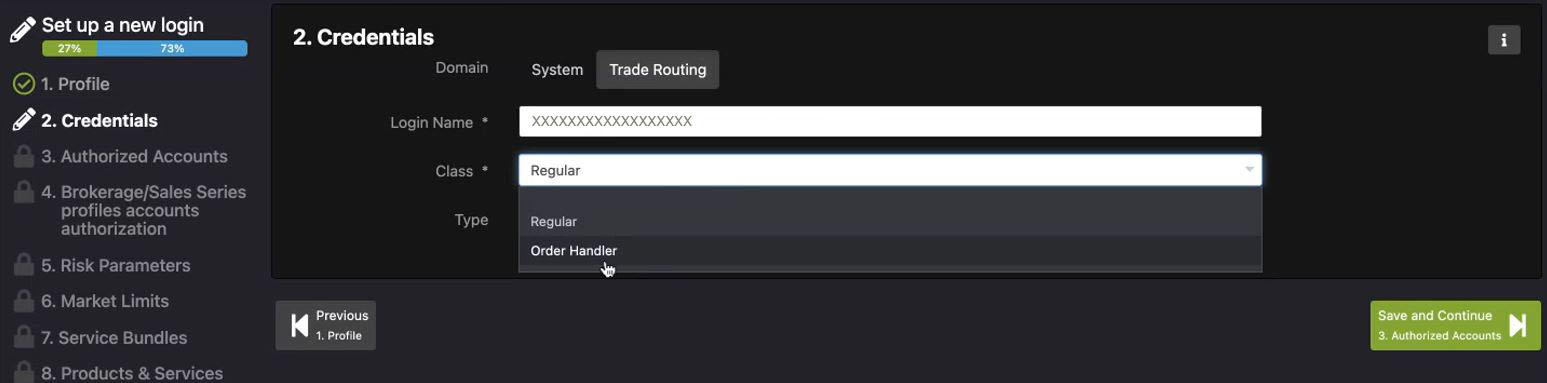
For Credentials create a Login Name and assign the class to Order Handler.
Search for the Brokerage and choose the Brokerage or the Sales Series Profiles.

Select the Risk Parameters.
Set Market Limits.

Click No and Save and Exit and an Order Handler page will open.

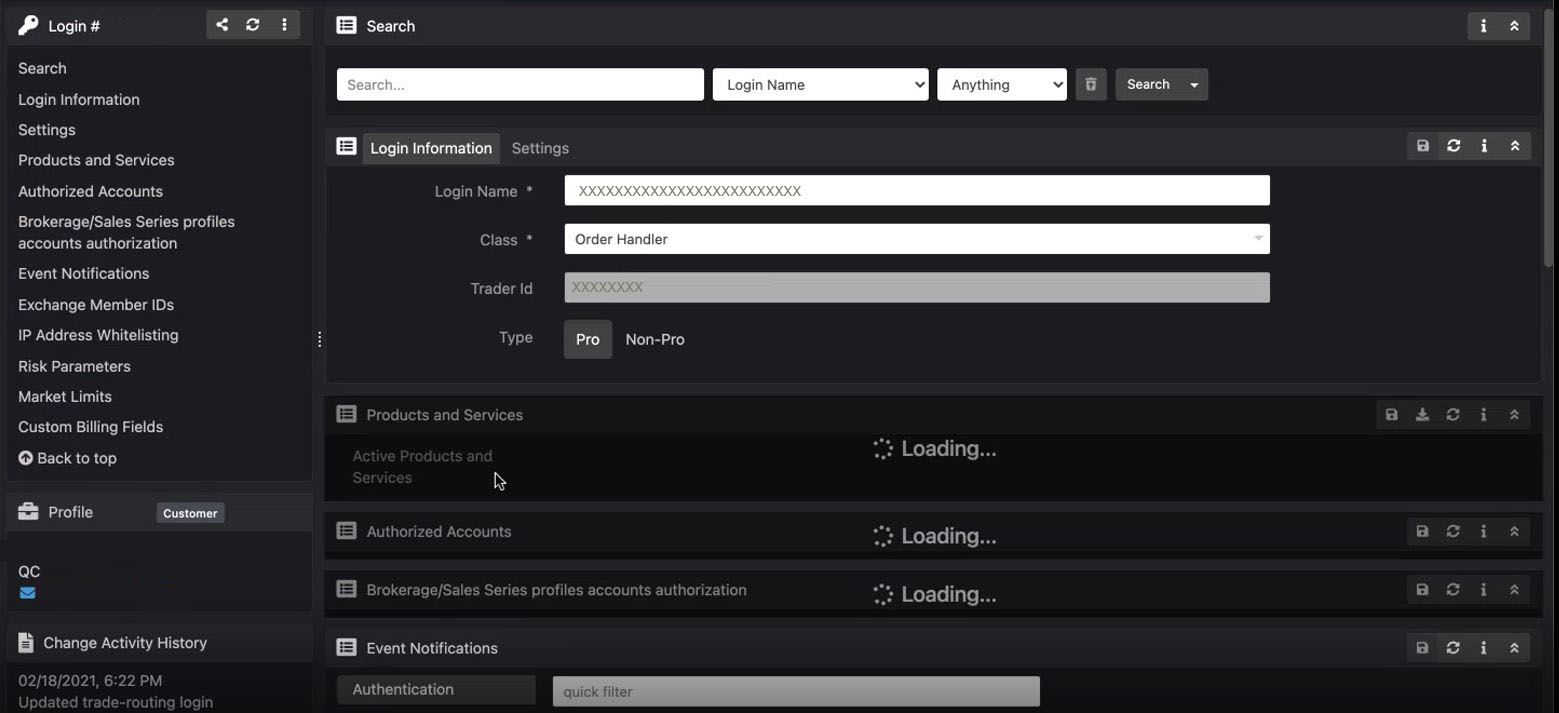
The new Order Handler page will load.
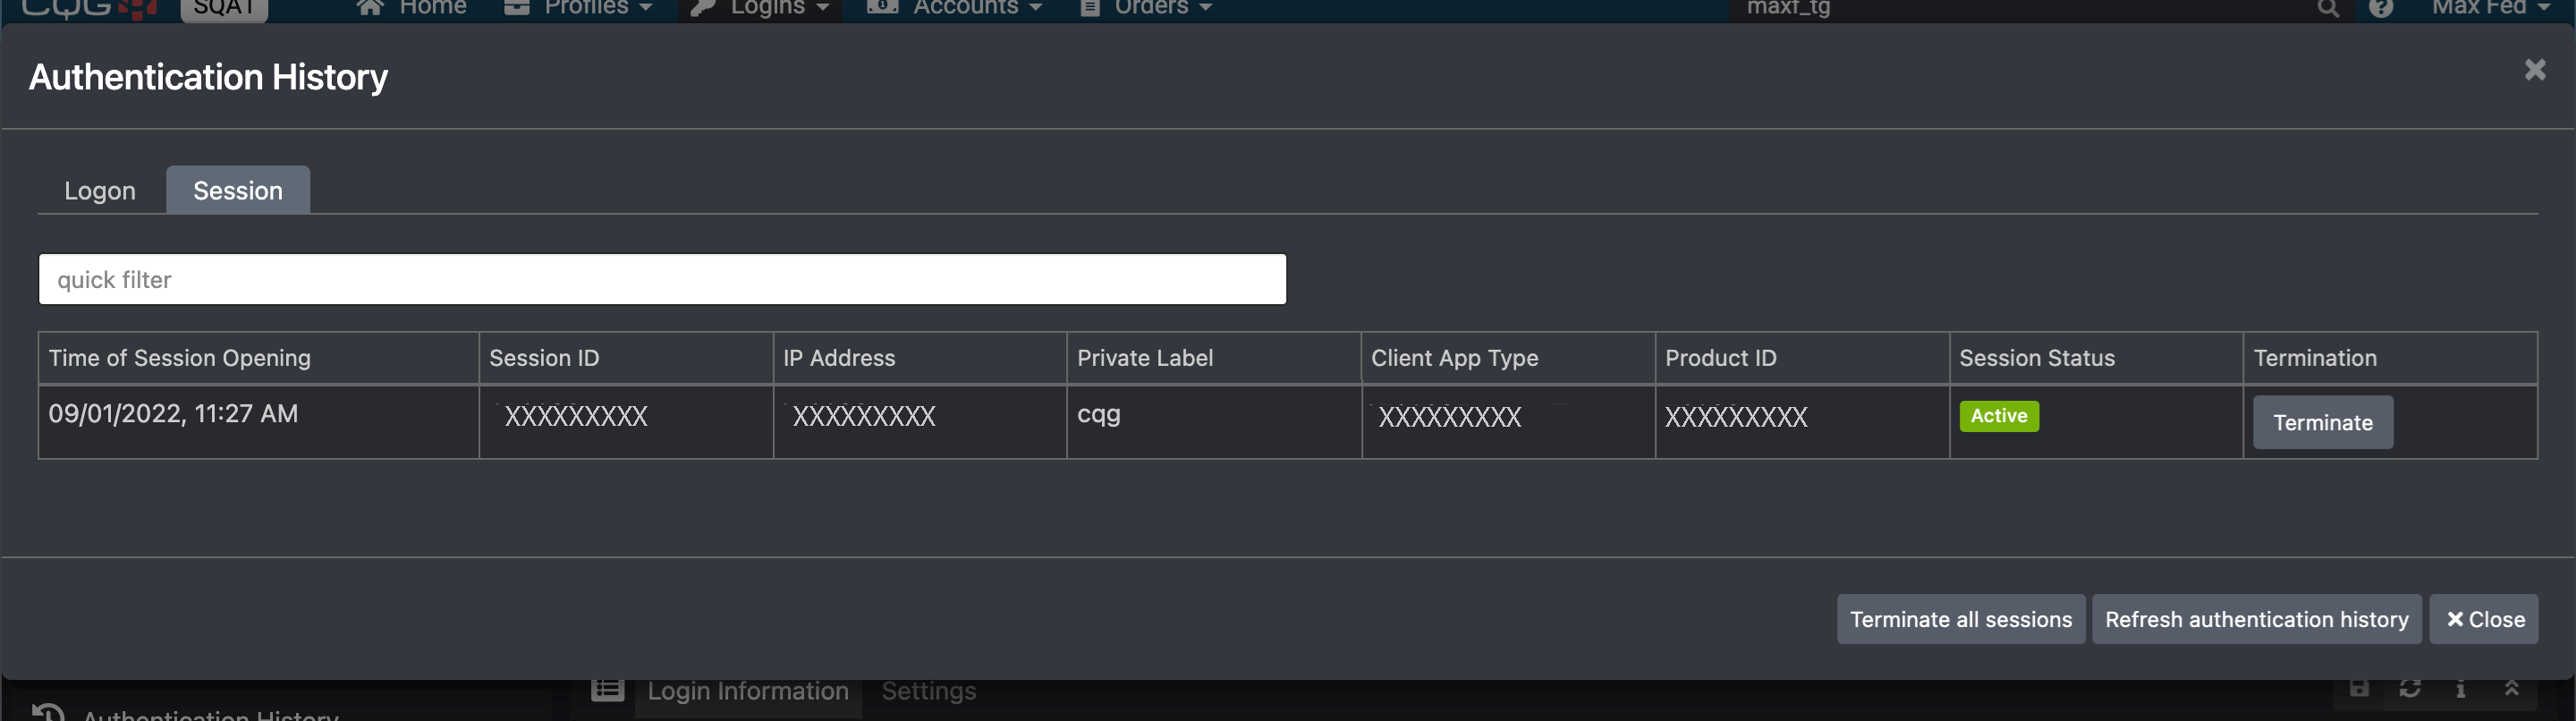
Scenario: Terminate a Session
Login to the account.
Select Show more details under the Authentication History.
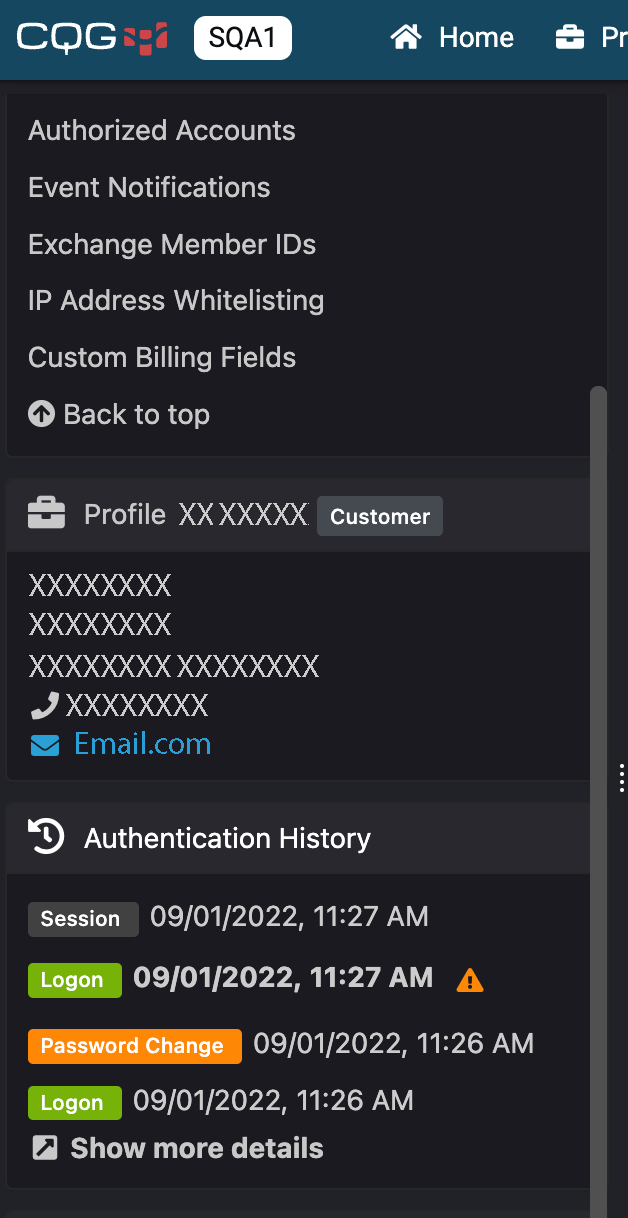
The Authenticate History Sessions management widget opens in a new tab.
Select the Sessions tab.
Select Terminate for a single session or Terminate all sessions.